🔥 Ride Warm, Ride Smart: Grip the Heat, Own the Road!
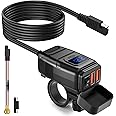
BikeMaster Heated Grips 7/8 120mm Black feature a cutting-edge heating system with five adjustable temperature levels, delivering rapid warmth through a durable, weather-resistant rubber grip designed for 12V motorcycle applications. Combining sleek style with functional performance, these grips ensure comfort and control in any riding condition.
| Vehicle Service Type | motorcycle |
| Brand | BikeMaster |
| Material | Rubber |
| Item Weight | 1 Pounds |
| Manufacturer | Bikemaster |
| UPC | 887337008615 748264586143 101922001233 |
| Item Package Dimensions L x W x H | 10.47 x 6.42 x 2.44 inches |
| Package Weight | 0.46 Kilograms |
| Item Dimensions LxWxH | 9.5 x 6.5 x 2.5 inches |
| Brand Name | BikeMaster |
| Part Number | AM10902E |
S**L
Very Hot Grips, Fairly Easy to Install, Fraction of Cost of Other Brands
The media could not be loaded. I am writing this review after riding six times with these heated grips in temperatures ranging from 35 - 65 F. These grips are excellent, period. They are also excellent value compared to other brands. I picked this model because of its price, ease of installation, with a fully integrated unit that can be swapped on in place of the original grips, and because the controller is small and simple. I hate the look of other models with huge controllers and lots of distracting LCD screens or LED lights. This is simple and does the job.Specs: My “offline” testing using a 12V switching power supply indicates a draw of 2.5 A, so at 12 V that is 30 watts. Others indicate these are rated for about 3 amps, which may be what you get from a battery. The fuse in the wire is rated for 4 A. There is no official spec, but good to plan for about 3-4 amps draw on your bike. With the engine running and alternator charging the battery, you will be looking at something closer to 14 V, so ~36 watts. The grips got up to 160 F on the hottest setting, and lower settings use PWM (basically rapid switching power on and off) to modulate heat.Heat: Excellent! It takes a few minutes to warm up. Other people comment that the heat is unbearable on the hottest setting. Maybe this is true with bare hands, but with gloves this was not my experience. That being said, on a 60 F degree day, the hottest setting was uncomfortable. Even on a freezing day (35 F), with thick winter riding gloves, the hottest setting was very warm, and after about 5 minutes I opted to turn it down to the 3 setting.On moderately cool days with thin gloves, I will probably use 1-2 for a heat setting. On colder days when I wear winter gloves, I will likely start on 5 for 5-10 minutes, then turn it down to 3 once it is warmed up. Adding this to my bike will definitely have a huge positive impact on the quality of my cool-weather riding, and extend my riding season! Really happy so far! That being said, additional accessories like handguards to block wind, good quality winter gloves, and warm weather gear are still needed for a comfortable cold-weather riding experience.Installation Difficulty: Installation is easy if you are comfortable doing basic work (read: if you change your own oil and know how to remove the fairings/covers/gas tank of a bike to get at the internals, you can do this job). I agree with other reviewers who have noted that the instructions are pretty poor. That being said, the kit is very self-explanatory and detailed instructions shouldn’t really be necessary.TEST BEFORE YOU INSTALL. It would be really frustrating if you cut off your old grips, get these installed, and then find out they don't work. Get a 12V power supply or spare battery, hook them up, and verify they get hot. They go on snug, and once they are on it is very difficult to get them off again.Installation – Wiring: Again, in my experience the wiring is very self-explanatory. Each grip has a cable and 2-pin plug, which goes into a wire harness that the control module is attached to. It doesn’t matter which grip goes into which plug. This harness has a 4-pin plug that attaches to a long cable, which has two wires at the end that you attach to 12V power. I would recommend switched power, if you can get to it easily, so you don't kill your battery by leaving them on accidentally. There is no auto-off or voltage monitor on these, like some of the more expensive brands have. I used the Honda 6P connector on my NC700X. I added a splice to my custom wire harness, and terminated the cable with a Sumitomo HM waterproof connector.The end of the cable supplied in this kit has its own fuse, which you should leave in if you are connecting this directly to the battery. I opted to cut off the fuse, so I could trim the cable to the correct length, and because I'm attaching to a fused, switched circuit.Installation - Grips: One of the grips has a larger inner diameter; this one goes over the throttle tube. The other one goes on the other bar. If your throttle tube has ridges or bumps, such as my Honda did, you *will* need to cut these down with a Dremel or file them down some other way. Some people disassemble the whole throttle tube/cable assembly to do this, but I found it was easy enough to just grind it down with the Dremel while still mounted to the bike.The kit includes end caps for bikes that don't have bar-end weights.I opted to just cut off the old grips - I won't ever put them back on. If you want to save them, some people lift them up and blow compressed air or lubricant (PTFE or silicone) to break up the adhesive. Clean the adhesive off of the bars before installing, then get them slippery with soap or hair spray, which will allow you to press and twist the new grip on. Some people use a block of wood and mallet to help this process, but I found that it wasn’t necessary. Once the soap or hair spray dries, the grip will be firmly stuck in place.I used the included superglue on the right throttle tube side, but not the left side. The bottle of glue is very low quality, and leaked on my hand when I opened it up! Not good. It also leaked on the paint on my bike, because I stupidly did not put a towel down to protect everything first. Regrets. Buyer be warned. If I did it again, I'd go buy some name-brand Permatex cyanoacrylate "super" glue to use instead of what was provided.
M**E
Great for the Suzuki DR650 handlebars!
These handle bars get so warm. I am very happy with the product. If installing on a stock Suzuki DR650 you will have to get an adapter for the auxiliary plug. You can buy the adapter from ProCycle.
C**B
If you're thinking about it, BBBUUYYY IIITTT👌🏼👍🏼
Best upgrade I have ever bought for my motorcycle other than a GPR steering stabilizerI live in California and I ride every day all year. That being said, where I live doesn't really get lower than 40 F so take that into consideration. Also I have had this for less than a month so also keep that in mind. And lastly, I use super cheap mesh gloves so I'm not too sure how it would work with winter gloves.On the coldest rides I go on, I guess I could be wanting a little more but what it does is more than sufficient. I have not had popsicle fingers since I bought this. The heat has settings and I always use the hottest setting whether I need it or not. If I'm riding and it's not ridiculously cold outside then it's almost too hot for my hands, which is perfect. I am extremely happy with the heat output 👌🏼👍🏼Seems like it should last a long time. Not too sure why it wouldn't but I'll make an edit if anything happens.I recommend installing it to your ignition or lights or something. I installed mine to my battery which is by far the easiest method. Anyone could do this on their own even if they have never done an upgrade on their own bike.There's are some cons to this item but I am still giving it a 5 stat reviewThe grips are thicker than a normal pair of grips. It feels a little weird at first but it's really easy to get used to. Took me maybe 3 or 4 days before it felt normal. I have become so accustomed to it that now when I ride my other bikes I feel like the grips are way too skinny. It's not a major problem at all, but it does take a little getting used to.If you're like me and you hook it up to your battery be prepared for a dead battery some time. I drained my battery twice so far from leaving it on. Fortunately I was home both times so it wasn't that big of a problem but still. Unlike a USB switch or something small, this thing will kill your battery if left on for a few hours. This can be avoided pretty easily, I just haven't changed the wiring yet.Lastly, this is probably the biggest flaw and the only reason why I wouldn't give it a 5 star review. Still.... I think it deserves 5 stars. I use an aftermarket throttle tube. I believe they're all the same but mine might be thinner, I have no idea. But the grip on the throttle hand does not fit as snug as I would like. I have never NEEDED to use superglue, spray paint, etc to keep a grip on the handlebars before this item. There is a pack of super glue included but I dont like that its 100% necessary. I glued it down once, then it came apart from getting to end of my power band (I go way too fast and really crank on my throttle). It wasn't that bad, actually took me about 3 or 4 days before I glued it again. It seems to stay in place now. I could have just done a poor glue job the first time, not really sure. But I do dislike that it's not a snug fit compared to a regular pair of gripsI tried to be as thorough as possible in this review. There's are a few things here and there that make this item imperfect but still, for what it's worth I am beyond happy with it. I couldn't really imagine wanting so much more that I pay another $20 for the oxford 🤷♂️
G**Y
Warm up fast
Took a little effort to get them on the motorcycle (Crf300l) and to find a place to put all the wiring. Once I get them on they worked very well.
Trustpilot
2 months ago
1 month ago