Desertcart purchases this item on your behalf and handles shipping, customs, and support to Greece.
✨ See and be seen: Headlights that shine as bright as your ambition!
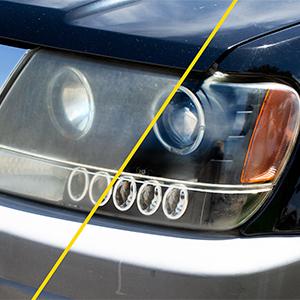
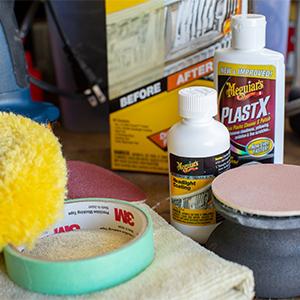
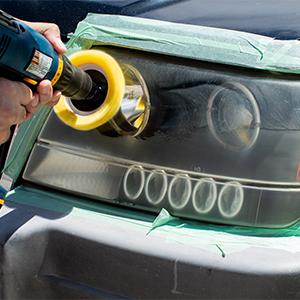
Meguiar's Heavy Duty Headlight Restoration Kit delivers professional-grade restoration by combining drill-powered sanding and polishing to remove heavy oxidation and yellowing. Its advanced coating protects headlights from re-oxidation for up to 12 months, enhancing nighttime visibility and safety. The all-in-one kit includes everything needed for a clear, like-new finish on plastic headlights, making it a must-have for maintaining your vehicle’s sleek, modern look.


| ASIN | B01M2D763D |
| Best Sellers Rank | #651,202 in Automotive ( See Top 100 in Automotive ) #280 in Automotive Headlight Restoration Kits |
| Brand | Meguiar's |
| Brand Name | Meguiar's |
| Customer Reviews | 4.6 out of 5 stars 5,416 Reviews |
| Global Trade Identification Number | 00070382012649 |
| Included Components | Auto part, Automotive Accessories, Replacement and Performance parts |
| Item Form | Cream |
| Item Type Name | Heavy Duty Headlight Restoration Kit |
| Item Volume | 12.3 fluid ounces |
| Manufacturer | Meguiar's |
| Material Feature | Hypoallergenic |
| Material Features | Hypoallergenic |
| Model Number | G2980 |
| Number of Items | 1 |
| Part Number | G2980 |
| Scent | Unscented |
| Size | 6.5 Ounce (Pack of 1) |
| Specific Uses For Product | Headlights |
| Surface Recommendation | Plastic |
| UPC | 070382012649 |
| Unit Count | 6.5 Ounce |
| Warranty Description | Manufacturer Warranty |
C**S
Good kit
Last year I restored my headlights with a Sylvania kit and I have to say this Maguire's kit is quite a bit better in my opinion. At least the job went much better and easier but time will tell how well it lasts. The longevity of the job done with the Sylvania kit didn't impress me so I'm hoping this Maguire's kit will show it up. What's most notibly better with Maguire's kit is the last two steps: the polishing and the sealant. Maguire's PlastX polishing compound works good and allows you to see how nice the light will look (and it should look great) before finishing it off with the sealant. The sealant assures it will stay looking good, hopefully for a long time. The other kit relies solely on the sealant to create the transparent shine (no polishing) but by that time it's too late to fix any flaws you may have. Also the Maguire's sealant is thinner so it's easier to apply and it dries slower so you can check for and remove any junk that may have gotten in it before it dries. Another plus is that I still have plenty of product left after doing my Ram so now I can restore my daughter's headlights with it too. Overall I'm pretty impressed with the Maguire's headlight restoration kit.
C**O
Skeptical at first, but color me impressed with the results!
I'll admit, I wasn't confident in this product when purchased (the heavy duty version). I've dealt with yellowing headlights for years on a 15 year old truck. I used the 3M system a while back and it worked well, but it took me over an hour per headlight and they were yellow again in less than a year. I wanted something that would be a little quicker and liked that Meguiars had developed a special coating to help keep the yellowing at bay once the yellow had been removed. I was skeptical about the hand sanding. The 3M has drill attachments and figured that doing this by hand would have sub-par results...boy was I wrong. This kit is very simple to use. Instructions are laid out well. Took me only about 15min per headlight and looked great before I put the final coating on. Now they look brand new. I don't know how long the results will last, but b/c it was so simple to use it would not be a hassle to do it again in a year. It would be nice if they just sold the sanding pads, since it is a bit of a waste to buy a whole kit again (the 2 liquids, the buffer, and the sanding handle could all be used many times...just need new sanding pads). I would recommend at this point in time. *********** UPDATE 11/27/18 Lights still look fantastic! I just clean them on occasion and wipe with a plastic UV protection spray and they still look as good as the day I sanded them. Still recommend!
A**R
It works!!
Honda '07 Civic with original lights - driving in the dark was becoming dangerous. I've tried another kit that included sandpaper grit much higher that did not make a difference in my 12-year-old headlights. I took the advice of another review that suggested buying 600 grit wet sandpaper and really scrubbed them down well with this before using the included 1000 then 3000 grit. After the first light I noticed I could have gone longer with the 600 grit to erase more pits in the light but daylight was fading and I still needed to get to the other light. The second light was faster knowing what I was getting into, more time with the 600 grit then the others. I also want emphasize another point I found helpful in the reviews - after the buffing stage using PastX your headlight should be clear. Continue to buff small areas with the product until the headlight is completely clear. My drill died quickly, so I busted out a new wax applicator sponge I had from a car wash kit and found it just as effective as using the drill buffer. Buff a small area, then wipe off with a clean microfiber towel. The final stage of clear coat is very runny, you do not need much on the foam applicator as it drips down the headlight! It's messy, guide it on quick before it starts setting up. Pros of this kit: the gripper for the 2 stages of sandpaper with precut rounds made it really easy to hold and sand. I bought this drill kit because my dominant hand has a bad wrist. Alas I did not use the drill-assisted part but I survived. The products included are powerful and I'm pleased. Follow the steps on the box and read the reviews here they are very helpful! If your headlights are old and other kits didn't help, start with 600 grit and then follow the steps written. My headlights look great and I'm not dreading driving in the dark anymore! Highly recommended.
S**K
Great results!
This was my first time using one of these kits. I mean, I'd rather have a DA and sanding discs and such to expedite this process, but this still gave me fantastic results. I used this on our 12 year old Jetta. Follow the directions and you'll see some pretty good results. I wished it did come with more sandpaper options as it didn't remove ALL issues. I have another vehicle to do and I will probably pick up some lower and higher grit sandpaper for the next one. Edit* So I did the 8 year old Pilot, too (the day after the Jetta). I didn't buy additional sandpaper. It turned out very well, but could have been better with additional sandpaper. The headlights had some very deep horizontal scratches (touch washes anyone!?) in addition to oxidization. The scratches were not completely removed, but no longer noticeable unless you've got your eyeballs up on them. I had to redo the clear coat on one housing because I applied it with a crappy foam paint brush since the kit sponge was in the trash after the first vehicle. Don't use those, they suck for application. I spent an hour removing it with PlastX. I ended up digging that sponge out of the trash and cleaning it to re-use since I didn't have anything else suitable laying around. Don't use rubbing alcohol or acetone to remove the coating! I tested each in a small inconspicuous area, and it left permanent damage. Overall, they turned out pretty good! I was able to do two vehicles with the provided sanding discs. I will not be able to get a third out of them. The foam hand sander still has tons of life left. I was able to use the clear coat on two vehicles, with nothing leftover. Perhaps 3 vehicles since I did two coats to fix some blems on one headlight cover of the Pilot and re-did one side completely. I still have plenty of PlastX left. The yellow polishing pad sheds lint like crazy while polishing. I don't know if it's reusable since it depends on how it washes. If you can clean up the clear coat applicator sponge, that is reusable.This kit is a great value. You will see the best results if you follow their directions!
C**G
Great Product - Great Results!
The headlight housings on my wife's 14 year old Prius were so scratched and fogged up from years of exposure to the weather (it was never garaged) as to render the car useless for night driving. My local Toyota dealer's service department told me they could do a restoration for a few hundred dollars, but that I shouldn't expect too much. So I decided to opt for a $25 solution, and try this product. To say that it far exceeded my expectations would be the understatement of the century. I'm sorry I didn't take any "before" photos, but you can see from the photos I included with this review that the headlight housings now look almost new. Make no mistake: there is work involved, but with persistence and elbow grease, I got this result in less than 2 hours. Everything you need is included, except of course for the power drill, and the instructions are very clear and easy to follow. I can't comment on longevity, but I was pleased to find that there is enough polish and sealer to do a touch-up in a year or two if needed. This is one of the few products I've run into that not only lives up to its promises, but exceeds them. If your headlights are as bad as ours were, save yourself the expense of a new car, and use this!
A**S
Super great product, saved me money!
I am very pleased with Meguiar's Headlight Restoration kit. I was hit a few years ago and my bumper, driver's side fender & headlight had to be replaced. My car is just over 15 years old so the passenger's side headlight looked awful & yellow next to the new headlight on the driver's side. I finally got tired of the way it looked and googled my options. As a student I really can't afford to put a ton of money into my car right now, so this seemed to an inexpensive route with relatively positive results. This kit worked very well and was quick and easy! Other than masking tape, a screw gun, and windex, you don't need any other products; everything comes with the kit. I can't speak yet to the longevity of the product, but even if it only works for a few years it's still worth the money in my opinion. I wish I had enough foresight to take a before and after picture of my headlight; however, we did use it on my Dad's headlights. Please see pictures above for reference. Meguiar's kit is a great purchase; I would recommend this product if you're looking to save a bit of money for headlight restoration. (Please note: I am not affiliated with the company or seller in any way, I am just a happy customer.)
J**N
Clear Headlights!
I found that I didn't need the power buffing system (could have saved some money). The sanding and buffing by hand was not strenuous. I have arthritis in my fingers and my thumbs and shoulders- so had purchased the drill attachment combo --- but the manual process was not a problem for me. It took very little time to achieve great results on 2 different sets of car headlight. What a difference it makes in the car appearance!!!! AND in the amount of light that they now shine. There is pleanty of both solutions remaining to lend the kit to my father for his headlights, and pleanty more to set back if I need it later for another car or cars. I know that I could have had stellar results if I'd put in a bit more work, but I had limited time. I can go back later if I feel like it - but for now, the repair is beautifully radical and the lights look new. I recommend the product - Meguiar's has lived up to its reputation again, for me.
J**S
Easy DIY - Beware of the Wool Pad 9.0/10
After finishing the project, I finally had the urge to make an Amazon Review for the first time ever in life. For the price, this kit is definitely worth effort for those who are looking to spice up the life of your Herby, Hot-Rod or my silver-colored Steele (like mine). My only complaint is the yellow wool-pad provided. It was a nuisance to deal with all of the extra wool residue that was left on the lights through the polishing process. I had to clean, clean and clean while trying to manage the power drill and the excess polish all over the headlights and hood. It took me around 2 hours to complete this project simply because I’m a perfectionist and I decided to do my fog lights after finishing my headlights. Unfortunately for me, I wanted to take the whole bumper off to properly take care of the fog lights. I was also listening to music and enjoying my day off – so sue me! The process that I went through for my headlights/fog lights was as followed: 1) Cleaned headlights with glass cleaner (I used Gyeon Glass for my windows, so I used that) microfiber cloth. I used around 4 microfiber cloths (2 for each side of the car) due to the excess of wool fibers and “white residue” from the lights. 2) Got a spray bottle with tap water and sprayed down the headlight & 1000 grit sandpaper. 3) Wet-sanded away for around 15 min in horizontal strokes (not exact time). I continuously sprayed with water and made sure that all of the white gunk was washing off the headlight after each pass. (you’ll see what I’m talking about) 4) I cleaned the headlight again with the glass cleaner before I repeated the same thing with 3000 grit sand paper. 5) I then cleaned the headlight once more with glass cleaner, and then started with the polishing. 6) I followed the directions to polish with the flat surface of the wool pad; however, the pad seemed to lose more of the yellow “wool” on to the headlight as it sprayed the polish all over the place. It took me a good while to finally get the wool pad “flat” and “soaked” with the polish to be able to polish appropriately. I did 4-5 passes to get every spot. 7) I then cleaned the headlight once more with glass cleaner before applying the Headlight Coating with applicator pad. For the fog lights, the process took 5 minutes for both since they’re small and I didn’t care much for them. I applied 2 coats of the Headlight Coating. It went well for one headlight; however, the other one ended up getting some wool strands dried prior to applying the second coat. I had to re-sand with 3000 grit over that area since it was hard to get off and then re-polish. Also, if you apply the coating in overlapping layers, be careful to not go over it again with a dried-up applicator pad or else it’ll create streaks. The coating starts to dry and get sticky after applying the first layer – please refrain from going over it again just for the heck of it (like a perfectionist would). You’re better off waiting for it to fully dry and then applying another coat. All-in-all, now I know how to learn from my mistakes. I’ll see if I can find a good polishing pad next time and apply the headlight coating evenly with caution to not get anything stuck on it. I may make a an update every 3 months, so stay tuned! Or not.
R**Z
Verdaderamente funciona
Si vi resultados, esto fue hace tres semanas, la duración del resultado, aún no la se
G**L
G
Todo
Trustpilot
1 month ago
1 day ago