Desertcart purchases this item on your behalf and handles shipping, customs, and support to Greece.
🧥 Stay dry, look sharp—naturally.
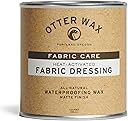
Otter Wax Heat-Activated Fabric Dressing is a 100% natural, PFAS-free beeswax waterproofing treatment designed to restore and protect waxed canvas jackets, rain gear, and more. Handmade in Portland, Oregon, this 8-ounce meltable wax penetrates fabrics with heat activation, delivering long-lasting water repellency without toxic chemicals. Ideal for eco-conscious professionals who demand durable, stylish outdoor gear.

| ASIN | B0088K7I72 |
| Best Sellers Rank | #275,838 in Clothing, Shoes & Jewelry ( See Top 100 in Clothing, Shoes & Jewelry ) #164 in Shoe Protective Treatments |
| Brand | Otter Wax |
| Brand Name | Otter Wax |
| Customer Reviews | 4.5 out of 5 stars 1,911 Reviews |
| Global Trade Identification Number | 00783583283960 |
| Item Form | Wax |
| Item Type Name | Fabric Wax |
| Item Weight | 8 ounces |
| Manufacturer | Otter Wax |
| Model Number | 0015 |
| Number of Items | 1 |
| Package Size Name | 1/2 Pint Tin |
| Part Number | 0015 |
| Specific Uses For Product | Waterproofing, Waxing Canvas, Water Repellent, Waxing Fabrics |
| UPC | 783583283960 |
| Unit Count | 8 Fluid Ounces |
K**C
Pretty good
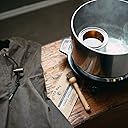
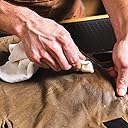
I used this to wax a brand new lighter weight inexpensive solid matte black coloured cotton jacket. I was hoping for water resistance and a nice even subtle silky black appearance maybe something like a Barbour though if it looked more like a Filson that would be fine too. Took a while for me to get the wax melted in the pot of water, probably would have been better on a gas stove, rather than electric, as the heat would have been even that way. Used a meat thermometer that I held with the probe off the bottom of the pot to ensure proper 180 degree water temperature. I applied the wax from the can still in the pot being heated on the stove to the coat a foot or so away with a new paint brush. It solidifies quick. I was rushing things a little and just quickly slopped on the wax to cover everything. the entire coat took the full can, though no more. I let it rest a few minutes then got out the hair dryer and used it to melt the wax until it was soft and then worked it in with a wooden shim that I had sanded down and rounded off. Made sure to work the wax into the seams, pocket pleats, and moved it around from areas that had been more heavily coated to those that were less heavily coated. Had lots of crumbs of wax that had blown off stuck to the side of the coat that was down on the tarp last. Flipped the tarp over, put the coat back down and began to melt the wax on the coat again and as I did I thoroughly and spread it around with a wad of old freshly laundered cotton T shirt. Certain areas like the top pocket covers looked good, like I was hoping the whole coat would turn out. Even the fabric on the chest above this looked like that, at the time. Did the whole coat like this. Beginning to end took about 4.5 hours. Then I hung it up to cure and let it set there for 72 hours. Only after that did I put it on. As soon as the fabric flexes it gets pretty chalky looking. Again the material above the top pocket flaps looked exactly like them and then that material flexed a little and turned a chalky grey. It's not the aesthetic I was going for and I'm not super happy with it, but OK it's not awful. My wife thinks it's awful, though, whetev. Stood out in the pouring rain with it today for 10 minutes. Watched the water sheet right off the whole time. I stayed completely dry. So it seems to have achieved the level of water resistance that I had hoped for. That is great! Very satisfied there. I'm thinking the aesthetic I desired is achievable, though I probably should have taken more time and watched the companies instructional video once or twice more as I was doing it. Also not having a needy 4 yo and 9 month old in my immediate care while I was doing it probably would have helped a lot. I'm guessing I over applied the wax and should have taken time to work each paintbrush application into the fabric as I went rather than brushing the wax on everywhere quickly and then melting it in and moving it around. I probably could have used 3/4 can and achieved a more even factory looking finish. I'm not worried about this as the item functions and the wax will need to be touched up re-applied in a year or so at which time I'll have another chance to make it look more like what I had wanted. I may try the bar for that touch up. So long review, in the end i'm very satisfied and would recommend the product. All in, jacket and wax, I've spent $42 and have a fall/spring coat that is durable and usable with some character and that I'll change the appearance of in a year or two when re-waxing; I'm putting this one in the win column.
M**M
excellent, but your garment will stink "a lot"..
I used Barbour wax initially and then tried this Otter..I like both and in my opinion they differ. I did a light weight 100% cotton field jacket with the Barbour and it turned out great, very supple and soft unlike a Filson tin clothe or similar but I probably could have coated it again to get more of a stiff finish..I did another 511 tactical heavy shirt with the Otter and the diff is it goes on thicker brushed and has a lot more of a thick coating before the heat process to impreganate it into the clothe..Another great way to apply it is heat the wax by sticking the heat gun on high right into the top of the can and when it melts a little stick the brush in and paint it on the garment spreading it as you use the heat gun and brush as you wipe off the excess before it dries which is much quicker than putting it all on the stove to melt it completely before applying..When I was finished both gave me excellent results with the Otter somewhat stiffer similar to a Filson finish..I find using a old iron to get this Into the clothe is best on easy to iron clothe then clean up any other spots with a heat gun or hair dryer just don't over do it or it will travel right thorough the clothe to the surface its on..This is a excellent procedure for both..My results were great and it was my first time. I think I'll stick with the Otter for price as you get twice the amount for the same cost and you will use the same per garment. Although the Barbour is easier and melts quicker and is more supple as you will have a hard time to know if the garment is Borboured by its looks and feel as it is soft but waterproof not stiff like Otter..Both are good though and if you don't screw it up you should be satisfied with either, but understand there is a reason you pay the $400 + cost for waxed jackets because they are a choir to do and you are paying for it so save and spend a coupler hours to save a couple hundred and do it to whatever you need to do it to..Up date; the garment I did is super water proof but it really smells and it smells everything else up in the storage. When I hang it in the garage, as soon as I enter it I can smell it a mile away..From now on only hunting clothes..
M**B
A Lot Harder To Do Than You Think, But A Lot Nicer Looking Than To Imagined, Too.
Works great but really hard to use. I needed to waterproof a canvas watercolor field bag. I found the perfect one on Amazon for around $40. The trouble is, the cavas was not water resistant at all. The quality and price of the bag were too good to pass on, so I decided to try and waterproof it with this product. It takes forever for the wax to melt…and, then, it goes from milky to clear before you should even think about applying it. I used a stiff 1-1/2” wide paint brush with stiff bristles. I could get, maybe, a 3” section of the bag sort of done and then had to put the brush back in the can to remelt everything and get the wax compound hot enough to go clear again. In any event, the bag tool four hours and looked awful, with missed sections and chunks of unabsorbed wax everywhere. So, the next day, I started rubbing tiny sections with my thumb and fingers. That actually works. As friction heats up the wax, the canvas absorbs it better and you start getting a uniform look….But life isn’t long enough to complete a backpack by that method, so I got out my heat gun. 90 minutes and I had a gorgeous, water proof, waxed canvas watercolor field bag. It’s been a week, now, and I would do this again…..but do yourself a favor and buy or borrow a good heat gun. Use it on low, to where it melts any bits of wax and the canvas absorbs them instantly. Fill in with the wax you scraped off with your wood tool (I used popsicle stick) when first applying the melted wax. Just kind stick it where you want it and melt it into the canvas with the heat gun.
M**E
Buy 2 for a whole jacket
Easy to use. Gets the job done.
D**S
Takes time but it works. Try this trick.
This stuff is great! It is messy but that cleans up easily. I used my heat gun to melt the wax in the can. It made it quicker and easier. Melted enough to start applying it then just kept hitting it with the heat gun. I Got an awesome camo massager bag from Amazon and waxed the entire bag. Then I used the heat gun on it and it melted into the fibers. It says to wait 24-72 hours before it's ready. I hung the bag up and had a fan blow on it. Twenty-four hours later it was dry and ready to go. When your hitting the item with the heat gun you will see areas you may have missed just reheat the wax with the heat gun and do your touch ups. The brush can be kept usable during application by using your heat gun to melt off the excess wax. Some say it smells bad when it's drying I think it smells good. Just me I guess.
S**S
It does the job but is tough to apply evenly
I got this to reproof my old Barbour jacket as it was less expensive than the Barbour Thornproof. It works but I found it to be a bit difficult to control the amount going on the cloth. The directions call for completely melting the contents of the tin to a liquid then applying to the fabric and rubbing it in. Even while working on a hot day and having a heat gun handy to rework it on the jacket I found that it solidified very quickly resulting in an uneven application. With lots of work with the heat gun and stiff sponges, squeegees and the like I was able to move it about to get it more even but it was a lot more work than the Thornproof. It has also remained tacky which may be a result of too much applied but I don't see how I could have gotten full coverage and used less. It does the job it is intended to do but I prefer the original Barbour product.
K**I
Works as intended,
I’m in Cordova Alaska now . The rain is wetter in Cordova and this “Otter Wax” works as intended. Improved application with the use of a heat gun. My co-workers covet my headgear. One can will last me a lifetime. Half a can at half the price would be enough and yet still a bit expensive.
K**S
Great product
It's easy to use with simple instructions. Rather than go up an inch and a half on the can, with water, I went up two and a half inches, it's sped up the melting of the wax.
Z**E
Smells very bad.
melts fine with a head gun, but it stinks, the smell becomes unbearable after a while and very hard to get rid of. Had to wash the clothes 3 times to totally get rid of the smell.
D**N
Deceptive and misleading advertising: "Large 1/2 Pint Can" (473mL). More like "1/10 pint" (100mL)
Miniature. No where near a "half pint", not even half a cup. More like "100mL" (1/10 pint) I'd estimate. Bought this per reviews expecting a good product and importantly sufficient quantity to re-wax one jacket and other projects. That won't be possible due to deceptive and misleading advertising.--Full refund please.
M**Y
Works well
A little difficult to work with but this is to be expected. Provides good waterproofing for oil skin outer wear.
T**T
Déçu
Je déconseille
B**T
Restored my old jacket well
It's a pain to use but it works well restoring my old old waxed jacket and smells pretty good.
Trustpilot
2 weeks ago
2 weeks ago