🛠️ Build Your Style, One Shelf at a Time!
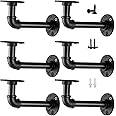
The Yuanshikj Industrial Wall Mount Iron Pipe Shelf is a robust and stylish shelving solution, featuring a 42" height and 12" depth, designed to support up to 50 lbs. Made from high-quality iron with an anti-rust finish, it includes all necessary installation tools for easy setup. Perfect for maximizing storage in any room, this DIY-friendly product allows for customizable designs to fit your unique aesthetic.


K**T
Great value extra storage
This was a Great storage option for a corner where we had no cabinets, it has very stylish hardware Storage Space it’s quality built it fits well it’s very easy to install. It came with screws. All the hardware, I’m going to put white dishes on the shelves with my coffee bar.
E**H
Great choice! But use the studs and longer screws
I bought these to do open shelving in my kitchen remodel. My contractor used longer screws than provided and screwed directly into the studs. They have been holding my huge corral ware dishes set and much more for several months with no signs of sagging. We just used some pieces we had leftover to put bookshelves in my daughters room and plan to use even more in my sons room. Awesome system just screw into the studs instead of the drywall like they tell you to.
H**Y
Good Value
I was aware ahead of time that this is a set of brackets only. They are beautifully finished.I went to Home Depot and found wood that I had them cut down for me to size. I would advise to have an idea of what type of wood you want and the length and width of shelves you want.Putting the brackets into the wall are difficult if you are following the instructions that tell you to assemble it on the floor and drill in.My advice is that it was much easier to assemble each circle into the wall at a time and go up the wall, adding the pipes as you go up. This made it easier to hold the unit together. I also would make sure each section was level as I went.When you get to the point you are going to add in the other rung, make sure that it lines up with the first one you put up or the shelves will be crooked.Once completed, I am very pleased.I saw similar units with shelves included that were much more expensive so it's a good value and you get to be creative with what style you are going for.
B**Y
Not real Black Iron, but works just as well
First, these parts that I got were not real Black Iron pipes like you would pick up at a hardware store, they are like furniture grade tubes for an IKEA shelving system. The thread would fit 3/4 pipe from like HD, but they are not the same, I know this because I just bought some of the pipe and parts for a small shelf right before ordering this. I should have known from the price, the real stuff is kind of pricey, but nicer. The elbows and T-connectors as well as the flanges seem more like galvanized steel painted black. HOWEVER, the end product is pretty nice and very versatile as to where you would want to put it. It is still pretty sturdy, and if screwed into a stud, I believe it would hold a lot of weight. The entire shelving system is painted black, so unlike Black Iron, it will not stain your hands black when handling it. Putting this together took about 30 min, the longest part was adjusting angles and lengths to get it flat and squared, but was not hard at all. This kit does NOT come with shelf boards, so length of that is up to you. It also came with mounting screws, but they are thin and I would suggest as your getting boards for shelves, also pick up some beefier screws, U used #12 - 1 1/4" wood screws with the sleeves for drywall and a little longer for securing it into a stud. All in all, this black pipe shelf looks nice, is nice and will work out great, just know, it is not the real Black Iron pipes and parts you would get from a hardware store, but the threads would fit if you wanted to add to this. I only knocked down one star because of this, and if I am going to buy more of these, I would prefer the real stuff and not go with this one.
K**K
A really fun project!
This was a really fun shelving project my handyman and I were able to knock off in a few hours. I have a vintage 1940s kitchen where space is at a premium. I had ordered the pipe shelf materials ahead and was initially disappointed it didn't come with the shelving but I was able to get one 12 x 20 board from home depot and have it cut into 4 pieces. We stained it and assembled all within a few hours. Note: there was one additional clamp piece - which is actually a plumbing piece - we needed to use to secure the shelving on the pipes. It only comes in rough silver but we were able to do black spray paint and it blends in beautifully with the piping. This is my handyman's favorite things he's ever done at my place. He took tons of pics and I must say it came out great. As for cost, he felt that the price was good. If you tried to create the pipes yourself, you'd spend far more so...even without the shelving, I'd say it was a good buy and we're really pleased with the results.
K**P
I LOVE IT!!!
For those who gave a negative review because the boards weren't included obviously haven't came out of their house in a century. I purchased 4 boards and seperate mounting anchors from home depot and spent an addition $92 on those items. Obviously, I only used 3 of the boards. As for the install. I am a DIY female. Originally, I didn't realize the poles were 2 different lengths. If I had read the instructions, I would have realized that. Easy fix, because I hadn't tightened the pipe at this point. I completed this project alone. It was difficult to level across and straight up and down by myself. Because I was low to the ground, I managed. This does require a small amt of common sense and patience. Without those things u could b dead in the water. Good luck on your super awesome shelf.
S**R
Nice pipe shelves! Excellent quality!
I really like the fact that the pieces were already painted. I compared the cost of the unit to buying the pieces from the big box store and this was far more cost effective for me.The installation went well and I ended up creating a template for installation. For the template, I measured the width of one of the flanges (part that mounts to the wall), cut a piece of material the same width. I found the center and drew a line down the middle. I then placed the section with top and bottom holes over the center line and then marked the other two holes.I then drilled out the holes, put on wall and used level to plumb. I used small pilot drill bit to drill through the template into the wall.One thing to note is that I did not use the included anchors instead opting for some from the big box store.
Trustpilot
1 week ago
1 week ago