Desertcart purchases this item on your behalf and handles shipping, customs, and support to Greece.
๐จ Elevate your home's air game โ because dry is so last season!
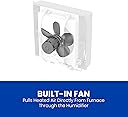
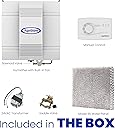
The AprilAire 700M Whole-House Fan Powered Humidifier is a high-capacity, manual control evaporative humidifier designed to cover up to 5,300 sq.ft. It delivers 18 gallons of moisture per day, integrating directly with your furnace via a built-in fan to distribute humidified air efficiently. Manufactured in the USA by industry leader AprilAire, it features adjustable humidity control with a built-in sensor, ensuring optimal indoor air quality and comfort while helping preserve your home and health.


| ASIN | B00DJVISBK |
| Best Sellers Rank | #720,414 in Home & Kitchen ( See Top 100 in Home & Kitchen ) #522 in Humidifiers |
| Brand | Aprilaire |
| Brand Name | Aprilaire |
| Capacity | 18 gallons_per_day |
| Color | Gray |
| Control Method | Touch |
| Customer Reviews | 4.6 out of 5 stars 847 Reviews |
| Filter Type | Evaporative |
| Floor Area | 4200 square_feet |
| Global Trade Identification Number | 00686720207006, 00686720704000 |
| Included Components | 24VAC Transformer, Humidifier Control, Valves, Instructions, 5ft Cord |
| Item Dimensions D x W x H | 11.35"D x 15.91"W x 18"H |
| Item Shape | Rectangular |
| Item Type Name | Humidifiers Evaporative |
| Item Weight | 11.7 pounds |
| Manufacturer | Research Products Corporation |
| Material | Plastic |
| Model Name | Humidifiers Evaporative |
| Model Number | 700M |
| Number of Packs | 1 |
| Operation Mode | Evaporative |
| Other Special Features of the Product | Adjustable Humidity Control, Auto Shut Off, Humidistat |
| Part Number | 700MZ |
| Power Source | ac |
| Room Type | Whole-House |
| Runtime | 0 minute |
| Special Feature | Adjustable Humidity Control, Auto Shut Off, Humidistat |
| UPC | 686720207006 068672070400 686720704000 |
| Unit Count | 1 Count |
| Voltage | 120 volts_of_alternating_current |
| Warranty Description | 5 Year Manufacturer |
| Wattage | 120 watts |
R**Y
these should be manditory on all furnace installs. love this unit!
OK, this is exact same as the automatic except it has the manual humidistat. I was a bit nervous about installing this because of how little room to install this. There is literally 1/2" between the wall and this now. But works amazing! Straight forward installation. Installed on the supply plenum. One thing, don't use the saddlevalve they give you. Go buy a sharkbite valve. Super easy to install with no soldering required. List of supplies used. 1. Metal tape (duct tape for the plenum but made of metal) 2. Tin snipe. (To cut the plenum) 3. 3/4" sheet metal drill bit (titanium or better) 4. Sharkbite valve (connect to water line. Just push pipe in both sides((1/2" osd)) 5. Sharkbite 1/2" to 1/4" on/off valve 6. 1/4" osd foggy plastic hose (connects to the water inlet on humidifier) 7. 1/2" clear tube (for the drainage tube on humidifier to drai ) 8. 18x2 thermostat wire, wire nuts, and plastic tube to hide wires. 9. 1/2" copper tube. Maybe need only 3"-5" (extends the sharkbite valve) 10. 20' outdoor extension drop cord (only if you don't have plug near supply plenum) 11. Level 12. Electric drill 13. Yellow handle tin snips (yellow means cuts strait lines or curved) 14. #8 self tapping sheet metal screws. 1", and only 4-6 is needed. 15. Pipe cutter 16. 13mm open socket wrench Shut off breaker to furnace. Do not install before you do this. So, the toughest part on the install was cutting the plenum. I didn't have enough room for the drill to drill hole, but was creative and got one made. The instructions are the template for the humidifier base. Used a level and made sure it was on level. I chose to use the supply plenum to install so I wouldn't need to use hot water. Save a few gallons of water daily. After the square hole was cut, I used a hammer and pliers to make sure the edges were even. Then mounted the base, and screwed it in. Next, used the metal duct tape (do not use regular tape, must be the metal kind) to tape around the base. Take your time and make it look good. Next, wiring. The bottom of the base has two brown wires. Using the 18x2 thermostat wires, connect one brown wire to the common circuit on the furnace circuit. Should be labeled C. Next, connect the other wire to the W (24v aux). Connect that wire to one terminal on the humidistat. First mount the humidistat where you want it. After the the power wire is connected to the humidistat, add another wire to the other post in the humidistat. Doesn't matter which one you use. Take that wire and connect it to the other brown wire on the base of the humidifier. Next is the water. If you have a water softener, you will be using the copper line going from there to the water heater. Shut off the main valve and grab a small bucket (water will drain from the line) and place under where you want to install the sharkbite adaptor. Use a black marker and mark the pipe. Then measure 1" both left and right. This is where you want to make your cut. Cut the pipe in both spots so you have a 2" space between ends. Slide the sharkbite adaptor in between and press the adaptor hard in each side. It will lock in to place. Cut a 3"-5" piece of spare copper pipe and push in the middle of the adaptor. Then attach the 1/2" to 1/4" sharkbite valve. Push it hard and it snaps in. Take off the 1/4" but and the copper coupling inside. Slide the foggy 1/4" tube through the but and then the coupling and in to the valve. Using a #13 wrench, tighten the but down as much as you can without breaking it. Connect the other side of the tube to the bottom of the humidifier base. Using the same method of through the but and coupling, then tighten down a lot. Otherwise this will leak. Next connect the 1/2" drain line. Run it from the bottom of the humidifier base to your drain near the water heater or softener. If there isn't one, you will need to buy a pump and attach it to there and pump it out of the house or to a drain. Last, use the extension cord, connect from outlet to plug on the humidifier. Use the black tube to conseal the wires if you want. Turn on the water to make sure no leaks. If there are some at the valve and base of humidifier, tighten those nuts down. It will stop leaking. May seem like you will break the sylanoid on the base, but it won't. Turn on the furnace breaker, set the heat to high to you can monitor the humidifier. It should be working fine. Alternative install. Use the transformer and connect to the HUM spot on the circuit board and the other to Neutral, the the humidistat to one of the back side and other goes direct to the brown wire on the base of humidifier. I am not a HVAC tech. So if you have questions I can't really help. But installing yourself will take 3-5 hours depending on trips to the hardware store. It will also save you between $350-$500. The total cost of the parts were right around $100. But because I didn't have the drill bit, the pipe cutter, yellow tin snips, metal tape, extension cord, or tubing. If you have those, the sharkbite adaptors will be around $25. So far we have felt an immediate impact on the air quality. Well worth the price.
J**Y
Aprilaire 700M installation and tips.
The Aprilaire arrived quickly within 3 days. When I was quoted $350.00 for a HVAC contractor to install the humidifier system, I decided to undertake the installation task. Installation is straight forward and the instructions are very easy to follow; but it does take a moderate understanding of electronics and a bit of plumbing know-how. The hardest tasks were cutting the opening for the humidifier on the furnace duct (my space was very cramped which highlighted the difficulties of cutting sheet metal), and running the connector wire from the humidistat to the humidifier through the crawlspace under the house. The instructions themselves on the reverse side were the template for cutting the opening. You must have a level to ensure a level opening or else the humidifier will not work efficiently. Once the duct opening was cut and trimmed, then the humidifier frame was attached. You need to make certain to slide the mounting frame topside clips first under the duct sheet metal and lift the unit to secure the bottom clips over the bottom of the opening. Then turn the two metal clips on either side of the humidifier to 90 degrees and tighten to the duct. (I used my better half's compact mirror to check the all of the clips on the backside) 6 sheet metal screws finished the attachment. The humidifier was then hung onto the mounting frame easily and just clipped into place. Once the humidifier was attached, I shut off the furnace electric feed at the fuse panel. I hooked up the electrical connections first from the provided 24 volt AC transformer to the humidistat, humidifier and then Aprilaire sensing relay (not included in the humidifier package) to the common (white) wire on the furnace blower. This would turn on the humidifier when ever the blower was on even when heat might not be needed. To hook the plumbing into the humidifier you have to install the provided saddle valve to the hot water pipe leaving the hot water heater; then connect the humidifier selinoid to the saddle valve with 1/4 inch O.D. copper tubing (not included in the humidifier package). The last thing I attached was a 1/2 inch I.D clear vinyl tubing that was routed to the A/C condensation drain pump. After I was certain everything was connected satisfactorily, I turned on the furnace breaker and opened the saddle valve. The initial setting on the humidifier was turned to max and then I could see water trickling down the drain tube confirming the system was operational. My observations: 1. Within the first two hours operation home humidity went from 26%R.H. to 37%. 2. Static electricity shocks (very annoying) went to zero in a couple of hours. 3. No nighttime bloody noses of kids. 4. Dry skin seems to be healing (6 days so far) Two things that stand out that were not included in the package were the 24 volt sensing relay and 1/4" OD copper tubing. While these are minor issues, I did have to make a trip to the local hardware store to get the tubing and wait another day for the sensing relay. Overall, I have been very satisfied with the performance of the Aprilaire Humidifier 700M. One month after installation, I am still a very happy customer. House feels warmer now-thermostat is set 2-3 degrees lower than it was set before humidifier installation. I will check my heating gas bill this year vs last year to determine cost savings. Recommended Tools/Supplies for installation: Needle nose pliers Wire stripper/cutter Tin Snips Level 1/4" copper tubing 5ft for my purposes**not included in package 5ft ID vinyl drain tubing**not included in package Sensing relay**not included in package, but probably not necessary for units with an outside sensor included. Electrical tape Nov. 2016 Update**** Humidifier working without skipping a beat. I change the water pad every year just before turning on the furnace. Humidistat setting is normally 35-40%. I can honestly say this unit saves us between 8-12 percent in heating costs. Picture shows how tight installation space is on our furnace-but doable. Darn picture keeps loading sideways-sorry
P**.
works great with Nest
This is a very good unit, relatively easy to install. I am not a technician, know very little knowledge about wiring. But I did some research on YouTube, reading reviews of previous owners, installed it all by myself. it works great. Here are some insights I would like to share: 1-This unit works with Nest (3rd gen) perfectly well, my furnace is Carrier Weather Maker 9200. Do buy the 700M model, you do not even need the manual control, (but need to have the 2 brown wires out from Humifier), neither the transformer that come with. 2- Install the unit itself is easy, just follow the instruction, buy a piece of copper pipe, and a 18 Gage security wire (the one I bought has 4 wires, 2 wires is enough). 3- Important is the wire connection. Make sure turn off all the power to your AC and Furnace before connecting any wire. I connected one of the 2 brown wires on the humidifier to the COM-common (has 24v) wire on the mother board in the furnace. The other brown wire connects to the * port in the Nest Control. (If you don't see a wire connected to this port, usually there are extra wires that not used, you can connect it to the * and the other end connects to the 2nd brown wire from the humidifier.) After connected turn on power, set up Nest under equipment (you can find on You Tube how to set this up.) I installed it yesterday, the whole house humidity went up from 20% to 31% now, upstairs is about 42% now. I called the Aprilaire and was told it will take up to one week to reach 45%. But now I feel much better, wish I have bought this unit long time ago. Hope this helps, let me know if you have any questions. I will be glad to share.
A**R
Among the best but ...
This is likely the best whole-house humidifier available - certainly for the price. Unless it is replacing an existing unit (and maybe even then), I would strongly recommend hiring an HVAC professional to install. For example, I wanted it to be wired so that it would activate whenever the furnace fan is running (e.g., even if the heat is NOT running or when I choose to have the thermostat set to fan "ON" for continuous running even if the heat is not running), and not just when the heat kicks on. I wanted that configuration to "squeeze" out every last bit of humidity into the home. A professional is required for that for sure. Also, be aware that the manufacturer (understandably) exaggerates the house square footage that the unit can possibly service. We have the unit servicing about 4000 square feet (two levels) and it is unable to raise the humidity level above 35% in the dead of winter here in Maryland (a relatively mild winter climate). To be fair, I did not expect any better. That is about what we got from our last unit - a Carrier brand. My guess is that this unit does a good job for space under 3000 square feet. Understand, the problem is not the design of the unit, but rather the inherent limitation on how much humidity a furnace humidifier unit can deliver. Aprilaire does offer another type of humidifier which delivers steam directly to the space - not through the furnace. This design definitely delivers much more humidity. But, aside from the additional cost, which I would have happily paid, installation of the steam unit is nightmarish and almost impossible in many situations. Maintenance is also highly burdensome and costly. Bottom line is that for most homes, this 700M unit (the 700 unit is absolutely unnecessary in my judgement) is adequate and even for larger homes, it is better than nothing. Without it, our home humidity dips into the low 20s in the dead of winter. That fosters dry bloody noses, static electricity, and generally unhealthful conditions. 35% is still too low, but better than low 20s! So, I recommend the product so long as it is purchased with reasonable expectations.
D**H
Eureka!! Wiring setup with Ecobee4 -- Works Perfectly!
I got the Aprilaire 700M (manual) version because with a smart thermostat, you don't need an outdoor sensor to tell the temperature. The idea is that the relative humidity (RH) inside your house should decrease as the outside temperature also decreases. Otherwise you'll get condensation on the windows and other parts of your home, leading to frost, freezing, dry-rot in your attic or window sills, etc. The Ecobee4 knows the temperature at your location (via Wi-Fi connection) and has a "Frost Control" setting that will automatically adjust the home's humidity level accordingly; no need to use the manual humidistat and constantly change the humidity setting as temperatures change. I've attached a diagram of the exact wiring I used -- even the colors are the same. It took combining about 4 different diagrams that only told part of the story, a call to customer service, an email to an HVAC guy, and bit of trial and error (e.g. I had to learn not to use the HUM connection on my furnace because it's only charged when blowing heat) but my Aprilaire 700M and Ecobee4 now work PERFECTLY together! When I need humidity in my house, my thermostat will turn on the furnace fan and the humidifier to add humidity without heat... as well as with heat, if needed. IMPORTANT Instructions: 1) You DO NOT need to use/wire the humidistat control (dial-a-humidity level) because the Ecobee4 perfectly takes it's place (actually, it does a much better job). 2) You have to know that when you set up your humidifier with Ecobee, you have to tell it that it's a "steam" humidifier, NOT an evaporative one. This is not true, but it will allow the Ecobee to call for humidity even without heat blowing. 3) You need to purchase an extra relay to make the call for humidity without heat to work. Aprilaire recommends the Aprilaire 4851 relay. I'm not convinced there isn't a less expensive relay that will make this work, but I know the 4851 will work. 4) Take note that the G (green) wire needs to be disconnected from your furnace control board. This is according to the 4851 relay instructions. There are a few other oddities with the wiring too, so pay close attention. 5) Be sure to use 18-guage wire for 24 volt purposes (which is all this diagram shows) 6) I used the 2-wire setup for my Ecobee; there is a 1-wire installation, but I couldn't get it to work. 7) I did not need to use the transformer the Aprilaire 700M came with (because I didn't need extra 24v power). 8) When using no-heat with your humidifier, please note that Aprilaire recommends installing the humidifier on the hot-air service side of your furnace plenum, and to use hot water to flow into your 700M. This will allow the water to evaporate better. I'm going to add insulation around my 1/4" OD (outside-diameter) copper tubing (sold seperately needed for installation, with compression fasteners) to keep the water a little hotter. I used a SharkBite valve (Model # 24983A; 1/2" push-to-connect, 1/2" push-to-connect, and 1/4" compression fitting) to tap into my hot water line. The SharkBite fittings made it super easy to install onto my PEX hot water pipe. You may want to use something similar if you don't want to use the saddle valve the 700M came with (which I couldn't, nor did I want to run the risk). I had virtually no plumbing or electrical experience before doing this install, so you can do it too! I've attached a few other photos and the diagram that came with the 4851 relay, and the Ecobee4. I hope this helps! And enjoy your new perfectly comfortable home! p.s. Be sure to go to your electric company's website and look for a rebate on smart thermostats; the two main ones here in Colorado Springs both offer a $50 rebate!!! Free money.
K**7
Working nice with Nest 3rd Gen thermostat.
Its been two days since I completed installation. Working nice so far. I have a 2300 sq. ft single family. The unit is maintains a comfortable humidity level. I have hooked it to my Nest 3rd Gen thermostat. I had to wire in a 90-290Q relay along with AprilAire 24VAC transformer connected to EAC on my furnace. The Humidifier comes with a saddle valve and a 24VAC transformer. Additionally, I purchased the following: 1. 10ft 1/4" OD Tubing/Hose pipe for water connetion 2. 10ft 1/2" ID Plastic drain pipe 3. Stanley straight cut aviation snip 4. Pair of cut resistant knit gloves 5. Electrical wire connectors screw terminals (nuts) 6. six #8 1" Self drilling sheet metal screws (I still had to drill a small hole each time though) 7. A box of 12-14 AWG female disconnects 8. A box of 18-22 AWG female disconnects 9. 3M Silver Aluminium foil tape 2" wide 5 yards length 10. White Rodgers 90-290Q Replacement Heavy Duty Switching Fan Relay SPST 1-NO 24 V Coil 11. 50ft 18/2 Thermostat Wire 12. 2ft of 12 gauge standard black and white electrical wire. Make sure you turn off the power supply to the furnace before you work. Its recommended you turn off the water supply before piercing the water supply pipe with saddle valve. It took me altogether about 3 hours to complete the installation. I did it in parts taking time to make sure that I had followed the steps I gathered reading reviews and watching videos. I was a little nervous installing the saddle valve. It is easy enough but I still got my plumber to come and double check my installation. Make sure the screws and nuts are tight enough so water doesn't leak. I installed the unit on the supply side with cold water as shown on the template. Be careful of where you cut the plenum, be aware that the air condtioning coil is inside the supply side sitting close to where you are to cut. You need to cut the plenum 1" above the coil. Cut the plenum using the snip on the inside of the template marking. I cut atleast 3mm above the markings especially on the top and the bottom so that the screws has some bite and support when you mount the frame.After fixing the frame I sealed off the gap using the aluminium foil tape. It took some research and reading to figure the wiring since I had no experience with electricals. It started with what is a relay to figuring the supplied 110VAC to 24VAC transformer to finding out the right gauge wires to use. I connected the * of the Nest to No.1 (coil) terminal on the relay (using the 18AWG female disconnects) Connected no.3 of the relay to the C (common) on the furnace. On the switch side of relay I connected No. 2 to one terminal of the supplied transformer. Connected No. 4 of relay to one of the brown wires of the solonoid valve on the humidifier. The other brown wire is connected to remaining 24 VAC terminal. I connected black wire of the 24 VAC to EAC terminal on the furnace using the 14 gauge black wire using a 12-14 AWG female disconnect (I could connect to HUM, but I wanted the option of running the humidifier stand alone with out runnign heat). The White wire is connected to the ground.
S**Y
Furnace Humidifier
Used to replace same model that no longer worked
C**S
So far so good
Will update rating if things go amiss. Purchased the open box 700m when available (Was $140/prime as of purchase) Something to note right off the bat for those wavering between the 700 (automatic control) and the 700m (Manual control): The automatic part of the former is it adjusting how much humidity it thinks you should need, based on outside temperatures, by way of a hard wired thermometer. The manual version comes with a simple dial control, which you use to tell the unit what humidity you want it to provide. With that said, the automatic version is vastly more complex wiring-wise, if you are a do-it-yourselfer like I am. (Note: installing yourself voids your warranty, so that is pretty important) We have a Bryant 80 furnace and install went smoothly. It has a 24v COM port as well as a 24v HUM port (**BEFORE ASSUMING YOUR HUM PORT IS 24v, CHECK WITH YOUR FURNACE MANUFACTURER. THIS IS RATHER IMPORTANT**). Which meant that we did not need to use the transformer to get the required 24v connections. The 24v COM port went to the one connection of the manual control box, and the HUM went to the humidifier unit and then on to the the second connection of the manual controller. When using the 24v HUM port, the humidifier ONLY runs while the furnace's heating element is running, which is how we wanted it to run. We had no desire for it to be wired such that the controller would tell the furnace fan to run with the humidifier when heat was NOT running, concerns about water vapor in cold ductwork and all the nastiness that could create. The only thing that might affect my rating of install, is that the template to cut the duct allowed the base to attach, but the location of the screws prevented all of the bottom locations to entirely miss the duct metal. Ridiculously bad design-wise. They could easily have shifted those locations further from the edge of the ductwork metal. I put some silicone sealant around the edge to at least keep it relatively airtight against the duct. (I installed on the heat side of the furnace, and the controller on the cold air return side)
S**N
Brings humidity up quickly. Seems well built.
Works fast for bringing up humidity in a 2100 square ft home. Used hot water at 110 F . Installed on return air plenum because no room on supply side. Was a lot of work to get it all done properly. Took my time. Use an Ecobee 5 to control it. Very happy with the final install.
H**K
Great product and works great!
Product arrived. Installed it in 4 hrs next day. It brought the humidity up in our 2200 sq ft home in approximately 4hrs. I would recommend this product.
Y**S
Perfect unit for heat pumps
Perfect unit for central Air Source Heat Pump. It is controlled by my Ecobee thermostat and connected on cold water line. My cold temperature heat pump has electric heating elements as backup but never had to use it even in minus 25C temperatures. Since heat pumps operate at longer frequencies, I do not need to waste hot water. The Ecobee can be set to Frost Control to prevent frosted windows. Very happy with the Aprilaire 700
B**N
difficult to install for a DIY 700m with Manual Control but doable
hole saw to start your hole and tin snips needed to cut into your duct work. Difficult to cut with tin snips but doable. hardest part is wiring the unit because the instructions are incredibly vague. The transformer gets mounted to a nearby electric outlet connecting the black and white wires to hot and neutral. However transformer is OPTIONAL if you have another way to source 24v. You can instead source your power from your furnace which is PREFERRED. This should be your FIRST option as this allows your humidifier to power off when your furnace is off saving you water. Connect one 18/2 gauge wire (not included) to your Furnace common the other end to your manual thermostat, any one of the two connector and the other thermostat connector to your humidifier yellow/brown line (doesnt matter which of the two). Then connect the second 18/2 guage wire to your furnace's HUM 24v connector to the second humidifier yellow/brown line. This allows your humidifier to only turn on when heat is activated. To TEST turn up your humidifier thermostat, make sure your humidifier is plugged into an outlet and turn on your furnace heat. Should hear the fan from the humidifier turn on when the furnace is activated. Essentially as long as the humidifier sees complete circuit to both yellow/brown lines it gets activated. if you want full control and want to be able to run the humidifier from a smart thermostat such as nest, you can technically connect directy to your smart thermostat without extra gear. Essentially you would remove your connection to HUM and connect directly to your thermostat such as the * connector on NEST. Remove the manual thermostat and connect the other yellow/brown line directly to common on furnace. This gives nest control instead of your manual thermostat. Do this on a weekend because it will take you all day. Prep your equipment ahead of time. Does not come with everything. You need 18/2 wire, drain hose, copper line from hardware store as stated in instructions
M**.
Buy it, you will not be disappointed.
Easy install once I had read the instructions closely. Hooked it to the hot water line in a 1200 sq. ft. home. It works beautifully, exceeds my expectations. The air quality is awesome.
Trustpilot
2 weeks ago
1 month ago