
DOWNLOAD THE APP


Customer Services
Copyright © 2025 Desertcart Holdings Limited
DOWNLOAD THE APP
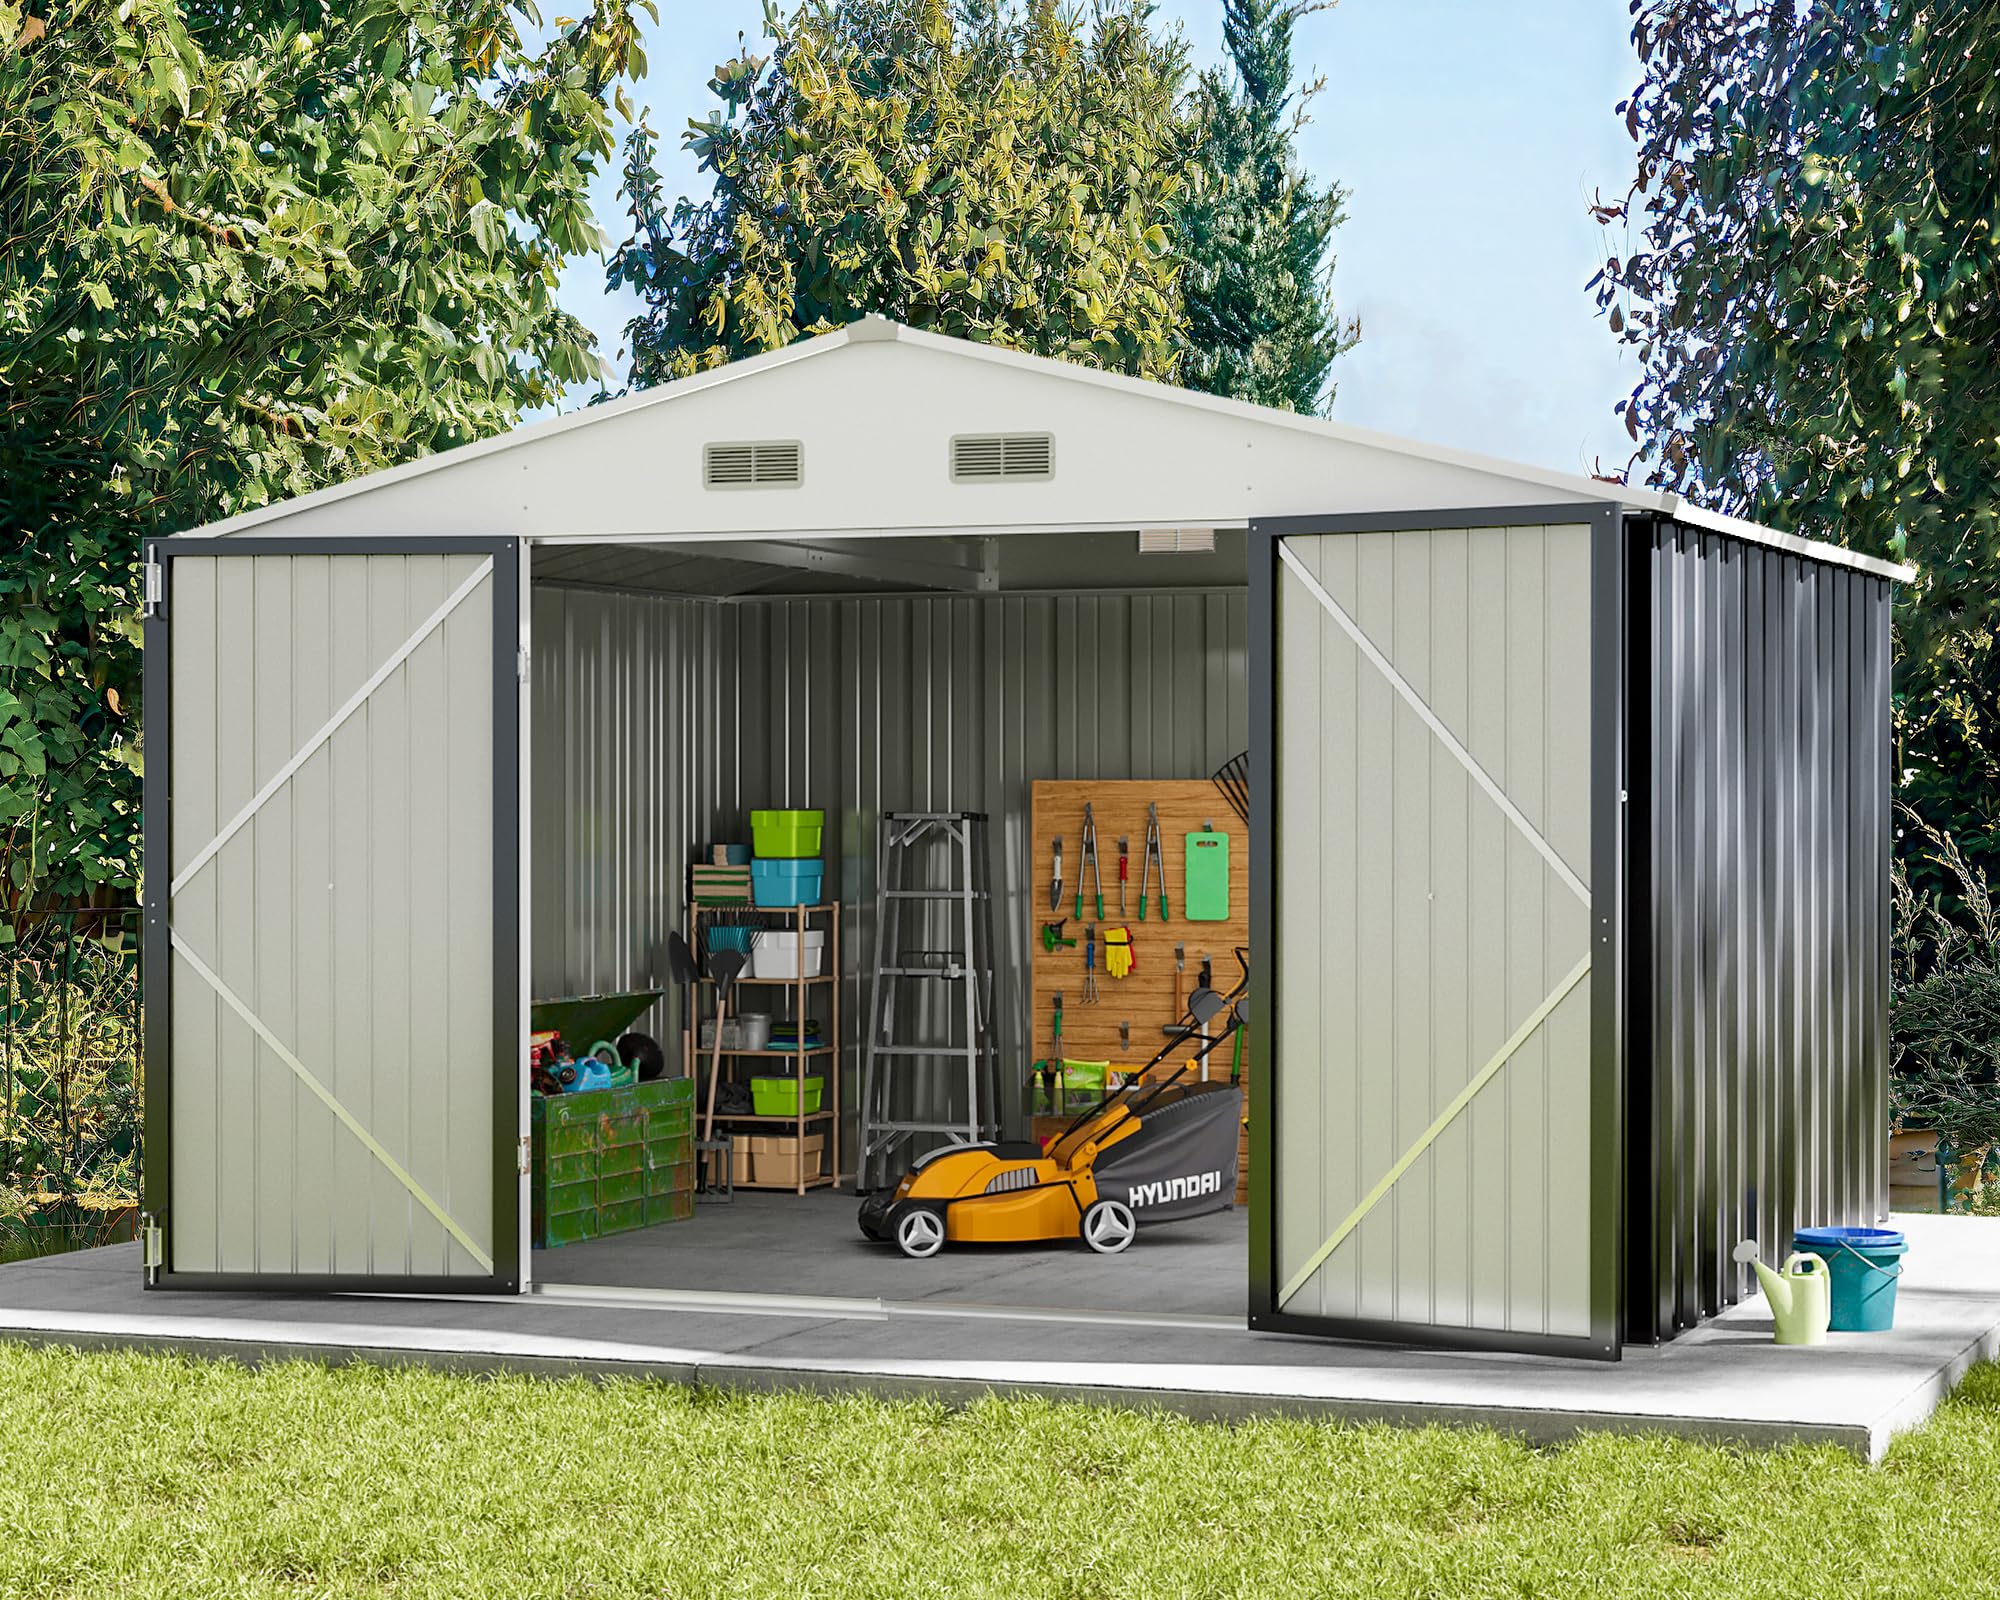
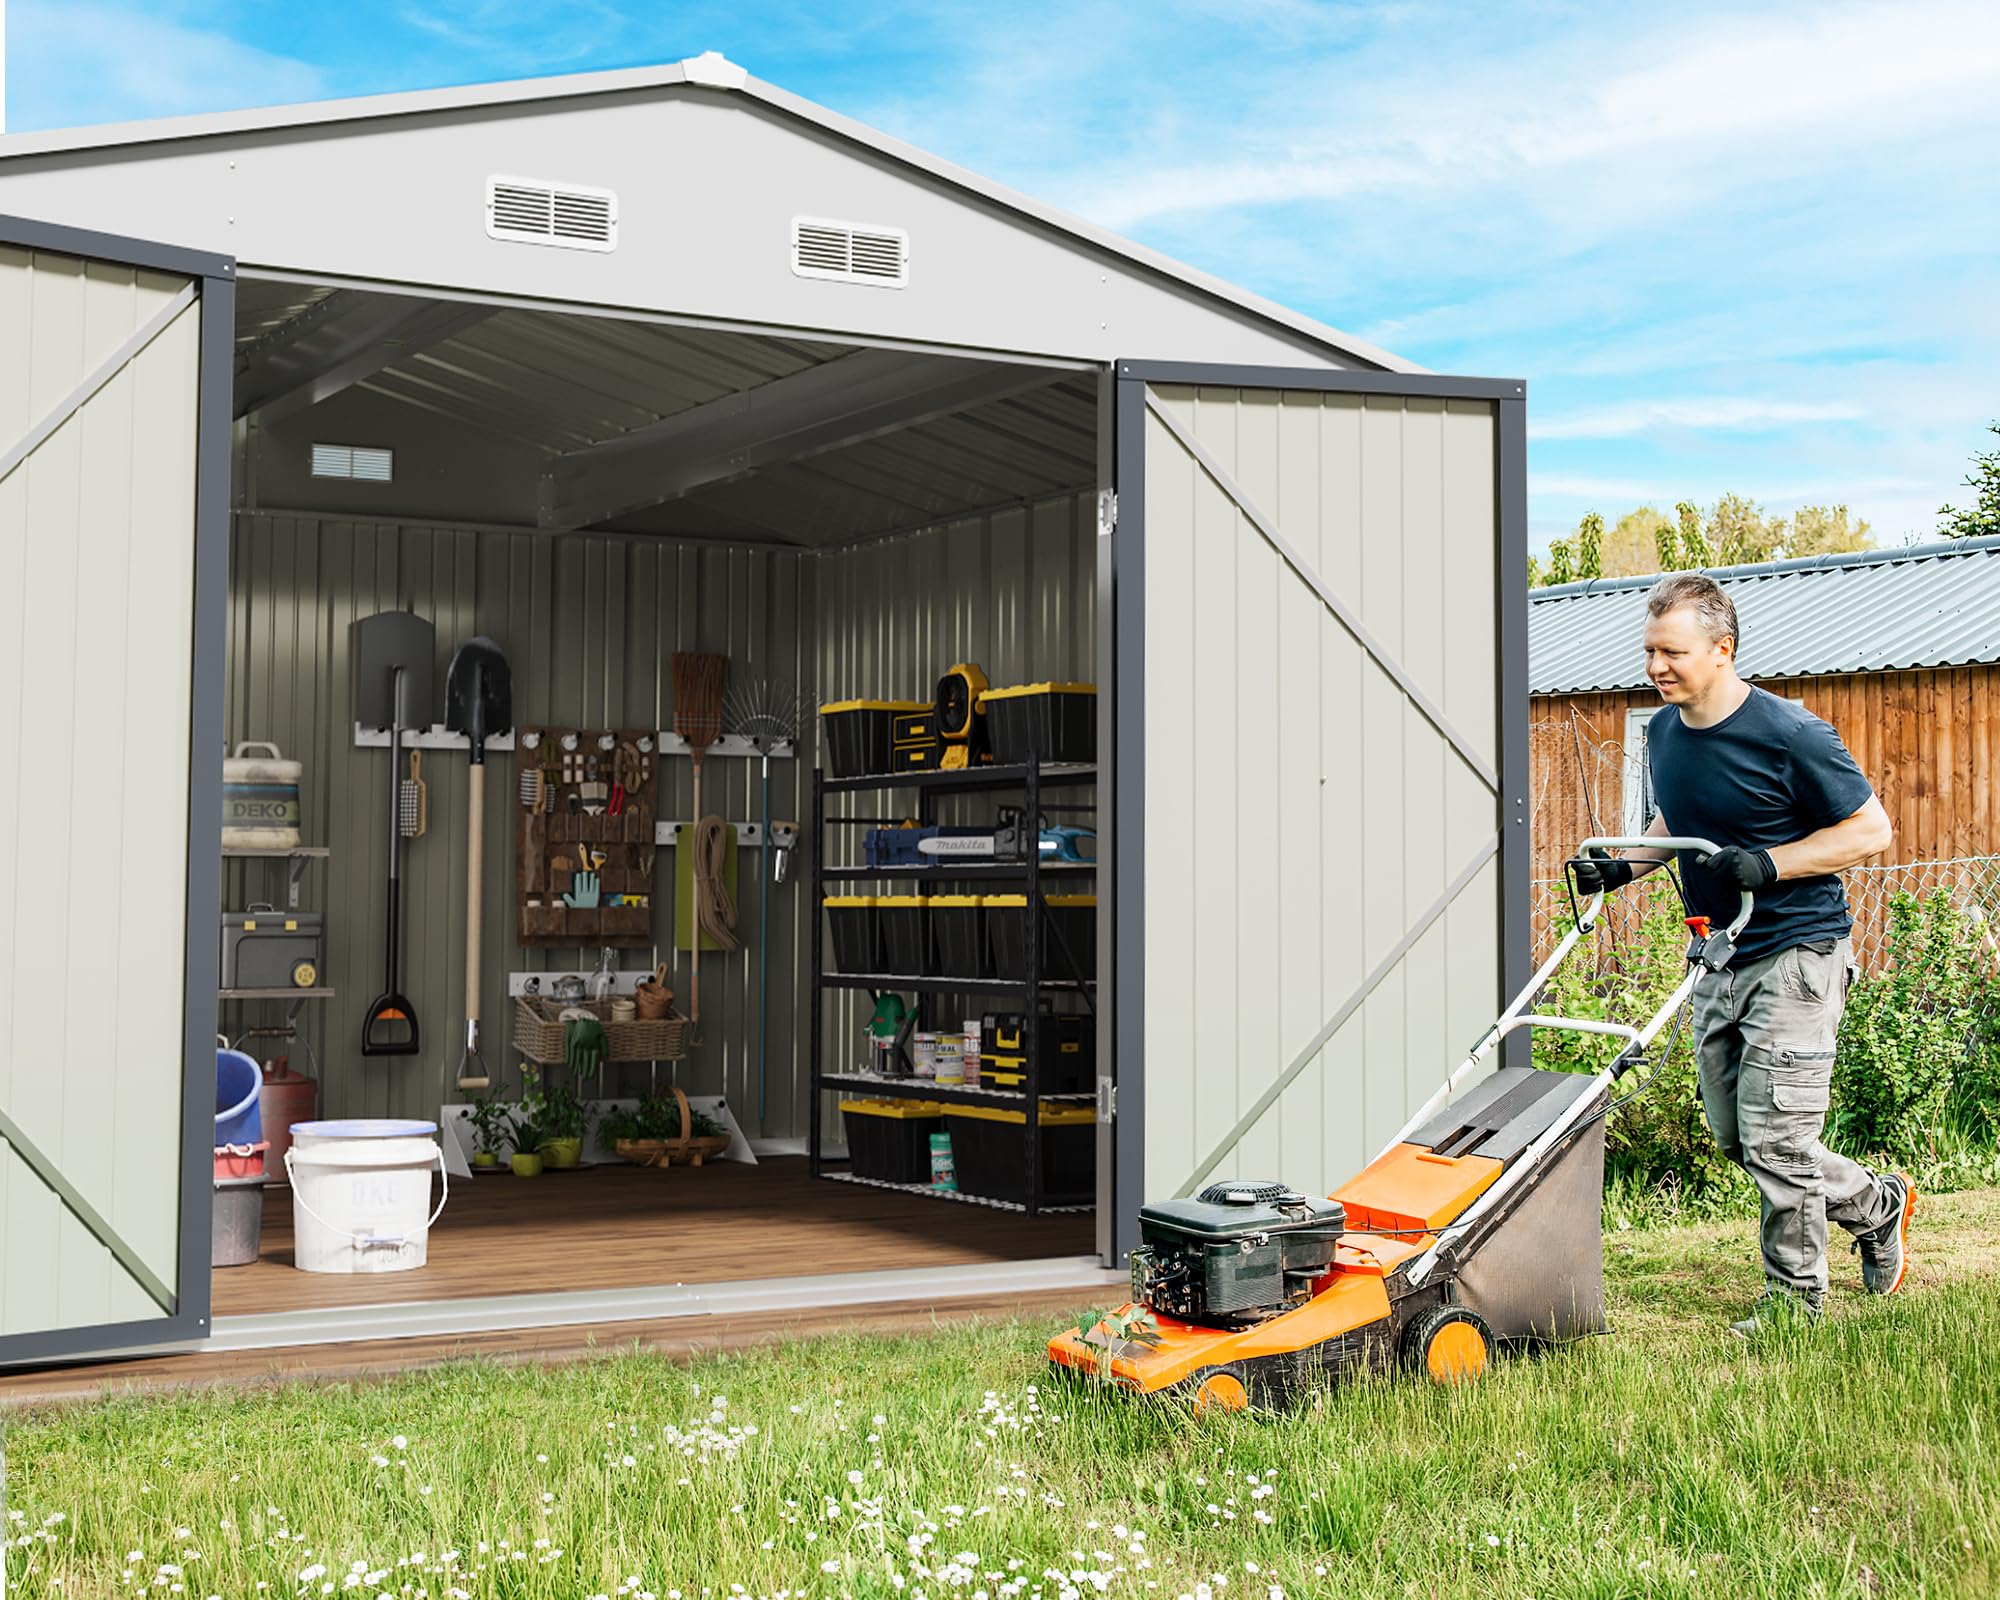


🏡 Elevate your backyard game with secure, sleek, and spacious storage!
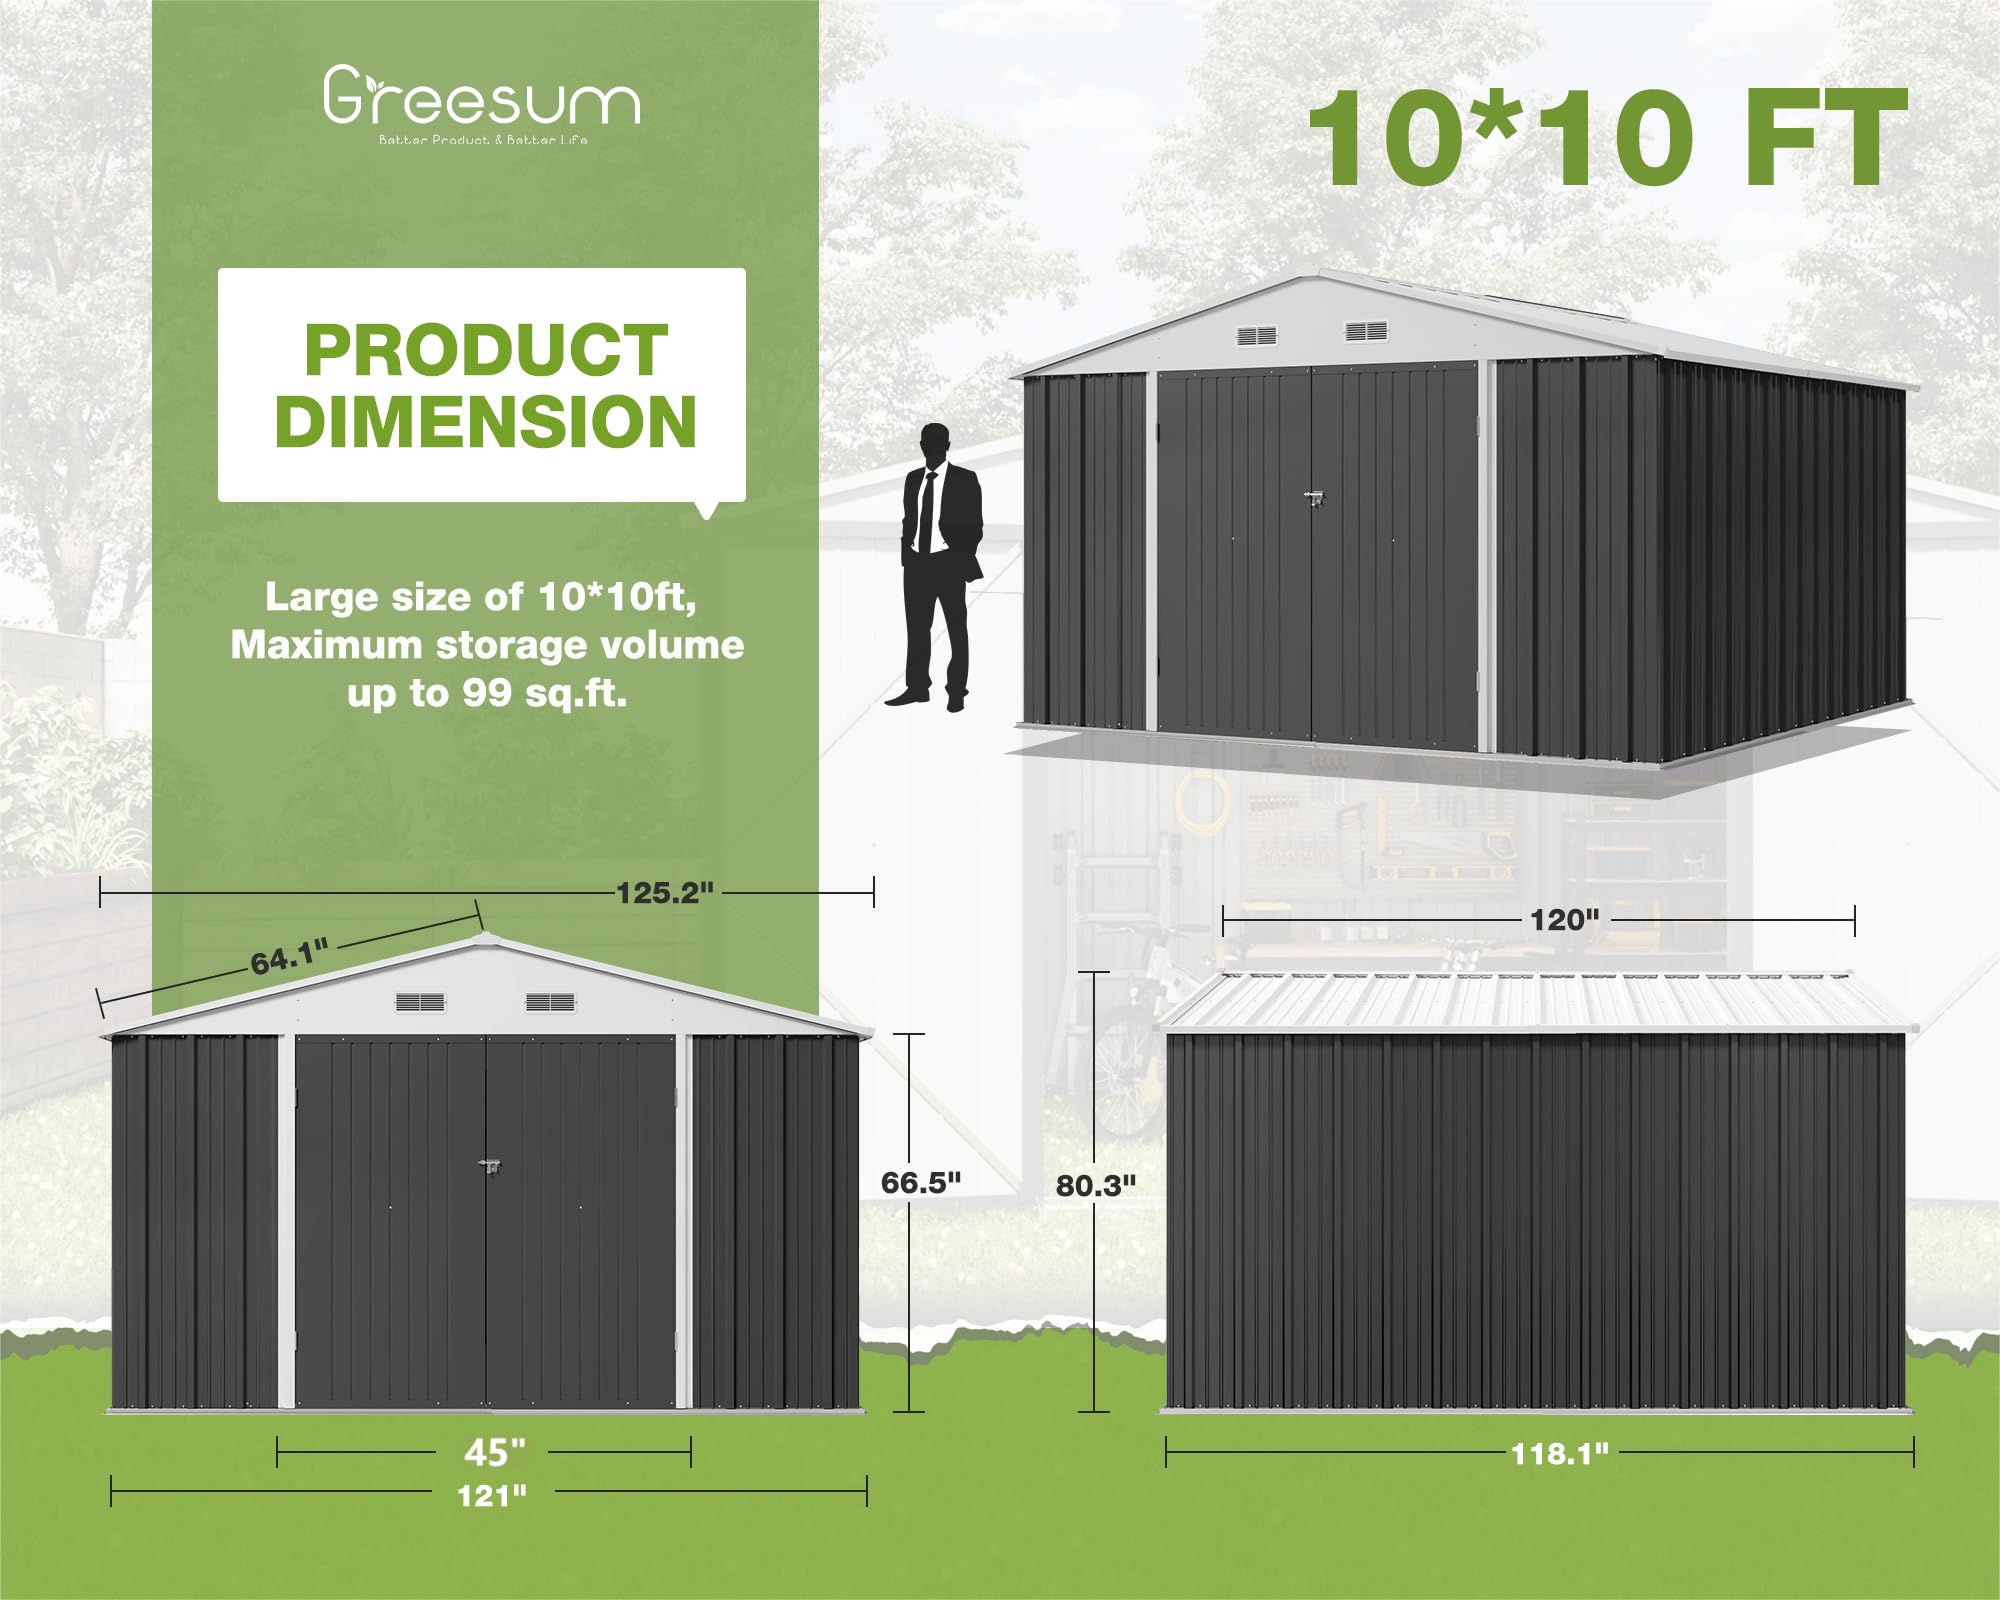
The Greesum Metal Outdoor Storage Shed offers a durable 10x10 ft galvanized steel structure with a sloped roof to prevent rust and water damage. Featuring a lockable door for enhanced security, this versatile shed is perfect for organizing garden tools, patio equipment, or even creating a safe pet space. Designed for all-weather use, it combines robust construction with easy assembly, making it an essential upgrade for any modern outdoor space.
P**E
Great shed & a ONE-person build (w/patience)
I read tons of reviews before purchase, but at a cost of $219 this shed is an excellent value. I bought and built it myself (I am a 5’ 6” female). I saved HUNDREDS of dollars and took my time to construct it . Several reviews discussed the ways that they built this shed, but if you search for “Greesum Metal Storage Shed” online there is a 40 minute and 54 second video by UTECHPIA (building the smaller 5’ x 3’ shed solo) that I found extremely helpful. The shed isn’t EASY to build if you are inexperienced, but it is absolutely possible if you are patient, have the correct tools, and have the time and determination to devote to building. For a builder with experience, this shed build would be a piece of cake though. The build is completely logical.TIPS:1) FWIW, I did use an electric drill w screwdriver attachment instead of a ratcheting screwdriver and it saved a ton of time and strength. (TBH I started w/ a ratchet and changed after my arm got sore - so save time and start that way!). I was just VERY careful to set the torque low on my drill and to be careful not to strip the screws on tightening.2) I inventoried each piece of the build before I started, to make sure I had all the pieces, which I did. I read the instructions (e.g., looked at all the pictures) before starting. I did not inventory the screws/ fasteners because for the most part I could tell there were plenty.3) When installing the wall panels, I put a starter screw at the top, then attached the bottom screws first, which was more difficult to do since that part was close to the ground and were therefore harder to screw in (I lifted the very light shed frame up onto an incline to allow my drill to get low enough to reach each screw). FWIW, if you assemble the structure correctly which is not hard to do, ALL the holes match up. HOWEVER, it is important to stretch or push the metal slightly to fit, as it can get a bit shrunk and bent during packaging. None of the materials in my packaging were damaged. Because it’s thin sheet metal, it is easy to shape so all the holes line up. Take your time and wear the gloves so you don’t get cut by the metal.4) the instructions are sometimes tricky, so pay close attention to the holes that DO & which DO NOT get screwed in (at first) on the corner panels for the walls and roof. Otherwise you’ll have to undo and redo them, which I did the first time. Didn’t make that mistake twice.5) there is one error on the roof build instructions, or at least I THINK it was pictured backwards. The number 17 and number 18 front and back roof edge finishing pieces (which screw into the middle roof panel and are both around 3 to 4 feet long) appeared as reversed in the photo instructions I had. (The 18 piece is shorter, 17 slightly longer. ) Consequently, when I tried to put the roof supports around the edge of the roof panels, they appeared to be too long and jutted out too far past the corners of the roof. Just reverse 17 and 18 pieces, and then the side roof structure finishing pieces and corners will match.If you have ever built Ikea stuff you will be able to build this shed. Just pay CLOSE attention to the tiny holes pictured on the page and figure out what is top, bottom, front and back before you permanently affix each piece. And there’s nothing you can’t undo and redo, generally, if you must.The HARD part of this build was creating a level surface for my shed because my yard is on an incline (and I had no experience with a patio-making task). However, the finished product is a success. The shed withstood last night’s rain, and everything inside is water free. In the picture, you will see an IKEA Omar shelf, which fits well in this shed with room to spare. (See pics). I put a large piece of plastic for flooring inside, and it too was dry. I am very pleased with this shed.UPDATE - after several days of hard blowing rains, there was some water infiltration from (I believe) gaps at the roofline underneath the roof’s drip edge, which is short (the edge comes down only about an inch beneath the gaps. To cover the gap better, I purchased a $10 10-foot length 2.25” by 1.25” galvanized steel bent roof drip edge and two $0.72 pieces of 8” long, 4” by 4” folded galvanized flashing (because the drip edge piece wasn’t quite deep or long enough to cover front and back of the roofline) to act as a water diverter. If that solves the issue, great. If not, I will report back. :)Good luck!
C**O
A single mom put it this shed together…
Overall product is great for the price. It was difficult putting it together myself at times you really do need a second pair of hands, but it can be done with one person if you have patience. I didn’t have issues with holes lining up UNTIL the roof. The second row of beams did not line up to the precut holes no matter what I did. Having an impact drill and buy extra screws and bolts. My door hinges and pre drilled holes, not the screws didn’t fit - so I ran to the local hardware store and bought some new ones. I read that buying hardware for the locks was recommended and I agree. One good kick and that will be broken as the item is thin. I do think it’s great for the price. I bought the 8x6 and it took me 3 days about 4 hours each day. I am adding extra weather protection to help prevent water damage from getting inside. I think that adding screws and bolts across top and bottom will add more protection from wind/snow damage etc. I am using this shed to store a lawnmower and yard decorations etc. Overall, as a first time shed builder I was pretty pleased. I would suggest reading all of the reviews as they helped me avoid mistakes and know to have an impact driver amongst other things to build this shed. I am happy with how it turned out as it looks great in the space I put it in my backyard. I had no issues with the directions, only twice the picture was displayed in a way that I couldn’t quite figure it out. If you are on a tight budget. This will work out well.
A**S
Okay Shed As Is—Excellent Shed for Extra $70
The media could not be loaded. This shed took about 2.5 hours to assemble with my wife’s occasional help. I’ve seen other reviews say this is a two person job and for the most part that’s true. However, if you have something like saw horses or ratchet straps or really anything that will support the vertical portions without you having to hold them, then it’s a one person job.The pros:- this shed is a GREAT value for the money. A huge cut above anything I could find at Walmart or Sam’s or Home Depot, etc- it’s fairly easy to assemble if you’ve got an impact driver. Don’t buy any means use a screwdriver unless you’re just a glutton for punishment. You sometimes need the extra force of the impact driver to bring the metal into the correct position.The thing is somewhat sturdy on its own. It’s heavy enough that someone couldn’t just pick it up and throw it or something to get to the contents.It’s got a plastic coating which I did NOT tear off because I figured it added to the weather protectionCons:- unless you’re a short person you won’t be able to stand up in it. The thing is pretty short. But then again it’s a storage shed. You’re probably not gonna be walking around in it.- The screws provided are incredibly small and I wouldn’t trust them to hold up to much- The thing is fairly weak overall. If I fell into it I think I’d bust through the walls. And if two people wanted to get your stuff, then all they’d have to do is stand on either side and pick up the shed since it does not have a bottom- The included latch is flimsy and so is the hardware. But again, you’re paying for the shed, not top quality hardware. Again, that’s an aftermarket thing.- The thing is not super waterproof. Water WILL get in the bottom. I haven’t observed yet whether it gets through the roof or the sides but it definitely gets through the bottom if there’s nothing under it and it’s open at the floor- Overall, it’s a cheap shed and you get what you pay for, but if you do what I suggest below, you get a really quality shed.TO MAKE IT BETTER AND STRONGER:I set out to reinforce this cheap budget shed and make it at least a bit more intruder proof and make it not feel like it’s blow away with some heavy winds. It cost me an extra $70 or so at Home Depot if you already have some basic tools (drill, impact driver, circular saw, screws) Here’s what I did (see my pics and video in the post) if you’re even a slight bit handy you should be able to do this.1. I laid five concrete blocks ($2.98 each) on the corners and center of the bottom. This helped to weigh the shed down and provide a raised platform so water running under it wouldn’t automatically touch the contents of the shed. (I live at a rental property so I couldn’t do anything drastic to anchor it. If I owned the property I would’ve used concrete anchors through the base into the slab on my back porch or I would’ve used rebar to hold it in the ground like stakes. Lots of different options to anchor it to the ground)2. I bought the cheapest plywood I could get that had some sort of weather coating on it. It was $14 for a 4x8ft sheet at Home Depot. Don’t remember what it was called. Other options could be buying a sheet of plywood and painting or coating with epoxy to help it not rot. Really anything like that’d work. I cut it to the dimensions of the base and sat it on top of the concrete blocks3. Next came framing (something I’d never done before this, so you can do it too). I bought a 8ft piece of 2x6” pressure treated wood and two 12ft 2x4” pressure treated wood. I cut the 2x4s into four vertical pieces to serve as studs in all four corners of the shed. I anchored these to the shed usIng Tek wood-to-metal self drilling screws that I already had on hand. Lots of different screws would work but these got the job done. I used a combination of 1 3/4” screws and 3” screws going down the side. I then used the 2x6s to make shelves running perpendicular to the 2x4s. They were attached with cheap decking joist things (not sure what they’re actually called, you can see them in the video). They were similarly secured with tek screws.4. Use an assortment of hooks or whatever you like to hang things from the “shelves” and organize that bad boy!5. Lastly I upgraded the lock. For $8 at Home Depot you can get a much nicer locking mechanism and secure it with stronger bolts than the provided ones. Haven’t gotten around to installing the lock at the time of writing this but it’s not hard.6. Optional: I didn’t do this but if you want to make extra sure you don’t let in the elements or cause you’re shed to rust, you could use finishing washers with every single screw OR go back and slop some sealant over each screw to make it airtight. I’m not too worried about that though.Prior to doing this I searched high and low to find a tutorial for how to make this stronger and I couldn’t find anything. Literally seemed like no one had ever done this which I find hard to believe. So I share this to say that I’m not overly handy but I could do it. Total extra cost was around $70-$80 so for about $200 you can have a REALLY solid shed. Hope this helps somebody.
B**A
Esta como se ve
Está perfecto con el instructivo, solo hay que saber ver las perspectivas en ocasiones. Lo arme yo solo, sin prisas, y si se van como 4-5h. Por lo demás, no necesitas hacer agujeros extra o así como algunos dicen
D**S
Bueno con pequeños detalles
El precio es accesible, el cobertizo realiza su función. Doy cuatro estrellas porque varios orificios de las piezas no coincidían y tuve que realizarlos con un taladro para hacerlos coincidir. Cabe señalar que seguí el manual al pie de la letra.
A**L
Pésima calidad
No compren este producto. Carísimo, pésima calidad, quién lo armó se cortó pues de muy mala calidad la lámina. Lamentable.Ni se puede poner en el exterior pues se va a oxidar.
E**C
No hubo sorpresas es lo que se ofreció.
Es un gabinete con muy buena relación calidad/precio. Hay que armarlo y si se hace con cuidado es fácil aunque laborioso. Se requieren necesariamente dos personas para el armado y todas las piezas coincidieron sin necesidad de hacer nuevos agujeros. Algunas láminas llegaron un poco golpeadas pero para el uso que se les va a dar no representan ningún problema. Se pueden enderezar fácilmente.
A**.
mal producto
mal producto
Trustpilot
1 month ago
2 weeks ago