🔧 Build, Measure, Innovate!
The JYETech 'DSO Shell' Oscilloscope DIY Kit is a low-cost digital storage oscilloscope featuring a 2.4" TFT LCD display, rechargeable battery, and a bandwidth of up to 1MHz. Ideal for both hobbyists and professionals, this kit offers a unique DIY assembly experience, making it a perfect blend of education and innovation.
L**4
Quite amazing little oscilloscope!
I can start saying what is not perfect, however this is not meant to be perfect to start with. I soldered it without a problem, had to rework couple of my mistakes (please pay attention to orientations of the part you solder). The power connection to a battery was flaky (not their fault) and so after putting it together there was no signal (my battery connector nozzle is too short and created intermittent connection). The case is a bit flimsy, one button rubbed on the front pannel and I had to file the hole a bit to make it bigger, e.t.c. I almost gave up on it, but in the end it all worked and worked beautifully. It even provide the signal measurements (if you hold the OK button for 3 sec) and has a uart port (which is not soldered) to get the data out - another potential extension project in the future. Overall, I am quite impressed and satisfied with the looks and performance.
M**.
Weak, not robust enough to take handling during assembly
Booted up once after building it out, was able to see a reading, then I turned it off. The next time I went to turn it on, the unit went nuts saying it couldn't read the chip set on board (EPROM read error). Turned it on multiple times with the same error after that. Sent it back. I think it has potential, but it's just not robust. The display was color and readable and appeared to have decent resolution for a scope it's class. However, If it was destroyed in some way by me putting it together, how much worse will it be if I accidentally hit a voltage it doesn't like during testing? There's no instructions on how to assemble the main button on the front panel, I followed the steps in the badly written manual and there was nothing about what to do with the little PC board and the main button, took me a awhile to realize it after I put it together, but then had to unsolder the button from the main board to put it on the tiny expander board. The resistors were measuring all over the place with my precision digital multi-meter, I had to pick the nearest values to what was listed in the manual and on the motherboard. These are flameproof resistors (I assume), and should have good tolerances, but they were sloppy in value, some were off by thousands of Ohms. It could be the bad resistors is what caused this thing to collapse in front of my eyes. Electrically, it's a weak performer.
T**R
Definitely worth the purchase
This was a surprisingly good kit, rather well thought out and executed... and insanely inexpensive for the functionality. It is not a beginner's kit, designed to be hammered together with a propane torch and a brickbat... it's a fairly upscale kit that requires a pretty serious hobbyist to build it. You'll want magnification. You'll want good solder and a good iron. You'll want a pair of serrated-jaw forceps and some good sharp flush-cutting dikes. You'll want good light and a clean surface to work on, where tiny dropped parts can easily be found. A linen sheet is a good work surface. You'll want a very small Philips screwdriver and a decent multimeter (HF is fine, no need for a Beckman). You'll want a true 9VDC wallwart.It's NOT perfect; like all things, it could stand to be improved. The solder pads could afford to be considerably larger in most cases, for example, and most of the through holes could stand to be both smaller and closer together (per component). The adjustment instructions could stand a little clarification. I would have felt better if more of the resistors were within 5%, or even 10%, of nominal value; some were barely within 20%. I may go back and replace those with better resistors.The first task for mine was to fill some COVID time. Its second task will be to assist in troubleshooting and repair of an issue in one of the channels on my old Tektronix dual-trace oscilloscope. Reminds one of a junior cub scout helpfully assisting an elegant old lady across the street. 8)
H**E
Good enough for me.
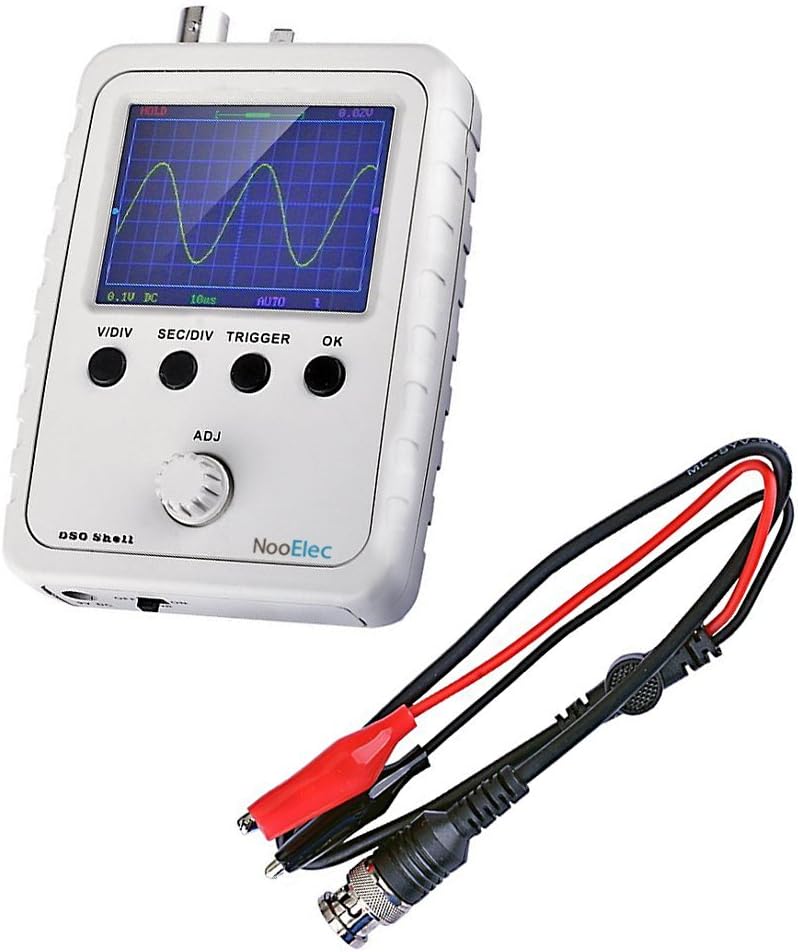
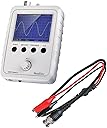
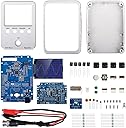
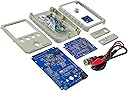
I'm an amateur electronic hobbyist and basement tinkerer, and every once in a while, I either assemble my own circuit or solder one up in a kit I get off Amazon, and problems arise that could be easily troubleshooted with an oscilloscope. But it's so rare that I never felt coughing up for a full blown 'scope was justifiable.Thanks to this kit, I've got a o-scope that I not only got at an a good price, but I take pride in the fact that I assembled it myself and it still works.This kit doesn't come with a power supply. But the instructions tell you what specifications the supply needs, so it was simply a matter of rummaging around for a transformer that met or exceeded specifications (at least in specified current output). The instructions, while not written by someone that speaks English as a native language, are clear enough to understand and electronic components are quantified accurately. There's a nuance I want to discuss about the instructions of this kit:I've assembled kits like this and many times, the instructions regarding circuit board testing are as clear as mud. But again, despite some broken English, I was able to understand what I needed to test on this board and how to go about it. You test the board before you begin soldering, and once more after you complete soldering. I appreciated the added effort to clearly specify what and where I needed to probe my multi-meter for testing!So, is this o-scope any good? I can't say yes or no with authority. The only experience I've had with an oscilloscope was nearly 10 years ago, and it was an old unit with a screen that barely worked, in some rushed training. I'd imagine it can't compete to even an entry level mass produced o-scope. But for my occasional needs and the price I paid for this, I think this 'scope is great and think it will hold either for a very long time, or until I get more advanced in my tinkering to justify buying a common o-scope.
Trustpilot
1 day ago
2 days ago