

⚙️ Upgrade your tap game with German precision and silent luxury!
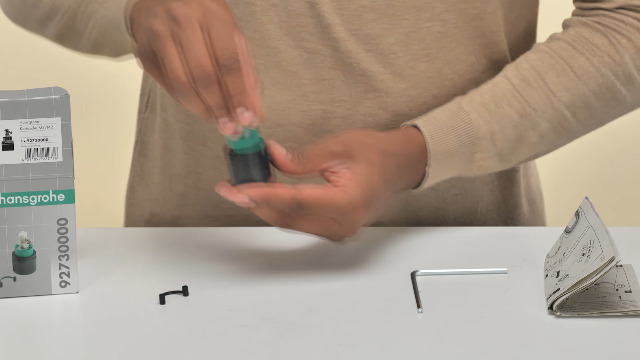
The Hansgrohe ceramic cartridge complete M3/M2 (model 92730000) is a premium replacement part engineered in Germany’s Black Forest. Designed for M2 and M3 mixers, it ensures quiet, drip-free operation with durable ceramic technology. Lightweight and easy to install, this genuine Hansgrohe cartridge is trusted by thousands for reliable, long-lasting performance.


| ASIN | B0017VFUO2 |
| Batteries Required? | No |
| Batteries included? | No |
| Best Sellers Rank | 93,744 in DIY & Tools ( See Top 100 in DIY & Tools ) 162 in Tap Cartridges 320 in Shower & Bath Taps |
| Colour | Multicoloured |
| Customer Reviews | 4.4 4.4 out of 5 stars (1,696) |
| Date First Available | 18 Aug. 2009 |
| Included Components | Ceramic cartridge complete M3/ M2 |
| Item Package Quantity | 1 |
| Item Weight | 115 g |
| Item model number | 92730000 |
| Manufacturer | Hansgrohe |
| Material | Chrome |
| Measurement System | Metric |
| Number of Pieces | 1 |
| Number of handles | 1 |
| Part Number | 92730000 |
| Product Dimensions | 17.02 x 12.19 x 5.84 cm; 115 g |
| Size | One Size |
| Style | Cartridge M2/M3 |
| Usage | Inside |
R**P
Quality part
Excellent genuine Hansgrohe part to fix dripping tap. Easy to fit with the right tools and did a perfect job. Recommended.
K**N
A safe bet
Decided to go for this genuine replacement part rather than taking a risk on a cheaper alternative. Works great - tap returned to normally smooth operation. Recommended if a bit pricey.
S**N
Expensive but works
These are easy to replace but you need to have the branded versions to get the proper fit. Pity as non branded versions if they fit are a lot cheaper.
M**P
Instructions are great. Dead easy to fit.
Great value and great original product. You’ll need a shifting spanner to loosen the large nut holding the cartridge in place and a small pair of pliers to lift out the decorative nut cover and that’s it tool wise. The part comes with the Allen key you need to loosen the tap from the cartridge. I’m thrilled.
A**E
Replacement valve
My basin mixer tap is fifteen years old but had been dripping for a while so I checked and found that it was fitted with one of these valves. I compared the old and new valves before actually replacing it (see photos) and found a few differences with them, with the new one being a little smaller and having a plastic neck rather than brass. The design of the tap means that those points are irrelevant however, and the new valve fits and works perfectly. The drip has now gone and I'm hoping that this new valve will last as long as the original.
I**R
Great Cartridge
Quality
D**R
Easy swap
Direct manufacturers replacement
A**R
Needed replacing again in less than 2 years
Bought this In September 2023 to fix a stiff tap, and it was easy to replace and worked well. However, less than two years later, it needs replacing again as the tap is dripping. I expected it to last longer.
J**S
Easily to install. Simple design.
S**O
First, I bought this cartridge because, after 9 years of use (installed in 2012), the faucet handle had become stiff. Used to rotate easily and the water turn on easily. Over the course of the last couple of weeks it had become increasingly difficult. (Kudos to the Amazon Q&A for this cartridge which said it cured this issue, which, indeed it did.) Second, I got to this cartridge through the Hansgrohe spare parts web site, although I must say it is a bit difficult to navigate and be assured this cartridge will fit an old fixture. It would seem, however, that this cartridge is a somewhat universal one which fits MANY Hansgrohe products. Third, the installation. Have attached a picture of what my faucet looks like for reference. It took me, probably, a half hour to install. It should have taken under 10 minutes. The directions are like Ikea directions. Pictures, no words. Except the pictures are only marginally helpful. 1) With the handle straight up (like is shown in the picture) mine had a small rubber plug in the base right next to the handle. Pull it out. If it falls in, not to worry as it can be retrieved as soon as the handle is off. 2) If you get a flashlight and peer into the hole with the handle rotated out just a bit, you'll see a hex recess for an Allen wrench. Contrary to what I thought I saw when I ordered, one is not included. However, from putting together a number of pieces of Ikea furniture and other "some assembly required" items, I've accumulated a wide variety of these wrenches. One fit just fine. Because of the way the handle is attached, the screw only needs to be loosened a full turn, maybe two. Pull the Allen wrench out & the handle comes off easily. 3) Next to be removed is a beauty ring. The directions indicate it unscrews. Nope. Press fit. There is a large "O" ring underneath this ring and, pretty much, just put a little off-center pressure on it (or grab it with one of those tacky unscrew jar lids pieces of rubber) and it will pop right off. (this is where I find the directions VERY misleading) 4) At this point, make sure the water is off. Once the beauty ring is off, there is a large threaded nut. If you have a humongous box/open wrench use it. Most homeowners do not. A pair of water-pump pliers (angle head slip joint pliers) easily do the job. (A regular pair of pliers will not open far enough for this nut.) 5) Once the nut is off, just pull the cartridge out. 6) Be sure to peer inside the hole where the cartridge came from and remove the fancy green washer which is probably stuck to the faucet body and did not come out with the cartridge. Just reach in and peel off with a finger. 7) Take note of the balking feature of the cartridge -two small cylindrical protrusions/pegs on the bottom of the cartridge. There are holes in the faucet body for these to fit into. They locate the cartridge in the proper orientation. 8) Put the cartridge in the faucet body. It will "seat" when the pegs are in their respective holes. The hex head retaining screw should be facing roughly toward you. 9) Hold the cartridge in place and screw in that big nut. Make sure the cartridge is properly aligned before trying to tighten down the nut. You'll feel it drop into place when in the proper spot. 10) Tighten the nut firmly but don't over do. 11) Pop the beauty ring back on. 12) Slide the handle on & tighten the retaining screw with the Allen wrench. 13) Insert the little rubber plug & turn the water back on. Despite what the product write-up says about a licensed plumber, absolutely not necessary. Only reason a plumber would be needed is if you break off the water turn off valve. I spent the majority of the time a) finding the right size Allen wrench and mistakenly thinking the retaining screw is a normal set screw. b) trying to unscrew the beauty ring rather than just popping it off. c) scratching my head over the directions and doing what they say, visiting pro.hansgrohe-USA.com, which is an absolute waste of time as putting in the cartridge part number brings up everything but. This is an expensive spare part but, considering it is the heart of a very expensive faucet, replacing it saved replacing the faucet which would have taken far more time and aggravation was worth the $40. And Amazon got it here in 2 days.
M**O
cartuccia perfetta grazie mille
D**F
Nach langer Nutzung tropfte die Originalkartusche vom Wasserhahn nach dem Abstellen. Bei HANSGROHE gab es Ersatz. Der Einbau war sehr einfach (Wasserpumpenzange hat fast jeder im Hause, der Sechskantschlüssel war beim Ersatzteil beigepackt). Am schwierigsten war noch der Ausb au der defekten Kartusche, da die Schraubgewinde naturgemäß verkalkt waren. Der Wasserhahn funktioniert wie neu.
H**T
ok ...
Trustpilot
2 weeks ago
2 weeks ago


