
DOWNLOAD THE APP


Customer Services
Copyright © 2025 Desertcart Holdings Limited
DOWNLOAD THE APP


🕰️ Own Time, Build Legacy: The Steampunk Clock Puzzle That Ticks with Your Style
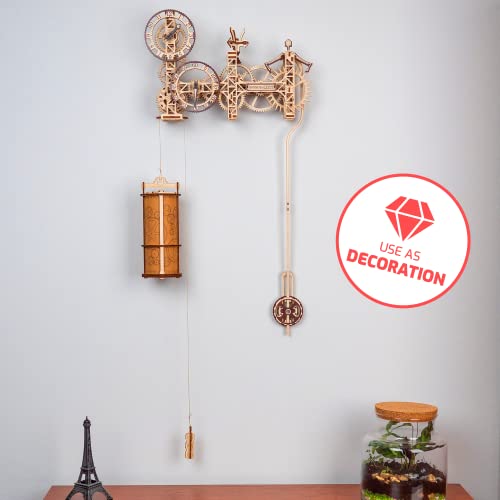
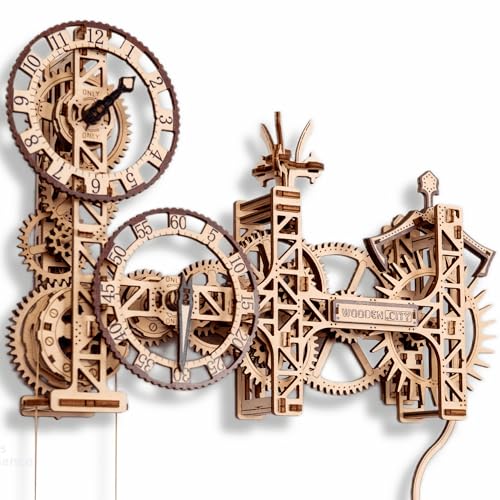
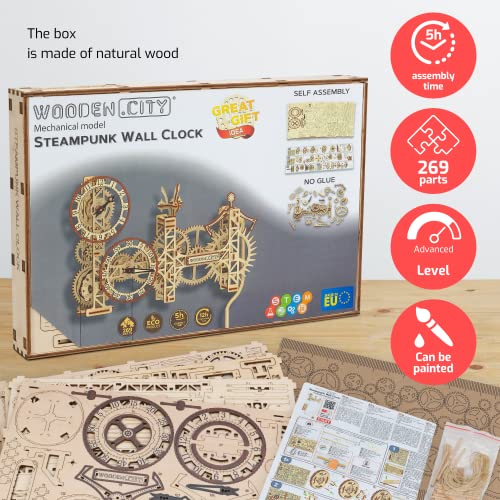
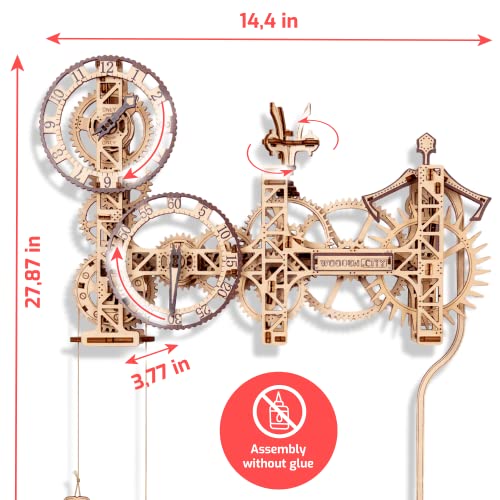
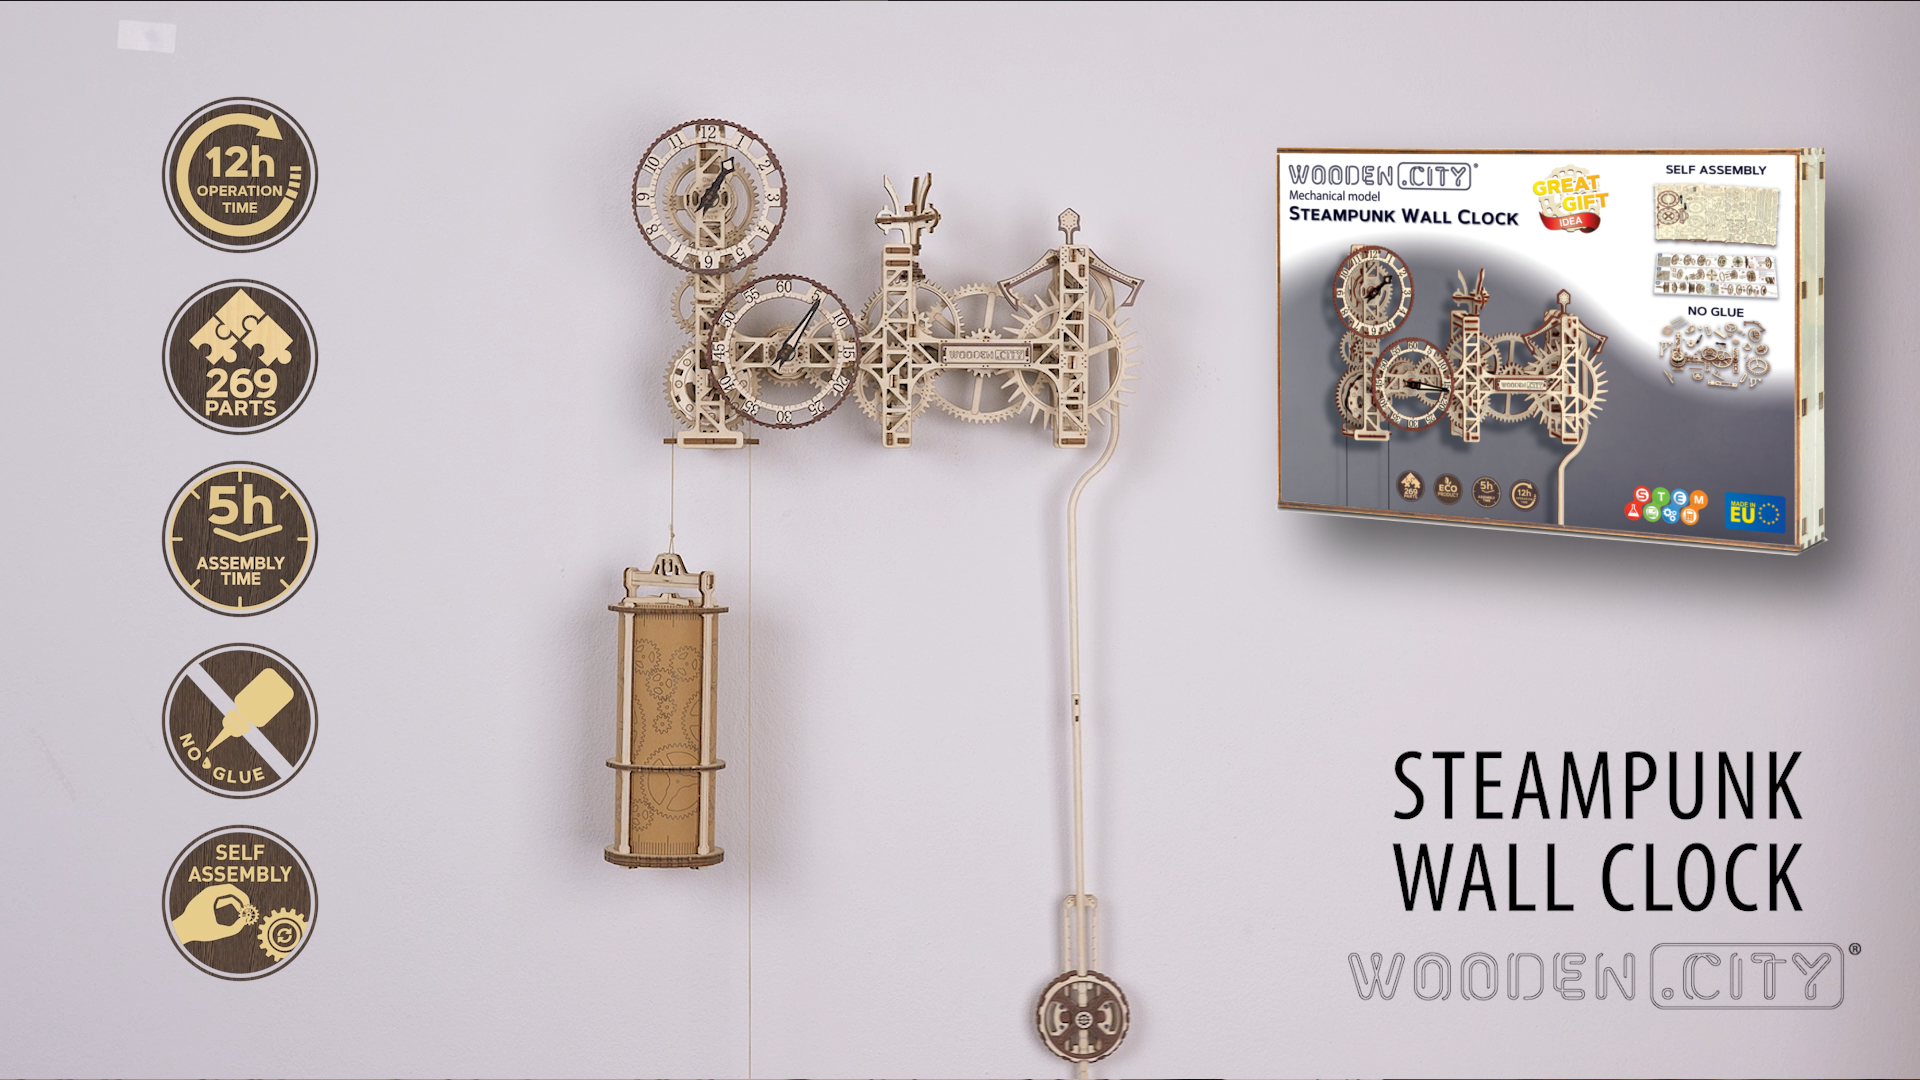
The WOODEN.CITY Steampunk Wall Clock is a 257-piece 3D wooden puzzle kit designed for adults and teens, featuring precision-cut birch pieces that assemble without glue into a fully functional mechanical pendulum clock. This eco-friendly kit offers a 5-hour engaging build experience that educates on gear mechanics and pendulum physics, resulting in a stunning, customizable wall clock powered by a weight-driven mechanism.


| ASIN | B0BH4VKX3T |
| Assembly required | Yes |
| Assembly time | 5 Hours |
| Batteries required | No |
| Best Sellers Rank | #156,792 in Toys & Games ( See Top 100 in Toys & Games ) #1,077 in 3-D Puzzles |
| Customer Reviews | 3.9 3.9 out of 5 stars (313) |
| Included Components | Laser‑cut wooden parts; wooden gears; pendulum; clock mechanism; clock hands; waxed cord; rubber bands; axles; candle; sandpaper; paper; spare parts; instructions |
| Is Discontinued By Manufacturer | No |
| Item Weight | 1.87 pounds |
| Item model number | WR352 |
| Manufacturer | Mobimods |
| Number of pieces | 269 |
| Product Dimensions | 14.33 x 3.78 x 27.87 inches |
| Warranty Description | 1 Year Warranty Against Manufacturer Defects |
B**R
Great project. Here are some tips.
I enjoyed this kit. I have spent a little time afterwards to reverse engineer the design and that was both fun (for me) and educational. One of the complaints I read upfront was that the documentation is mostly all pictures. That's what we get when people start complaining about things not being in their language. If you get this wonderful clock I have a few pointers. * There are 4 boards from which you remove the individual numbered parts. The parts themselves are not numbered. The number is beside the part and remains with the board. So do not remove parts until you need them or otherwise write the part number on the part. You might spend a lot of time comparing pieces to their pictures. With my kit some were already loose from their board and presented a bit of a challenge in keeping them straight. * One of the part boards has holes to help you locate the screws for mounting the clock on the wall. So do not discard those boards prematurely. It will help to use a level on the board too when marking the screw positions. That isn't mentioned. The clock has a provision for leveling. It does need to be level. The 'tick' and 'tock' need to be evenly spaced in time for the escapement to work efficiently. * With each major step you put together a sub-assembly such as one of the several gear pairs with axle. Label the assembly before you set it aside with the range of part numbers used in it. Later in the instructions they show you where to install the sub-assembly and you will have fun trying to figure out which is which unless you tag them. * There are errors in the instructions so be careful to match the parts with the pictures. There were but a couple of errors and they were obvious. Like for instance noting the wrong range of parts for one of the sub-assemblies. * A weight powers the clock and friction works against you. Wood is porous and wood rubbing against wood creates a lot of friction. You are instructed to rub various areas of the gears and axles with (cold) wax. This fills the surfaces of the wood and greatly reduces the friction. Do not leave wax chunks or excess residue on the parts. This is an important step. You don't want to later disassemble the clock (which you can do) to have to lubricate critical areas. * Once you are ready to go be prepared to add a little more weight than recommended to get things running. The clock will not at first run for very long before stopping. Make sure that each gear lines up with the adjacent gears appropriately and that no parts are contacting the frame where they shouldn't. Make sure the clock is level. Once you get it to run for an hour or so back off on the weight. Once broken-in the clock will run nicely on the recommended 0.55 kg weight. I will even try less as things progress. * There are 3 clutches in the design. One beefy arrangement allows the weight to be raised for rewinding. Two more subtle clutches free the minute and hour hands so they can be set using a clockwise motion. These are interesting. There is also a thumbscrew thing that helps in leveling the clock. That is a nice feature. * You can decide whether the clock is running slow or fast. If it is running fast lower the weight on the pendulum. Use your stopwatch app and time 100 swings of the pendulum. That should be just a small fraction over 132 seconds. Yes, I figured all of the gear ratios. The weight drops about 4-1/4 inches per hour and (provided you mount it high enough on the wall) the clock will run for 12 hours from fully wound. * You will need a beer/pop (soda) can to fill with sand for the weight. It is not visible (but could be). Um, I used an empty 60 Minute IPA just in keeping with the time motif. An additional ongoing source of empty cans can be helpful during the testing phase.
A**G
Nonfunctional but...hoping for success!
My husband loved this project although it was quite difficult to complete. However, after multiple attempts and approaches, he could not get the clock to work. We would have rated it much differently, had it been functional. ****Amendment- I have to upgrade my star rating on this item, based also on the customer service. I did my initial review, and was very pleasantly surprised that the seller followed up with me. They quickly sent a replacement puzzle, in the chance the issue we had was a manufacturing issue. They were pleasant and efficient. My husband is excited to have another shot at this fabulous creation!
T**R
Fun
)
J**K
Major frustration
I consider myself pretty good at the wooden puzzles. I put together Rokr pinball. Quite a project. It works well. This one, not so good. So we start. It doesn't actually come in a box. There are wooden sides that come apart. It took a while to figure that out as I didn't want to damage anything. Directions are on one sheet rather than a booklet. You open it up and it takes up the entire work space. You have to keep folding it different ways to make it small enough to not get in the way and still be readable. Directions are not always clear. Numbers not always easy to read. The pieces would sometimes fall out on there own. That wouldn't be too bad if the numbers were printed on the pieces. They are not. They are on the wood next to the piece. Thus I had to use tape to label them. Other times they were very difficult to get out. One even broke in the attempt and had to be glued back together to use. At one point directions were so obscure I had to email customer service for help. The sent a link to a video that had the entire assembly, some 4.5 hours! Some fast forward, back and forth and I found what I needed. Assembly time is longer than you might think. One afternoon I spent about 3 hours and didn't add a single new piece. I was just trouble shooting and trying to get the gears not to fall out. The axle was too short. I had to use a longer one and cut it down to the right size. Fortunately there was an extra one. And, of course, when finally finished, it won't run. So, I may try some trouble shooting or maybe just give up and go back to Rokr. If you buy this, I wish you good luck.
D**.
Entertaining project but couldn't get it to run.
The was a fun project to put together. It was a real challenge to get all the gears in on the final assembly because I'd get several of them in and with the next one a previous gear would fall out. Once it was together it looked great. I set up the weight and tried to get it running with no luck. I added more weight using but could not get it to work consistently. That's disappointing but it does look great on the wall.
B**R
Great & fun project!
This was my first 3D puzzle and it was a very fun project. I read all the reviews before ordering and it helped with needed advice to speed construction and avoid some mistakes. Initially my clock would only run a few minutes and I had to lightly re-sand some gear teeth and re-wax. It has been running for 3 days now with a little more than the recommended weight and keeping pretty accurate time. I have thoroughly enjoyed the time I have spent constructing this clock and plan to build the UGEARS Aero Clock next. I highly recommend this puzzle.
S**5
Love this clock!
Bought this for my 8yo son for Christmas to work on together. Took us about two months of occasionally working on it, but we did it! He would figure out what needed to happen, pull the parts, try to fit them together, and then I'd help with the force sometimes needed to get the parts to "click" (and QC his work!). But in the end... It's working! And we both love it! Took a little more weight in the ballast than the plans call for, and (pro tip) make sure to REALLY clean out the little wood nubs left within the gears from where they attached to the wood sheets... But this clock has been running for close to a week now. Finally have the pendulum dialed in to keep nearly perfect time! It's awesome, and he is so proud of it!
R**.
Arrived as described. My delivery problem on this item was satisfactorily and professionALLY resolved. Thank you.
I**T
Ik heb het gekocht met spijt
L**E
Comme décris, c'est un cadeau donc à voir au montage apres
C**T
Great entertaining
J**C
Es perfecto pero parece que el tipo de contrapeso que requiere no es el que ellos dicen, necesita mas, sino se para, seguire buscando que no sea otra cosa el problema.
Trustpilot
2 weeks ago
2 months ago