
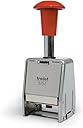


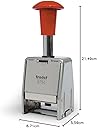
Trodat 5756 Numberer Self Inking Metal Sequential Automatic Stamp
Product ID: 48208471
🔄0-6 or 12 repeats per number
🔢6-digit sequential numbering
🖤Built-in self-inking pad
🔢 Stamp your success with every number – never miss a beat!
The Trodat 5756 Numberer is a professional-grade, self-inking sequential stamp featuring 6-digit numbering with 5.5mm tall digits. Its metal frame ensures durability, while the built-in ink pad offers mess-free, compact operation. Ideal for office or warehouse use, it repeats numbers 0-6 or 12 times before advancing, streamlining document organization and inventory tracking.

| ASIN | B000VE6LMG |
| Best Sellers Rank | 290,878 in Stationery & Office Supplies ( See Top 100 in Stationery & Office Supplies ) 2,168 in Stamps |
| Brand Name | Trodat |
| Customer Reviews | 3.8 out of 5 stars 133 Reviews |
| Global Trade Identification Number | 00092399866244, 05016844081063 |
| Item Dimensions L x W x H | 6.8L x 5.5W x 21.5H centimetres |
| Item Shape | Rectangular |
| Item Type Name | Office Numbering Stamp |
| Item Weight | 250 Grams |
| Manufacturer | Dormy Ltd |
| Manufacturer Part Number | 286873 |
| Manufacturer Warranty Description | 30 days. |
| Material Type | Metal |
| Maximum Supported Lines | 1 |
| Model Number | 286873 |
| Size | Large |
| UPC | 092399866244 |
| Unit Count | 1.0 count |
A**R
Didn't work had to return it
Faulty product
C**N
Easy to use and no mess.
Does the job. Numbers not always clear to read.
M**Y
Recommend seller
Good quality would buy again
B**.
This product does not work correctly
I bought this product to number some forms I have. It is useless because it fails to print the second digit. You will also find that it is exactly the same as Rexel Automatic Numbering Machines Black Gothic (4.5 wheels) which has the same fault.
M**Y
Does the job
A bit fiddley, but does the job well.
M**G
Good product
Delivered on time, and packaged well. Good product in general but found it slightly bulkier than others I have used. The push lock mechanism is very hard to undo. Has the same nagging faults as others in regards to inking on certain numbers, don't know why but some numbers ink and print better than others. Haven't found one that is equal on all numbers required so far though.
T**5
Perfect for the job
Does the job. Well made and easy to use.
A**C
PRELIMINARY REVIEW, instructions and mechanics (written by someone informed)
This is weirdly long. I might add some labeled pictures - hopes this helps someone, any tips on what's "too detailed and can be removed" would be great. I don't mean to assume you're all idiots! CHANGELOG: 20th Sep 2017: added labelled picture of mechanism, stamp is in the lowest position (pressed against paper) At the bottom I describe in detail how it works for those curious. I've written it now, so may as well keep it, at the top the problems - I'll see if I can get a way to consistently get good results out of it yet. Below that operating instructions. PRELIMINARY REVIEW: I don't know how to say "I have experience with stamping apparatus" without sounding like a tit, but I know realistically what to expect, how it works.... you get the idea. This stamp is able to print a configuable number of times before incrementing the value printed, that is: 1, 2, 3, 4, 5, 6, 12, 20 and "infinite" (the 0 setting) 20 isn't listed, at the bottom I explains how this works, there isn't a printed 20 but the setting and everything else is there. MECHANISM PROBLEMS: This stamp is identical to: Reiner Auto Numberer B6-6 Wheel - 5.5mm print in all but the base the handle and any stylings, the mechanism is IDENTICAL, construction wise and material wise. Unfortunately that means it has identical faults, the wheels are metal (cast aluminum) and are mounted without any "give" at all. Most stamps are rubber, this lets you press down and "mash" the stamp against the paper ensuring a good contact, metal doesn't do this and it means many digits don't transfer properly, For example suppose the 6 digit on the 10s wheel (like mine) is not as deep as the adjacent "1" and "5" digit (to print 165) it means the "6" will make poor contact and it shows. As a result of this the exact conditions of what you're trying to print on can make a huge difference, one sheet on a table will yield a very poor results, the more "spongey" the surface (eg a thick pad of paper) the better the results. I need to conduct a proper test, because some of the worst results were any number with "6" as the 10s digit, I'll do that later. ----------------------------------------------------------OPERATING INSTRUCTIONS------------------------------------------ The instructions are crap and there are a few lies (it implies something bad will become he who doesn't buy authentic Trodat ink) hence: The front side is the side with the black slider selecting copies and the rear side is the opposite side to this, with the cover. REMOVING REAR COVER: Just put a finger underneath the cover and pull away from the unit, it's a clip and DOES NOT come off from the top PLACING REAR COVER: Hook in at the top then press the bottom until it clips. THE TOP DOES NOT CLIP IN - it must go in first and come out last POSITION LOCK: With the cover removed there is a metal tab on the centre top of the rear side - it may be hard to tell it's not the cover, so remove if needed. It's still functional with the cover in place. TO LOCK IN HIGH (STORAGE) POSITION: Press the tab into the body of the stamp (little force is needed) and push the plunger slowly. You will feel the tab suddenly slide in, the lock is engaged. TO LOCK IN LOW (SETTING) POSITION: Push the plunger all the way down, then hold the tab, slowly let the plunger rise, just above the "full press" position it'll fall into the lock. BOTH OF THESE LOCKS are strong in the rising direction. this means you will not pull the plunger to disengage the lock, BOTH OF THESE LOCKS ARE WEAK IN THE DOWN DIRECTION - to release the lock push the plunger down, the tab will pop out with little force. The storage position doesn't put any force on the inkpad, if it's left for a while with force applied the ink will leave the part under pressure (the part pressed against the numbers) and go to the areas of least pressure - obviously this is bad. ---------SETTING (practice this before putting the inkpad in) CAUTION: the manual says to lock the unit low, but if you have it upside down to set and push a bit to hard the lock will come undone and the spring will make the unit snap into its long form. The ink holder comes down and may damage the "stylus" or hurt your finger or something INSTEAD: If you can use your non-dominant hand to hold the unit compressed, thumb on the short side opposite the printing wheels and ring finger and little finger (or just your little finger) behind the plunger keeping the unit compressed, this exploits a natural "thumbs up position" rather than bending your middle finger and risking hurting it if the unit extends. Alternatively use your leg, put the plunger (red handle) against your leg and just push with your non dominant. I prefer the leg way because you can then control the unit, letting it stamp a few times without putting the stylus down. With the unit compressed: 1) PUT ON "0" setting - to do this (with the unit upside down) put a finger behind the settings slider and nudge it away from the body of the stamp then move the slider to the 0 position (this is the end most, so "all the way" basically. The slider can get caught, which is why you need to pull it away from the wheels first. Now the unit is on 0 you can let it "uncompressed" and compress it without changing any of the wheels. So you can let go! When setting ANY wheel, the blank position (just before 0) counts as a "0" - that is you can use "0" or "blank", both will work. I use 2 blanks then 0s for my starting, so I get codes 0001 0002 ... so forth. We now have some options: If you want it to increment on every count you can have any starting number you like - go to 2A If you want it to increment after 2 or more copies and NOT start from 0 go to 2B The instructions suggest that you can align the black wheels so that it will "work" - this is unreliable as there's little room for small errors in where you line up the disks. My method works. If you want to start at 0 and increment after 2 or more copies you need to use the 0 mode to print all your 0 documents, and then set it to 1 using guide 2B. 2A) With the unit compressed set the wheels to your start number (INSERT INKPAD if doing this "for real") 3A) let go of the unit (so the stamp goes back up into the body) 4A) put the stamp upright on a desk as it would stand normally. 5A) press on the black control slider (that is currently set to 0) so it comes away from the wheels and move it to the "1" position The stamp is now ready, when you press down now it will print the digit you set it to, as it rises after printing it will increment to the next number. Remember to store the stamp put it back into 0 and leave on the high/storage lock as described above. ----B GUIDE--- REMEMBER: This does not work if the number you want to start with is 0, setting it to all 9s if you want 0 will only work if you want no blanks. If the ink isn't in already, you can put it at step 6 2B) With the unit compressed and the slider in the "0" setting set to the number before the number you want. For example to start at blank blank 0001 set it to blank blank then 4 zeros. 3B) Let the unit rise. 4B) With the stamp in its "idle" or "natural" extended position press on the black control slider (that is currently set to 0) so it comes away from the wheels and move it to the desired position (eg 3), to achieve 20 copies move it to the notch between 4 and 5 5B) now look at the bottom of the stamp (as you did to set it) and slowly push it down (BE SURE TO PUSH ALL THE WAY - otherwise it may partially engage and move the wrong wheel - this occurs often with the 0 position weirdly) then let the stamp go back to its extended state, as the numbers rise if no wheels move once it is fully extended, repeat this step If as the stamp rises you see the number change let it rise to the top. If you have ink in the stamp you are done, it will now print your starting number the set number of times before incrementing. If you need to put ink in go to step 6 now. Remember if you want to lock your stamp for storage to put the slider on "0" first, this way the act of pressing it to lock it doesn't increment the counters. 6B) The stamp will now print the number shown (your first number) the amount of times you've set it. To stop it counting anything with the stamp on a desk in it's usual position push the control slider back to zero as done before so it doesn't increment or count. Now put the stamp back on your leg or whatever so it's upside down and compress it so the wheels come to the end. Put the ink on the "metal shelf" which should be parallel with the edges of the body on the side opposite to the control slider. The ink pad simply clips in, be sure to have the pad side on the metal wheel side. Then let the stamp extend and put it on a desk 7B) Pull the control slider out and set it to the desired number of copies as before. The stamp is now ready, when you press down now it will print your starting number and it wont increment until it has printed a set number of times. Remember if you want to lock your stamp for storage to put the slider on "0" first, this way the act of pressing it to lock it doesn't increment the counters. TO CHANGE THE COPY NUMBER: When the stamp rises and you feel it move the metal printing wheels the stamp "knows" it has printed 0 copies of that number and will print the set number of copies correctly. Use this and a pen to number your documents correctly here, or set it to the number before and wait to feel it increment to the number you want, then it is set up. The settings 2 3 4 and 5 have their own wheels, so if you say use 5 copies, this will leave the "2 copy" setting as it was. The settings 0 and 1 do not affect any of the wheels The setting 6 uses the 2 and 3 wheels - but will not affect the 4 or 5 wheels The setting 12 uses the 3 and 4 wheels - but will not affect the 2 or 5 wheels The setting 20 uses the 4 and 5 wheels - but will not affect the 2 or 3 wheels You can use this to "set all the copy counts to 0" thus allowing reliable change of the numbers. ----------------------------------------------------------HOW DOES IT WORK?---------------------------------------------------- MECHANISM WORKINGS: The side-most printing (metal) wheel is the "units wheel", then the "tens wheel" then the "hundreds wheel" and so forth. The control wheels are the black plastic ones, these are described later, there are 4 control wheels then what we shall call the "void" then the edge of the stamp. The other side of the 4 control wheels is the highest printing (metal) wheel. The control wheels have "cavities" in them, and also little bumps. A metal bar we will call "the incrementor" goes across above all the printing wheels, it has the black slider to choose copies on it and the printed "0 1 2 3 4 5" and the "6" and "12" digits on it. The incrementor has 6 metal teeth, the longest is just to the side of the units wheel, these get shorter and there's one for each wheel. The incrementor bar has 2 positions "raised" and "engaged". There's a spring trying to pull it against the wheels (the engaged position) The black plastic "slider" sitting on this incrementor bar has a large tooth (larger than all of the incrementor's teeth) on it's far-left (away from the digit window) we will call this the "control tooth". MECHANISM ACTIONS: The incrementor bar is constantly being pulled against the wheels by a spring. If the control pin is allowed to drop (into the cavity of the black plastic wheels or the void space) then the incrementor bar engages. The largest tooth contacts the "units" printing wheel and as the stamp rises pulls that wheel round 1 position. If the units wheel just printed a 9 then there's a cavity in the units wheel that lets the incrementor tooth drop deeper, this causes the tens incrementor tooth to make contact with the tens printing wheel pulling it forward. The tens wheel has a cavity after the 9, so the incrementor can drop even further and engage the hundreds wheel (and so on so forth, this is how it rolls over from 9 to 10) In the "0" position of the slider (left most) the control pin is held up by a physical bump. This never lets the incrementor bar make contact and thus the digit printed never changes (you'd set it manually) In the 1s position the control pin is over the "void" (the gap between the side and the black plastic wheels) this means the incrementor bar ALWAYS engages and thus always increments on every stamp. The 2s position puts the control pin over the outermost control wheel. The control wheels have little sharp bumps on them. When the incrementor bar is pulled by the spring against the wheels the control pin is wedged under this bump, as the stamp rises it pushes the wheel to its next position. If the control pin falls into a cavity on the control wheel this engages the incrementor bar and the number is incremented. As the stamp rises the control pin pushes the control wheel forward because it's stuck in the cavity. The 2s control wheel has a gap every every bump. This means as the stamp rises if the control pin engages a bump it's holding up the incrementor bar and the digit stays As the stamp goes down the next time the control pin moves over the bump and along the wheel then at the bottom of the stroke (when the printing wheels are just above the paper) the control pin falls into the cavity engaging the incrementor bar. As the stamp rises it then increments the value and moves the control to a non-cavity position. As it goes down next time the control wheel stops the incrementor bar from engaging, at the bottom the control pin falls over a bump, as the stamp rises the control pin pushes the wheel around by the bump so next time it goes down over a cavity (which will cause it to increment) and so forth The 3s wheel has 2 bumps then a cavity. Say we are on 100, 100 is printed then it increments (over a cavity), we press the stamp down again and 101 is printed but the incrementor bar is disengaged, the control wheel turns, 101 is printed again and on the way back up the control wheel is turned, next stamp prints 101 again but now the control pin has fallen into a cavity, as the stamp rises 102 is set-up and pressed against the inkpad instead. Then the 4s wheel, 3 bumps then a cavity, and lastly the 5s wheel, 4 bumps then a cavity. To print say 6 times the the control pin is exactly between the 3 and 2 wheel. This means they'll both be turned as the stamp rises, but the incrementor will only engage if the control pin drops into a cavity, so a cavity must be lined up on both for the pin to fall in. If the 2s wheel is a cavity but the 3s isnt the pin wont drop and the incrementor bar stays disengaged. Suppose 100 is shown and both 2 and 3 wheels are at a cavity: We push down 100 is printed and the control pin falls into both cavities - engaging the incrementor so now 101 is pressed against the inkpad, as it rises both wheels are turned into a non-cavity position. We push down, 101 is printed and the control pin is held up by both wheels so the number stays the same, the wheels are turned so now the 2s wheel has a cavity but the 3s does not. We push down, 101 is printed and the control pin is held up by the 3s wheel, on the way up both wheels are turned so now 2 is a non-cavity and 3 is a cavity. We push down, 101 is printed and the control pin is held up by the 2s wheel, on the way up both wheels are turned so now 2 is a cavity and 3 is a non-cavity. We push down, 101 is printed and the control pin is held up by 3s wheel, on the way up both are turned so now the 2 is a non-cavity and 3 is a non-cavity. We push down, 101 is printed and the control pin is held up by both wheels, on the way up they're turned so now both are cavities. We push down, 101 is printed and the control pin falls into both cavities ENGAGING THE INCREMENTOR, on the way back up the both wheels are moved to their first non-cavity position and 102 is held against the ink pad. We push down, 102 is printed and the control pin is held up by both wheels AND SO ON 12 is done by the EXACT same concept but between the 3 and 4 wheels. A cavity in both occurs once every 12 turns The unlisted 20 is done by the 4 and 5 wheels, a cavity lines up only every 20 turns
S**E
Stempel für digitales aufräumen
Mein Mann ist begeistert, er archiviert jetzt alles digital und nummeriert damit alle Dokumente, die er aufbewahren muss. Nur den Preis für so einen Stempel finde ich zu hoch gegriffen.
J**L
Double check the number repetition settings
There's a 2, 3, 4, and 5 click wheels used for repeating before incrementing the number. Repeating 6 and 12 times is accomplished by having the notch hit the 2 and 3 wheels (2*3==6) and between the 3 and 4 wheels (3*4==12) There's also an undocumented 20 repetitions. Unfortunately, when I received mine and I tried it out, I find out that the #3 click wheel was added backwards and so it wasn't repeating 3 as intended. (which also effects the 6 and 12 repeats as well) Fortunately, it can be taken apart enough for me to flip the #3 click wheel around - BUT LOOK OUT FOR THE TINY SPRINGS AND LITTLE PLASTIC CLICK HOLDING PINS! Wouldn't want to lose those bits.
K**N
Buen Producto, tal cual ha descrito,
Buen Producto, tal cual ha descrito,
J**N
Perfecto
Súper practico si tienes que poner números a muchos papeles. Rápido y fácil de configurar. Se ve robusto y por ahora 0 problemas.
E**.
stamps clearly and font is a good size. It's easy to change the numbers and ...
Works very well, stamps clearly and font is a good size. It's easy to change the numbers and settings for whatever project is at hand.
Trustpilot
1 month ago
1 month ago