⚡ Elevate your space with smart shades that work as hard as you do.
The Rollerhouse Rechargeable Wireless Tubular Roller Shade Motor Kit transforms traditional roller blinds into smart, motorized window treatments. Featuring a rechargeable battery, wireless remote control, and sunrise/sunset automation, it offers easy installation and compatibility with various roller shades (excluding pleated and vertical blinds). Designed for 1.5-inch tubes and capable of pulling shades up to 8.8 lbs, this kit modernizes your home or office with seamless, eco-friendly convenience.


| Product Care Instructions | Spot Clean |
| Material Type | Plastic, Metal |
| Size | 1"W x 16"H |
| Number of Items | 1 |
| Item Dimensions L x W | 16"L x 1"W |
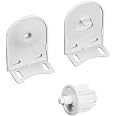
| Mounting Type | Inside Mount, Outside Mount |
| Control Type | Shade movement control |
| Water Resistance Level | Not Water Resistant |
| Additional Features | Rechargeable, Sunrise/Sunset Automation, Easy Installation |
| Closure Type | Motorized |
| Opacity | Blackout |
| Operation Mode | Electric,Rechargeable |
| Item Shape | Rectangular |
| Pattern | Solid |
| Color | Red |
A**R
Quality Product and Great Customer Service
I purchased one of these motors to test out as possible solution for several roller shades in our home. I have Rollease brand shades with light filtering fabric. I measured my existing interior shade tube at 35mm with a smooth interior. My shade was 70" wide and 84" tall (my largest shade). The motor is plenty strong to raise and lower the shade and is quiet - quieter than I expected - speed is good, not too fast and not too slow. The only modification I needed to make for my mount was to grind/cut down the mount bracket flat tab that inserts into the motor. If you don't have a way to do that, you could probably find and purchase a replacement bracket since the end is standard slotted - you just need to find the right size. It does have a couple different slots for different sizes, mine was too big.Installation was easy, take down shade which is a flip tab and lift out for mine and then pry out the old chain end clutch and slide insert the motor and rehang shade. Exact shade height doesn't matter as you are rehanging as you will set the top and bottom when setting the remote limits. The motor came with two additional grommets for slightly smaller/large tubes. I swapped to one of the other grommets that was a hair smaller that fit better for my shade. I removed a little retainer clip, swapped ends and reinstalled the clip - it might be a little tricky as the clip is small, a small regular screwdriver worked for me.I paired the remote prior to rehanging since it was easier to press the pair button when on the ground rather than when hanging up. I also charged the motor prior to starting installation so I was starting with a fresh full charge.Setting the top, bottom, and mid limit was very easy - you just need a paperclip to press the small set button on the remote. My complete install with remote programming and bracket modification was less than 30 mins and my next ones will be even quicker now that I have done it once. Depending on your specific shade, it could be plug and play for you or you might need some basic DIY skills. If it weren't for the bracket on mine, I probably could have done the install with no tools or maybe just a screwdriver.My original shipment didn't come with the remote as pictured but the seller was super responsive and shipped one out right away. They have also followed up several times to check in and make sure everything was ok - top notch customer service!Overall a great product and great seller. Worth the money spent and I will be purchasing several more based on this experience. Once I have everything setup, I won't have to pull shade chains on all my blinds twice a day, I can't wait!
J**O
Easy Install. Great Find
I was a bit apprehensive buying this given the varying degrees of difficulty people had reported. My experience was surprisingly simple. I was ready for cutting, grinding, and fabricated yet didn’t need to do any of that — the motor fit perfectly inside my tube, and the extra bracket assembly kit had an end plate fit perfectly on my existing brackets. I was able to take down my roller blind, insert the motor pulse end plate, and had it reinstalled in ten minutes. Here’s what I did1. Carefully measured my tube. It was 38mm2. Confirmed with seller the right motor to buy given my tube diameter and the metal tabs on the tube3. Bought the motor kit AND the mounting accessory kit. The accessory kit was mandatory for me to have the right end cap that would work with my existing brackets.4. Charged the motor battery5. Removed metal valence and popped out my roller blind. One end of my blind is a push pin and the other was the chain drive6. I pulled the chain drive out of the tube. Took a little force but it popped out7. I inserted the motor into the tube, rotating the motor so the rubber piece on the end aligned with my tabs on the tube. The motor slid in8. I made sure the charge port was facing down for easy access9. I found the end cap in the accessory kit. The black end cap whichworked with my existing brackets.10. I screwed the end cap in with the two screws. Many said the screws were too long. I didn’t find that to be the case11. I put the roller blind back into the brackets. The push pin allowed me to get the blind into the space while i worked on getting the end cap hooked onto my bracket.12, I tucked the antenna wire around back of the blind so it didn’t get clipped by the valence.13. Made sure the power port and remot program were facing down where I could access them14. I pressed the program button on the motor. It jogged twice. and then the c button on the remote. Roller and remote were now paired. And I could raise and lower15. I realized the motor direction was going the wrong way with remote. Pressing up caused roller to go down. Followed the instruction to reverse the motor direction. I held the limit button and stop button which reversed direction. Now remote worked correctly16. Programmed upper and lower limits per the directions17. Everything working flawlesslyMy test case worked and I ordered six more. Will update when done with the project. But so far…a big success and huge improvement to having the chain drive for so many rollersEdit:I ordered six additional motors and installed each. I did not run into any problems. Followed the sequence from above and all seven motors are programmed and workingI also purchased the 15 channel remote and linked each motor to the single remote. I can now control all seven from one remote with each window being on its own channelNext I purchased a BroadLink rm4 pro to connect the motors to an iPhone. I configured the BroadLink and added each shade to my hub. Bin each case, I went through the process of having the BroadLink learn the remote codes. And ultimately programmed open, close, and stop buttons. Now I can control each motor with my iPhone through BroadLink. I subsequently linked groups of shades to a BroadLink scene allowing me to control multiple windows at once. Even cooler was BroadLink allowing me to pair with Siri. Now I can say open living room shades and a block of four shades opens. Couldn’t be happier with the outcome. Have another five kitchen windows that I would like to automate in my next round. And my project will be complete.
L**.
Works great once setup. Information missing from listing about compatibility
I would give this product 5 stars if their instructions and documentation was better.Positives:1.) Works perfectly once setup. I have some Bali Roller blinds that I was able to hook these up to and they open and close automatically in the morning and evening without issue. Only took about an hour to setup After I had figured out all the frustrating bits about how you need to link them to a hub and found the right battery.2.) Their support is amazing and very friendly3.) Did not need to modify my existing blinds at all. They fit in the window and existing tube perfectly4.) No visible partsI had the following difficulties with the product:1.) No battery was included with the remote, and the remote doesn't say which type of battery it takes,and neither does the listing or instructions. For reference, the remote I got took a size 2450 button battery2.) While the listing says it can be controlled with an app and Alexa, it doesn't say how to set this up. I have not tried setting it up with Alexa, but I had to buy a broadlink RF hub and download the broadlink app. They were fairly easy to setup after this with intuitive instructions, although none of the "unofficial" rollerhouse presets worked. Luckily they have an option in the app to learn how to control the blinds by pressing the buttons on the remote in front of the hub.3.) Because there are so many different types, combos and listings, I at first thought they would come with the solar panels and mounting hardware, but they do say they are sold separately. Make sure you read everything closely, because there are a lot of "sold separately" notes
Trustpilot
1 month ago
2 days ago