Desertcart purchases this item on your behalf and handles shipping, customs, and support to Greece.
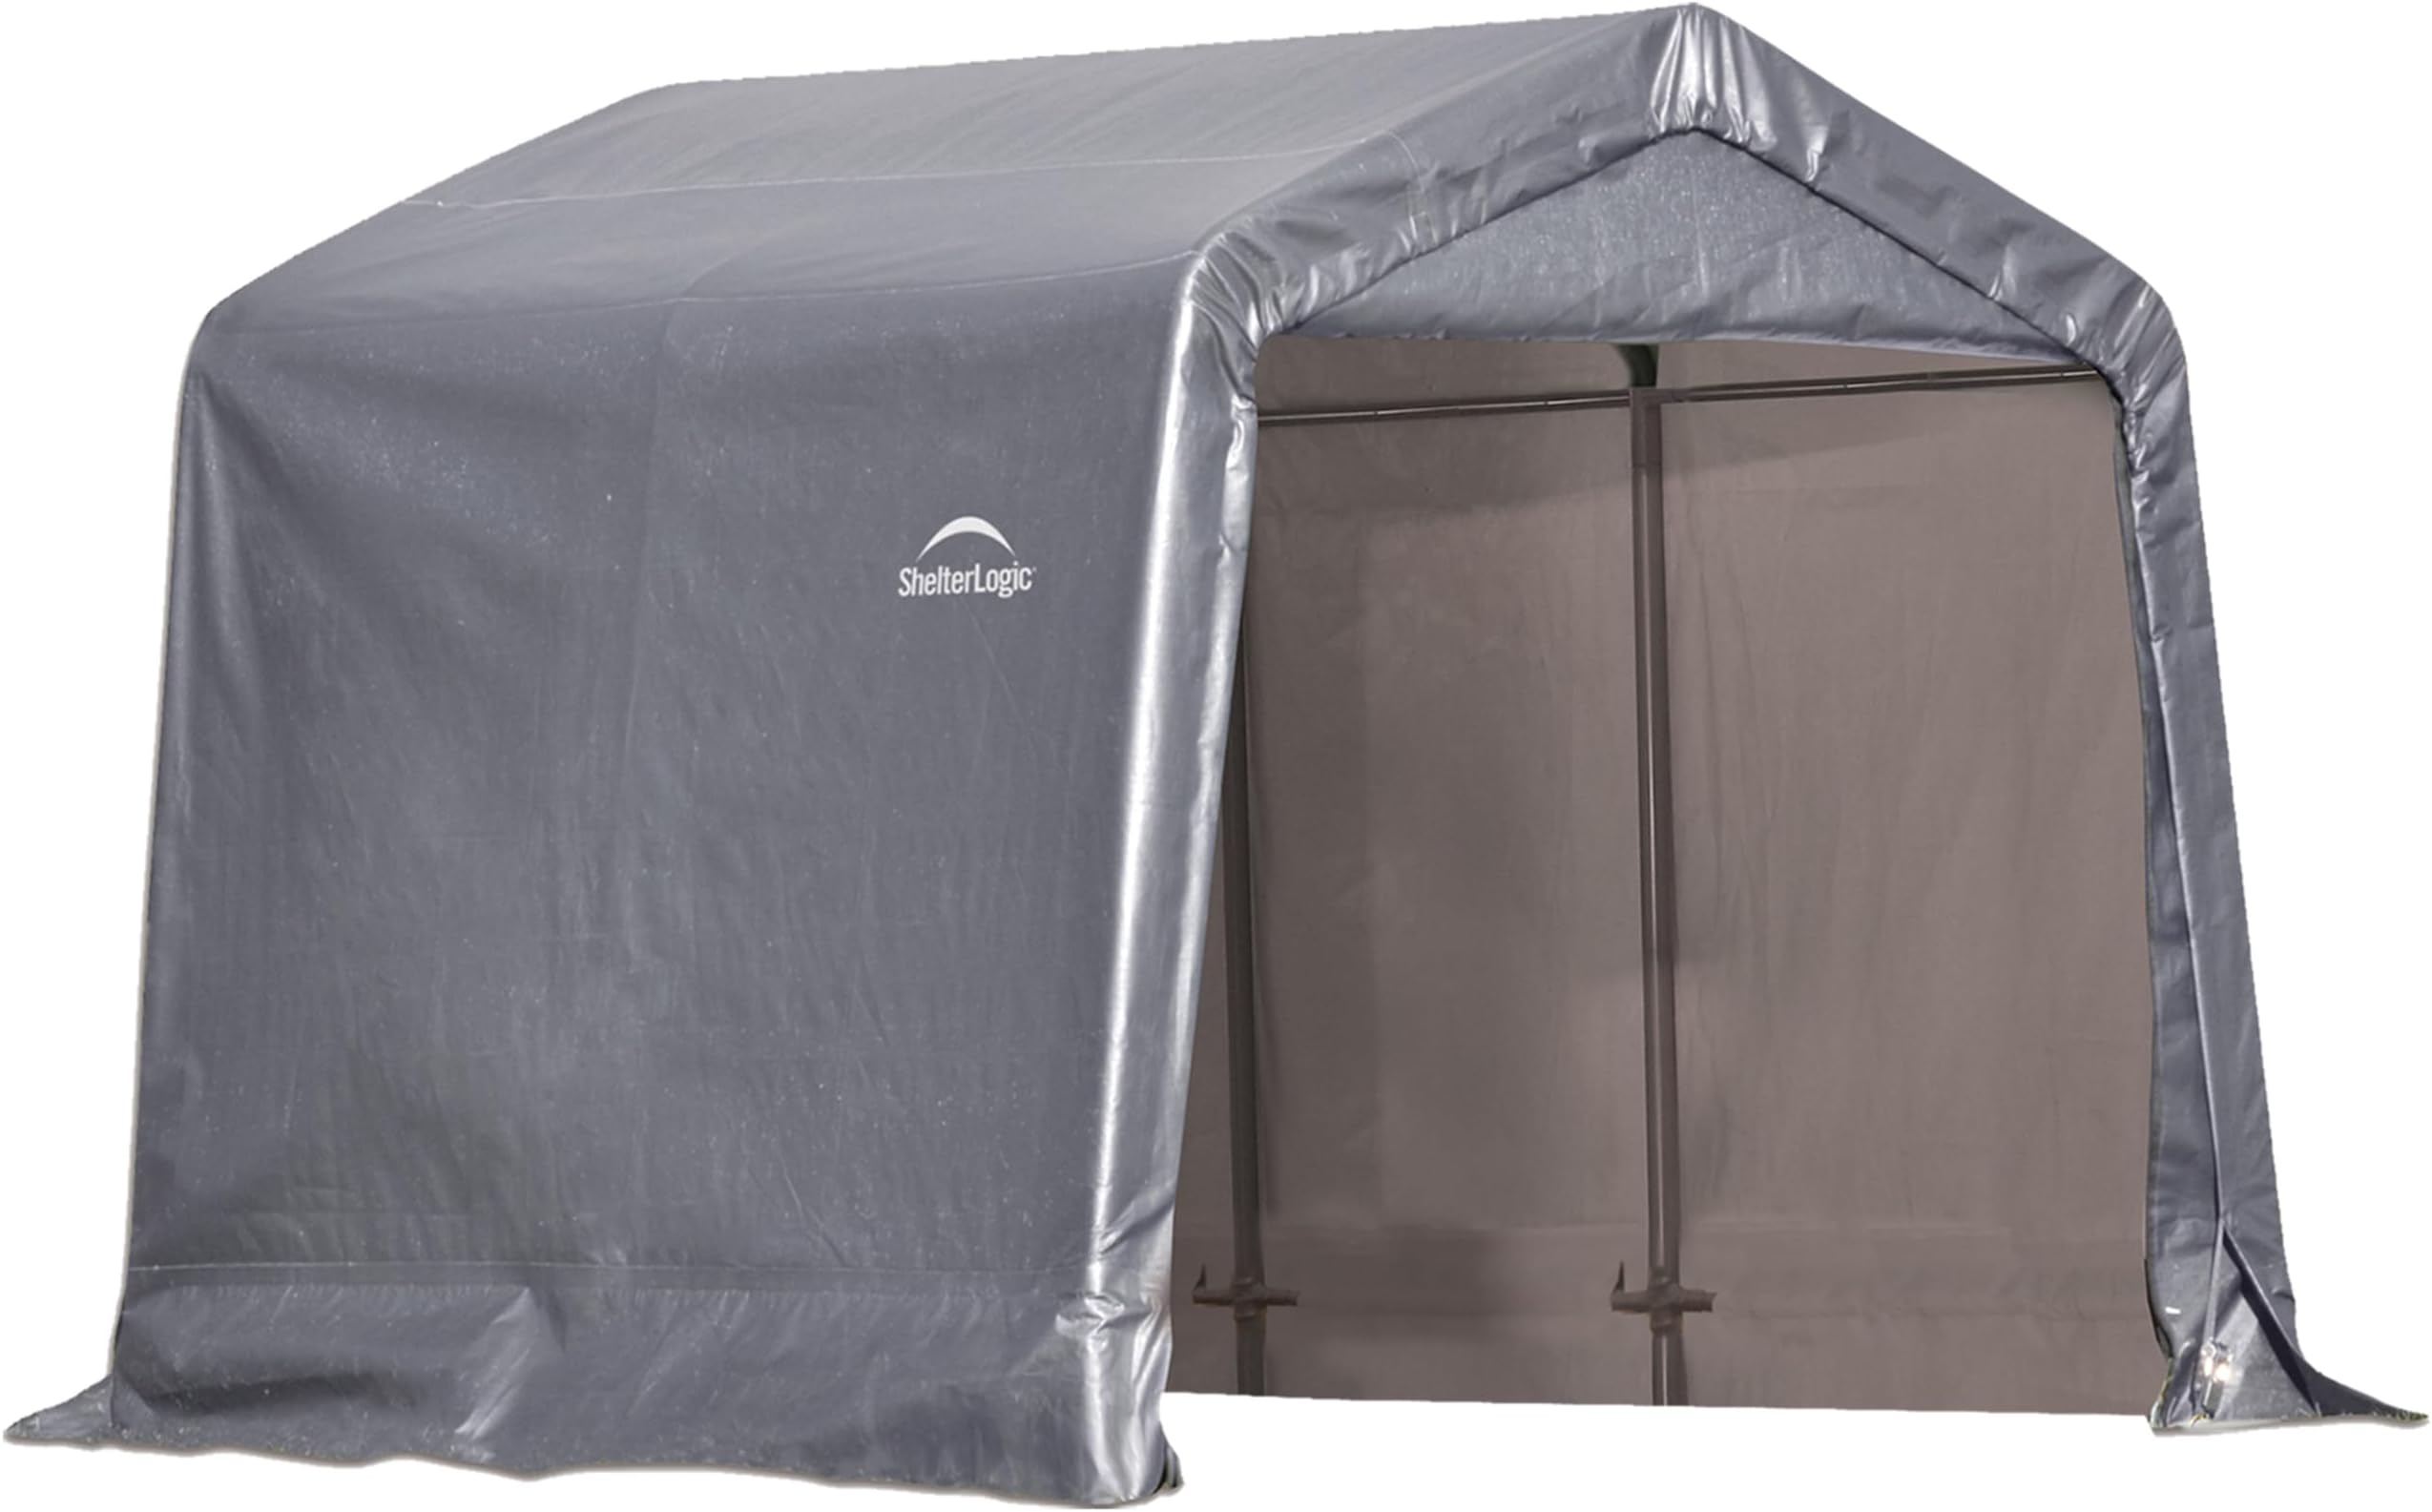
🏡 ShelterLogic Shed: Your all-season fortress for gear and peace of mind!
The ShelterLogic 8'x8'x8' Shed-in-a-Box combines a rugged alloy steel frame with a waterproof, UV-protected triple-layer cover to deliver a durable, weather-resistant outdoor storage solution. Featuring heavy-duty reusable auger anchors and an Easy Slide Cross Rail System, it offers secure stability and a perfectly tensioned fit. Designed for all-season use, its bright interior and zippered doors provide convenience and protection for your equipment, making it a smart investment for long-term outdoor storage.


| Base Material | Alloy Steel, Metal |
| Brand | ShelterLogic |
| Color | Gray |
| Door Style | Zippered Doors |
| Door Width | 57.5 inches |
| Floor Area | 64 square_feet |
| Item Weight | 31 kg |
| Material | Plastic |
| Material Type | Plastic |
| Style | Peak |
| Style Name | Peak |
| Top Material Type | Alloy Steel |
| Ultraviolet Light Protection | UV Protection |
| Water Resistance Level | Waterproof |
M**E
Not the easiest to set up, but solid and lasts for years.
This is my third Shelter logic shed. The last one I bought in 2008, gave to bro in 2012 and he's still using it. It's very faded, has some mouse holes in bottom, but he lives on a farm, and it's in direct sunlight most days. So based on that, when I needed a temporary shed for new mower while waiting on garage build...it was a no brainer. Again, instructions aren't the clearest, it's a PITA to put up (especially solo), you'll swear at it....but once up, you'll swear by it. Bro looks forward to getting this, new to him, shed in a few years :) I'll probably keep this, build it on a concrete base with a 4x4 bottom frame, 2 layers high, and keep it til I leave this blue marble. PS 6x8 would have been plenty for a lawn tractor.
S**.
Assembles fine, sure to last a long time!
Frist off, it’s a well-constructed unit with good quality parts. And assembly is straight forward; I did it myself in a few hours. The concern about it constantly falling apart during assembly was not my experience even though I did follow some of the recommendations to ‘tie’ it together. Was clear to me that these temporary ties were not needed due to the sung fit of the tubing. Here are the tips I suggest based on my experience in installing this at my seasonal campsite. Step 6: post squaring up the frame in Step 5, mark where to place the anchors inboard a about 4 inches from the corners at a 45-degree line from the comer. This way the anchors will (when attaching the securing lines) both ‘pull’ the frame side to side and front to back. Then move the fame over a couple of feet to install the anchors. New Step 6A: place back the frame and square it up again. Now take 4 spikes (not included) and drive them thru part 800361 which is the ‘foot’ of the frame. There are holes in this part including one at the top and bottom that will accommodate this spike and still allow the rachets in later steps to attach. The spikes will now hold the frame in place nice and square while installing the canvas. Given this you can skip over (not do) the loose wire ties to the anchors in steps 6a thru 6e. Note that I consider the supplied anchors more then adequate for my conditions. Step 7, 8 and 9: the “i” are simply telling you to NOT put the poles inside the sleeves and to NOT pull out the strap. The canvas ‘wraps’ around the frame and when you pull on the straps as you cinch it up. It will make sense once you do one panel. Step 8 and 9: you will need to pull apart select tubing joints for the straps. Having a rubber mallet will both help to get them apart and put the back together again. Step 11: the supplied rachets, while adequate, are fragile and finicky. One of mine was bent up (due to shipping damage?) so I had to pull it apart and straighten it out. Also, if needing to release the strap once tightened you may have to assist it to unwind. A screwdriver in the ‘slot’ of the wrapper core will assist in that. Additionally, the straps are too long (better then too short!). I found that cutting off about 6 inches per end left enough to properly wrap around the rachet but not fill it up to the point of overflowing and binding up. And do not forget to use a lighter to melt the end so it does not unravel. Step 11a. the hook of the rachet goes into the hole in the foot on the interior. The outside holes are for the large tarp that is installed in starting in step 12. Step 14: when placing the overall tarp and starting to tie it down, it is easy to have it too far forward or backward, so take your time and adjust as you go along. I measured the amount of ‘warp’ on the front (both left and right side) and same on back and got it as even as possible. Was about 5”. Step 14a: when putting the 2 tubes together pay attention to the holes on each end. They need to line up. While this is shown in the diagram, was not an obvious highlight. Step 17a. while the measurement shown is about correct, understand that the height and position of these cross beams dictate the both the location and the tightness of tarp. If one crossbeam is too high the other too low will result in an uneven wrap of the tarp. Once I centered the tarp, I loosened the clamps (part no. 13202) slightly and then tapped down the crossbeams with a rubber mallet to get the necessary tension. Step 18: I snaked the wire tie between the end of the crossbeam and the upright pole fishing it thru the clamp (there is room). By doing this the hold down wire is ‘trapped’ vs. being able to slide along the cross beam as it is shown in18e. Also, I fed the wire differently thru the wire clamp; i.e. instead of it being as shown in 12d. I fed the bitter ends in thru it in opposite directions. Then, after slightly tightening the nuts and using Vice-Grips, I was able pull it tight and then fully tighten the nuts. And this is where, if the anchors are at that few inches of kitty corner, it really holds the whole shelter in a good and tight fashion. And key to this are the spikes in new Step 6A, i.e. the spikes will keep the frame from pulling in when attaching the wire ties. Post all of this, need to check to ensure the door zips up without stress or being too loose. If so, pull out the spikes in the front and adjust as needed. I also when around and readjusted the rachets as needed. Overall, as great product that I expect will last a long time! UPDATE: Follow up after a couple of months, but it’s been like a couple of years! This was installed at my campsite in the Adirondack mountains in upstate NY where, like the rest of the country, we have been experiencing extreme weather conditions. Like those labs where they test things under extreme conditions to evaluate how it will hold up in the long term, we have had extreme winds as well as rain and unseasonably cold conditions this summer. How's it doing? Short answer: it like the day it was installed! Still sturdy, no rips, still taught and zero water inside (the ground can get wet from water running under it via the rocks). Recall also that I used the supplied “temporary” anchors > they were just fine for my soil conditions, but I did use spikes in the tubes as part of the set-up process and left them in. Updated from 4 to 5 Stars as a result! Door Tip. I continue to enjoy this shed but found it a little awkward to roll up the door and bungee it open > it simply does not roll up too easily. Fortunately, the bottom of the door has a pocket and a 1” PVC pipe fit it like it was made for it. And Presto! Now rolls up like a dream and easy to put on the bungees. I put end caps on the pipe after cutting it to length to keep out the critters. Note of caution: when unrolling it, guide it down to preclude it from falling and jerking the door which may eventually damage it. I used schedule 40 PVC but would have preferred schedule 10 as its slightly lighter but there was no availability in my area.
M**N
Decent she'd for what it is
I purchased my 8x8x8 shed in March of 2022. After 4 years it had definitely been beat by the weather and elements. The tarps is brittle an ripped up. For what it is an the price it lasted longer than I thought. Easy to assemble as well.
A**R
Buyer Beware - No Quality Control
Although we have another shelter logic which is five years old that was a snap to set up and has performed extremely well, this experience was a nightmare. I can only say that there seems to be no quality control in place with the current manufacturer. The process of setting up took days, not hours. We had to call support and even that did NOT help because of the following: 1. The frame poles must be bolted together and then inserted through a channel (like a curtain rod) however all four channels on the front and back of the shelter were too narrow to adequately push the poles through. They became so narrow the poles simply stopped. Mind you these poles also have a bolt in the middle that sticks out into the channel further increasing the diameter of the pole that needs to go through the channel. It is impossible. Easy fix may be remove the bolt (weakening the structure), however that didn’t work either because the channel is too small. We managed to get the poles without the 2 bolts by cutting the seams at the ends. 2. Yes we called support and were told just put the panel on from the top down and that will work. It did not. 3. Next step, putting the top and side on. Very easy except out of the carton there were two tears already in the material. More structural weakness. 4. Last step was to anchor the corners - which surprisingly seemed to actually go smoothly and worked. In summary, the structural integrity is questionable, the parts don’t fit, the instructions are insane - no words only pictures and support can read the pictures but also have no words to inform you of how to problem solve. If we were not on an island I would have packed this shed up immediately and sent it back. We are so underwhelmed by this experience we will never ever purchase another product from Shelter-Logic and truly hope you pay attention to the multiple reviews warning you against this product.
O**O
Excellent product - nightmare to assemble.
The parts and cover of this product are precisely cut and shaped. Quality is excellent with some exceptions. I have an engineering background and I've assembled hundreds of items like this over my lifetime BUT, the assembly of this product was THE most frustrating experience I've had in many years. You need to have abundant patience because the precision is high and there's no room for error. Even though the manufacturer recommends two people to assemble I did it myself. Unless you have a partner that is intensely interested in understanding the instructions they would be minimally helpful. I would definitely not recommend doing this with your spouse - you may end up dodging flying tools. If you have a tendency toward profanity you'll need to keep children and neighbors out of earshot. I had to walk away from the process several times to cool down enough to resume. It took me about 8 hours to complete the assembly. When completed it was excellent. Would I buy it again? No. I'd definitely recommend it to someone that I find annoying, like the neighborhood know-it-all, but not to a friend. Here's some tips; (1) sort all of the bolts out by size - the length difference it not noticeable enough to dig them out of a pile. When the instructions call out a specific length it's for a good reason. The hardware count is exact - if you have any extra hardware left over you need to find out where it goes BEFORE you put on the covers. (2) Put some tape over the tubes before you slide them into the pockets - the ends of the tubes are sharp enough to cut the plastic. (3) If you can mount the frame to a floor of some type or concrete pad do it. Otherwise you'll spend a few hours of time walking around it moving legs back into position as you work. (4) Watch out for the ratcheting strap tighteners. They look like the tie-down straps on a boat trailer but they're poorly built, worse than any I've ever seen. (5) Watch the YouTube videos on assembly. UPDATE - It’s June 2018 and it’s pretty much as good as new. It would be as good as new if I hadn’t launched a chunk of aluminum angle through the side while using my chop saw. However I patched it with duct tape (which color matches exactly). I changed my mind, I will be buying another one but I’ll hire someone else to put it together.
M**!
Over engineered by sadists creating an assembly nightmare.
I'm usually really good at assembling things. It reminds me of being a kid and building models. Starting with a box of pieces and ending up with a finished product is like solving a puzzle for me. Until this box of horrors showed up. There are no printed instructions, just a bunch of pictographs that require unlearning your native language and trying to figure out how our cave dwelling ancestors might have painted how to assemble this onto a dark cave wall with only a small fire for lighting. Each pipe has the product number sort of painted on it. Instead of labeling the pipes something legible and logical like "A-F" or whatever, each pipe had a long, seemingly randomly generated numerical code painted on it that unnecessarily complicates things, but it would be no problem if the numbers were actually legible. All of the painted numbers on my pipes were smeared so badly, on some of them I couldn't even identify the smudges as numbers, much less know if it was 800170 or 374124. Why couldn't they just keep it simple? Assembling the pipes without knowing which was which was a challenge, especially because they are all almost exactly the same size and shape. Maybe if I looked at the smeared paint in a dark cave with only the dancing light from a torch to see, the random numerical codes might have been visible. The first assembly diagram would have been straightforward if I knew which pipes went where, but to further confuse the customer the second assembly diagram is printed perpendicular to the first. (So all the pipes are in different places) and for absolutely no reason except to apparently make the cave drawings more confusing. Since the shed is darn near square in shape it wasn't immediately apparent WTF was going on, but I figured it out. The assembly pictographs go downhill from there. Some of the glyphs made absolutely no sense, and many of them were repeated. Like I couldn't hear them and they thought saying it over again would help. No. Printing them out using words would have helped. The pictures are supposed to support the words, not replace them. Assembly requires using 8 ratchets that have to be tightened in pairs, which would have been great if there were instructions on the process and 2 of the ratchets weren't broken. To be honest, I think only one was broken and I messed the other one up trying to figure out how to loosen it (there was no cave drawing for the process, and reverse engineering the ratchet was difficult for this cave man, I mean obviously, I haven't mastered the hieroglyphs yet). The pipes themselves have a cheap feel to them, the paint comes off easily and a few pipes had rust spots on them. The tarp material seems thin and lightweight. A couple of pipes were banged up a little, making them difficult to connect to each other, but they were all straight. In the end I got it assembled, but it took substantially longer than it would have if it came with clear instructions and parts with legible markings on them. I probably wouldn't buy this again, and I have a high degree of confidence the tarp is not going to last longer than a year. When it goes I'll replace it with something off the shelf. It will be easier to figure out how to adapt something else than to install the tarp that was sadistically engineered specifically for this metal frame.
M**A
Great size. Decent set up time. Perfect solution for an economically priced shed.
Loving it so far. A great option for storage outside my studio. Planned to build a wood shed. Which would have been expensive, not looked too nice (as i was going cheap), and time consuming. This was a great last minute option before fall and winter hit with Northern Californian Rains. Will update this review if the shed begins to crack or rip at any time. I mention this as it has done this with other customers. (see the reviews) But i have decided to chance it and see for myself. It is currently under a redwood and doesnt get too much wind or sun exposure. I never needed to stake it down with the heavy duty stakes that are offered with it (which is great, but you must dig into the ground). And thus far no problems. I have all my boxes inside it on pallets and nothing has gotten wet. Setting it up was not as difficult as some describe. The labeling of parts tho was incorrect at times. And i had to just guess it a few times on what to do next. It is best to take your time and divide up all the parts into piles. This took almost an hour alone. Then my father came out and helped put it up and i believe we timed it at 2 hours. Not bad. Very satisfied. Update: It has held up great in a very wet winter in northern California. When first putting it up, in my haste I used heavy duty camping stakes to tie down the shed. Well that was brainless! So it did blow over in a windy storm. But it went down a short hillside and was perfectly intact. Very impressed no poles were bent. And thus with help of 3 guys, we placed it back in its spot and used the heavy duty screw in ground stakes it came with. That took sometime to get done as the shed is on hard, rocky ground. Now I have two long extra 4x4s on its flap sides for extra hold. So far so good! So many reviews were negative but I am impressed and happy!!!!
P**6
Animal shelter
I bought this as a moveable shelter for my goats. I have multiple pastures for rotational grazing and needed small shelters. I am able to move and set this up by myself. My husband is not fond of my goats or all the work that goes into them! So, I have to come up with ways to self manage things. This is much cheaper than building a small run in shelter and it is very sturdy! It is not made out of a normal tarp material. Much thicker and the ratchet system makes it very easy to keep the material tight to prevent sagging. We have had some very strong winds and the shelter remains standing. Much to my husband's surprise! The first shelter I bought was a ShelterLogic run in for small animals, it is a dome shape open on both ends and not as tall. I loved it but it's a bit more expensive and larger. It was also very hard to assemble by myself but I managed. Both shelters are very well made and are meeting my needs. Great product!
H**S
Gute Qualität und sehr gutes Preis-Leistungsverhältnis.
Sehr fest. Wind- und Wetterbeständig. Bei dem großem Weidezelt sollte der Hersteller noch Klettverschlüsse anbringen innen, da bei Wind die Wände sehr stark "schlagen!". Mit Klettverschlüssen wäre die langfristige Haltbarkeit auch sicher noch besser. Ansonsten sind wir sehr zufrieden und kaufen sicher weitere. Freundliche Grüße Herr Tollas Firma OVM und Vorsitzender von Horse&Rider e.V. gemeinnützig.
S**R
Die Anker sind klein
Der Preis Zum Lagern von heu
F**E
Sehr stabil
Tolles und stabiles Zelt, dank der Bodenanker hält es auch Stürmen stand
L**G
Idéal comme garage à vélo
Franchement ce garage à vélo top nous y avons mis quatre vélos ainsi que le barbecue et la tondeuse idéal pour les petits jardins montage pas trop difficile
I**O
Buen producto!
Estoy satisfecho con el producto, me funciona muy bien, pero es mucho mas tardado y complicado de armar de lo que pensaba
Trustpilot
2 months ago
2 months ago