Desert Online General Trading LLC
Dubai, United Arab Emirates
Desert Online General Trading LLC
Dubai, United Arab Emirates


🔌 Power Your Adventure with NYI!
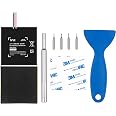
The NYI Upgraded 4550mAh HAC-003 Battery Replacement is designed specifically for the Nintendo Switch HAC-001, offering a significant boost in battery life with a 25% higher capacity than standard batteries. This lithium-ion battery comes with a complete installation toolkit, ensuring a straightforward replacement process. With safety features to prevent overcharging and short-circuiting, plus an 18-month warranty, this battery is the ultimate upgrade for serious gamers.


| Battery Cell Type | Lithium Ion |
| Recommended Uses For Product | Gaming Console |
| Battery Weight | 75.8 Grams |
| Unit Count | 1 Count |
| Reusability | Rechargeable |
| Battery Capacity | 4550 Milliamp Hours |
| Voltage | 3.7 Volts |
| Compatible Phone Models | Compatible with Nintendo Switch HAC-001, Nintendo HAC-S-JP/EU-C0 |
K**N
Was able to get it changed out in 45 mins but...
Amending once more after receiving replacement. As a note, the issue may not *actually* be the battery (it still could be), but the switch battery indicator incorrectly reading battery life incorrectly, which Nintendo has an article for (solution didn't work for me however). I tested the original NYI battery I received by playing and letting the indicator drop to 1% and seeing how long the battery lasted afterwards, and the battery lasted a total of 3 hours for Mario rpg (not too graphic intense). It's definitely no where near the original battery's life when I first got the switch, but it's better than the Nintendo battery after 8 years/SO many hours of play and changing, lasting an unpredictable 1 hr sometimes, 30 minutes others. I opted not to use the replacement I got because every time you have to change out this stuff/unplug connectors there is more chance of something breaking/bending. I am satisfied with this overall and would buy again.Amending my original review (below) because after charging and playing for about 15 minutes last night, my switch sat in sleep mode. I turned it on at lunchtime today to see if had dropped to 56%, and then when I went to turn it on after work it was completely dead. I charged it again to test it and this time I left it on for 10 minutes. Watched the battery drop rapidly to 56% then a couple minutes later it showed 4%. Ordered a replacement... It will amend my review again if i receive an actual working part.The kit had *almost* everything needed, and the instructions were very easy to follow. As others said and I had read, the adhesive on the original battery was REALLY tough to break. I watched a YouTube video that used isopropyl alcohol and a straw to drip it down the sides of the battery/tilt the switch and get underneath. The plastic tool that came in this kit was a little too thick to get under all sides of the battery, but ended up being able to pry from the bottom of the battery. After getting it out the rest was simple. The battery charged, and so far seems to hold the charge (this is less than 24 hrs after installation) so I will come back and amend my review if I have any issues, but as of now this kit/replacement gets an A+
D**Y
Best Kit I have ever bought
When you buy stuff, you expect things to work well, but this product overachieved my expectations.Let's start with the screwdriver and the bits. This is going to be in my top 3 screwdrivers I own. Magnetized, very confortable, great quality, great finish, smooth rotation of the back, it is just perfect for the job. The screw bits are very well labeled and they are the exact size for the Switch.The guide is just impecable, tells you the exact bits and steps you will take during the installation, following it exactly step by step will lead you to successfully replacing your battery.My battery came out fully charged, so I will need to check how much it lasts and I will update some months from now to determine its overall quality.For now, overall it's a solid 5 star review.I will definitely recommend this product to you, the reader and also my friends who own a Switch and might need this for the future.
W**S
really easy to do.
worked perfectly and a very nice set with everything you need.
D**O
This Is Only For Experts, But Works Great - Lots Of Issues I Experienced + Tips
For a start, I’d just like to say that the removal of the old battery and installation of this one is a long, involved process with plenty of ways for a beginner to make mistakes that can harm the Switch and render it inoperable. For a while after I installed this battery, I thought that my Switch was broken - you could easily fall to this same fate if you are inexperienced. I will share how I averted my crisis, and some tips that might help everyone else at below.After I installed the battery, I thought that it broke my Switch - I tried every way to power it on that I could think of, all to no avail. It was dead. I was very distraught at this turn of events, to say the least.If you find this happening to you, try this - hold the power button for 20 seconds, release power for 20 seconds, and then press the power button once. When I followed those steps, the issue fixed itself. If this doesn’t work for you, you probably messed up somewhere. Below are some tips for installing this.I have seen many other reviews of this item saying that they experienced this problem, and I believe that this would fix it. I only found this out after several hours of struggle and research, so I hope this benefits someone.Next, some tips for the installation. Firstly, I found the included instructions to be lacking - I recommend using ifixit’s guide for replacing the battery. Second, you have to keep your screws organized and separate. I recommend an ice tray for this, you do not want to keep them in any position where they could mix. Third, the SD card reader - this is the first difficult step of the repair. To properly disconnect the SD card reader without damage, pull straight up on the circuit board gently (NOT the connector) - the connector is fragile. Those who have dealt with this type of connector a lot before will have a feel for it, but you do not yank, you pull. You have to be a bit forceful to get it off, but too much will destroy the connector. For a novice, I would err on the side of caution, and not try to force it. My SD card slot still works, but a lot of people break those because they remove them improperly.Finally, removing the battery. The adhesive is very strong, some of the strongest I have seen. To give context, I’ve removed the glued-in batteries of MacBooks and iPhones, which are notorious for their tough adhesive, and this is by far the worst I have dealt with. It may genuinely be better to spend the extra 70 dollars for Nintendo to do it, rather than turn your repair space into an EPA superfund site with one slip of the opening tool. I do have a few tips for this, however, if you’re willing to take the risk First, get some isopropyl alcohol to soften the adhesive. 90% plus is recommended - 90 or more percent alcohol will not damage any circuit boards or anything else. You should squirt it under the battery extremely liberally. This will turn the adhesive more gummy, which will make a mess, but at least you can get it out. Second, remove the battery through the hole where the cable comes in. Trying to remove it through the top is a fool’s errand. Also, to get it started, a smaller tool than the included scraper is highly recommended. It will be hard, and you will need to use a lot of force. Lithium ion cells are incredibly finnicky, you DO NOT want to burst or severely bend it, unless you want the fire department at your house. This battery is especially tricky because there is no way to do this entirely gently. I would say that it is better to direct your force at a downward angle, not 90 degrees or even 45, but 30 degrees is probably safe. I ended up tearing the bottom paper layer on mine, which is bad, but way better than puncturing it or giving it a severe bend. You need to go slow and be confident, even though it is very scary.I really hope this helps some people to decide whether this is for them. It works great now that I figured it out, holds a charge for a long time. It just took a while to get there.
J**N
Bottom line, don't leave your switch in the sun
The battery of my switch was completely worthless after someone's child....plot twist it was mine.... left my precious animal crossing console out in the sun while at a birthday party. Well my switch would work perfectly while docked, handheld gaming became impossible as my battery would go from 100 to 0 in less than 10 minutes. Switching out the batteries seemed like a task will beyond my knowledge but with one quick YouTube video it was surprisingly easy
Trustpilot
1 week ago
2 weeks ago