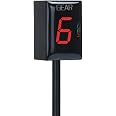
🔴 Shift Smarter, Ride Safer — Never Miss a Gear Moment!
This compact, LED digital gear indicator is designed exclusively for Yamaha EFI motorcycles, offering quick plug-and-play installation with no wire cutting. Its super waterproof housing ensures reliable performance in all weather conditions, while reading ECU data without causing any damage. Compatible with numerous Yamaha models from 1998 to 2016, it enhances riding precision and gearbox longevity by clearly displaying your current gear in bright red LED.
| Brand | Idea |
| Material | Plastic |
| Item dimensions L x W x H | 1.18 x 0.79 x 0.51 inches |
| Item Weight | 2.39 Ounces |
| UPC | 191442000182 |
| Manufacturer | IDEA |
| Item Weight | 2.39 ounces |
| Product Dimensions | 1.18 x 0.79 x 0.51 inches |
| Item model number | 5823950664 |
| Is Discontinued By Manufacturer | No |
| Manufacturer Part Number | CE21YAM001 |
| Bulb Type | led |
K**H
Works perfectly for those looking for a gear indicator!
Amazing device! I wish I bought this sooner! Fits for my 2014 Yamaha R6. There is some installation needed since it's not just plug and play. But if you have a little bit of time, it's pretty simple to install by yourself. Super bright screen makes it easy to read when riding at speed. Always displays the correct gear even though I changed my stock gearing and chain size
M**N
Much needed upgrade for a Yamaha FZ8
Super simple, yet effective gear indicator! I wish I would have done this years ago!Pros:- Installation was actually quite simple. 2 plugs and 2 wire taps.- Display is nice and bright, easy to see in the day or night.- Gear indicator changes almost instantaneously once you release the clutch (not when you change the gear physically) but that's OK for me. It's fast enough.- I run mine inline with my speedoDRD (speedo healer). Mine installed harness -> speedoDRD -> Gear Indicator -> speed sensor. Speed appears consistent as before.Cons: Instructions don't really clarify which wire to tap into for a Yamaha (FZ1, R1, R6, FZ8, etc), but after watching a YouTube video, I found that it's the grey wire on the harness side for the signal (colors swap on the sensor side). Nothing worth losing a star over. The power is just any switched power wire. No problems there.Overall, I'm totally happy with this gear indicator. I've put about 300 miles testing up and down, skipping gears, etc, and it's been dead on every time. Absolutely worth the money if you are missing a gear indicator on your motorcycle (and it's less than half of other brands out there!) Hopefully it'll last. For now, excellent product!
Z**Z
Surpsingly, Install on Yamaha FZ6R Was Not That Hard
First up, let's get this part of the discussion over with right away: Yes, this is 100% a knock-off of the GIpro X-type gear indicator. The previous version, not the new G2 version. But at under half of the price. Even the instructions are obviously the GIpro instructions, but with a ctrl + f search and replace "GIpro" to "Idea." It even mentions the "SpeedoHealer," which is a product make by GIpro.So you're buying a clone, kiddos. If the ethics bother you, pony up for the real thing. This ain't it.It may or may not use the same internal components, and may or may not have been knocked off by the factory contracted to make the real thing. Who can say? My example operates flawlessly. I installed it on a 2015 Yamaha FZ6R with the aid of the wiring diagram found in the back of the official service manual. Installation requires four wires: The unit comes with a male and female plug that place it in line with the speed sensor wire coming from the transmission. This plug is located under the tank, in the rearmost of the two big rubber boots. The plugs are easy to spot, since they are the only two on the entire bike that look just like the ones on this gear indicator. The third wire, the green and black one, goes to the crankshaft position sensor wire, which is conveniently located in the other big rubber boot in the same location, the frontmost one, and is a yellowish green square coupler with two wires coming out of it. The instructions say to use the "natural or black wire," and not the grey wire. In my example the correct wire was white (next to the grey one). The fourth wire can go to any switched 12v supply wire, and I followed the instructions recommendation and used the positive wire from the rear brake light switch (found directly above the crankcase and going to, uh, the rear brake light switch).It's worth mentioning that the "vampire" wire tap splices the kit comes with are completely craptastic. The ones I got in a big old bucket at Harbor Freight For $2 were better -- so don't use them, just buy some real ones from the auto parts store or similar. Several small zip ties of extremely questionable quality are also provided, which is not a problem for me since there's basically nothing to zip tie to between the harness and the handlebars on the FZ6R. So I taped my wire to the inside of the frame tube with electrical tape instead. Keeping it classy, as always.I was also surprised to find that they include an extra stick on "lens" for the front of the indicator for when you F yours up in a few years. Have fun remembering where you put it in the meantime.The gear indicator operates just as described. It is a "universal" type that calculates your current gear based on the 1:1 relationship between wheel speed and engine speed. I found it to be fast and accurate provided you heed the instructions which clearly say that it will only read an accurate gear with the bike in motion and the clutch fully released. You are only able to "fool" it into showing an incorrect gear (or more often, no gear) by deliberately slipping the clutch at speed, upshifting while stopped (in which case it corrects when you move), or presumably while fully airborne. Not even doing a burnout fools it, since it gets your wheel speed from the countershaft sprocket.I got the red model and have no issue reading it in direct sunlight. (There is no orange model that is closer to the FZ6's stock dash illumination.)I only docked stars for the absolutely awful install parts and flagrantly copy-pasted instructions, which were singularly unhelpful in showing me where to locate the correct wires on my bike.
J**
Good product.
Only reason for giving 4 stars is there is no instructions in the package. (Unless I just got unlucky). However, if you have common sense you can watch a YouTube video and be good to go. It was a pretty simple install. The product does what it says and is accurate so long as you program it right on the first ride. I’ll include the steps to help anyone with a 2014 R6 or like models.Remove tank and correlating fairings to route the wiresFind the speed sensor. Mine was located in the upper right once you remove the tank. It’s a 3 wire connector. (White) connect the connections to there appropriate connectors on the indicator.Red wire- Power. I tapped mine into my tail light. (Self explanatory)Green wire- goes to crankshaft commector. (Gray wire) for me, it was located pretty much directly under the speed sensor. It was a yellow-ish connector with 2 wires. (4 total) with a white/gray sheathing protecting the wires. Cut the sheathing back and tap into the gray wire with the green one.And you’re done! Hope this helps someone. Once again, good product for the money. I honestly didn’t expect much so it exceeded my expectations.
M**S
DIDN'T Work!
purchased for my yamaha R6 raven. Went to have it professionally installed. My mechanic told me he connected and installed everything correctly and even tested it connected to a separate power source, it never worked. Don't waste your time and money with this. Was looking for a cheaper option for an indicator, well I got what I paid for, never worked. I was able to return it for about 85%of my original purchase price after talking with customer service. Just from my experience even tho it's expensive, just stick with the trusted healtech name brand gear indicator. It's a true plug and play installation and works every time.
Trustpilot
1 day ago
2 weeks ago