


⚡ Charge Ahead: Power Up Your Adventures!
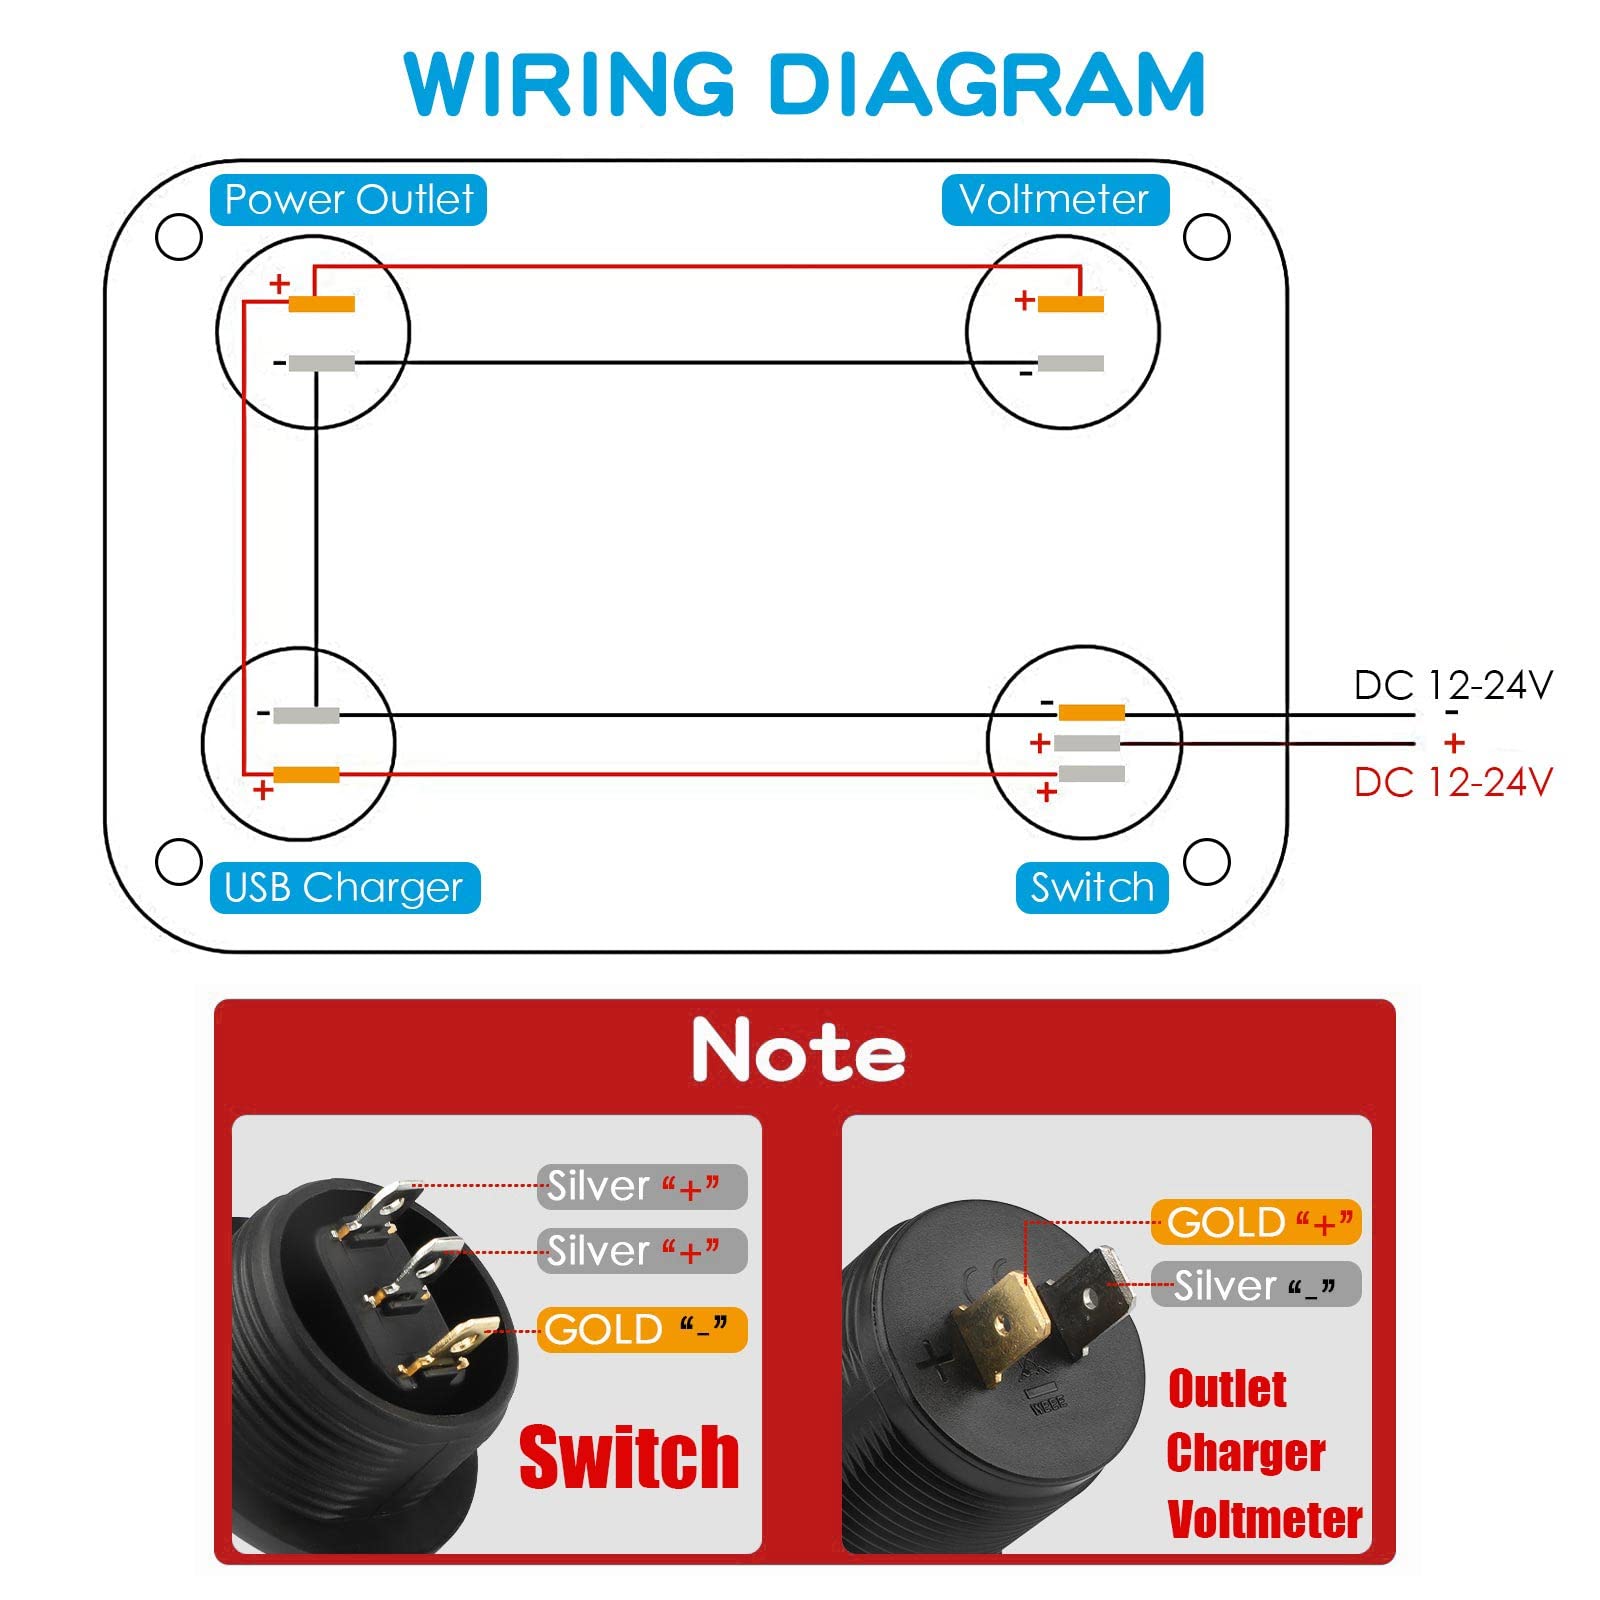
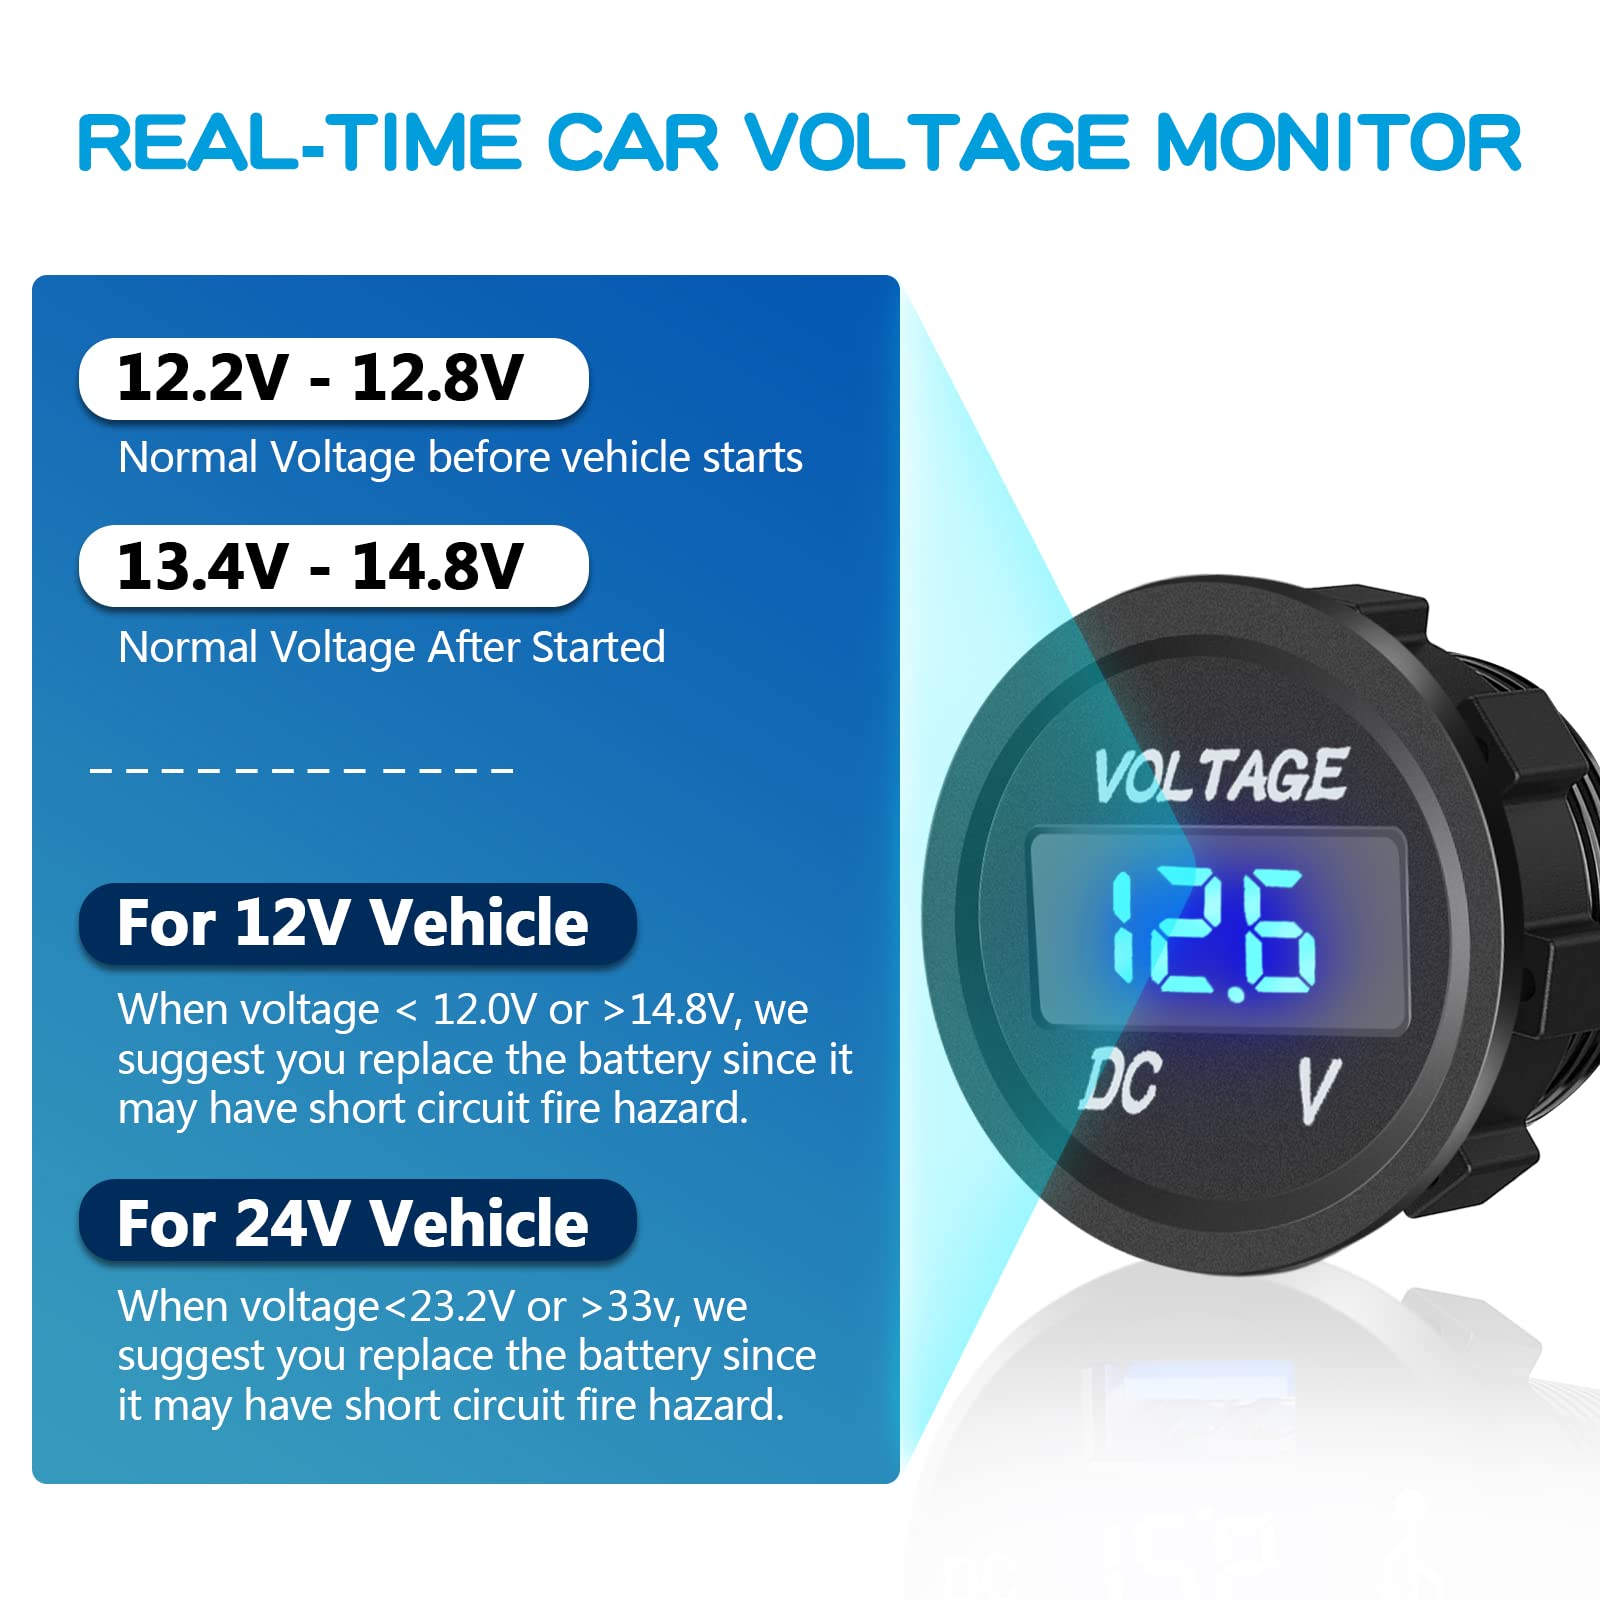
The Upgraded 4 in 1 Charger Outlet Socket Panel is a multifunctional device designed for vehicles, featuring dual QC 3.0 USB outlets, a real-time LED voltmeter, a cigarette lighter socket, and an ON/OFF rocker toggle switch. Made from eco-friendly, flame-retardant materials, it ensures safety and durability while providing fast charging and essential battery monitoring.
D**H
Easy to wire and customize.
Worked great!!
C**N
Nice interior addition
Very nice additional piece to add to the interior of my pickup. No instructions for wiring, but the premade harness made connections easy enough to figure out.
A**R
Does exactly what it should. Install tips
Great add on for my A-frame camper. Works exactly as expected. I can now charge stuff without getting the generator out. Very easy to install if you follow my steps below. Noticed some reviews complaining it was hard due to mounting bracket pod holes being close to edge. Almost didn’t buy so I figured I’d help someone else out.Install steps-screenshot / take picture of wiring diagram in pics on Amazon add. (2nd pic)-disconnect battery and any other power going to system (shore power)-find place you want it. I put mine by converter box so I didn’t have to add wire. Make sure nothing is behind for at least 6inchs so pods can fit with wires installed-install mounting bracket with 4 included screws. Don’t over tighten and strip hole.-use 1inch hole saw with drill. Try for center of mounting hole. Repeat 3 more times.-use a smaller drill bit with drill to take edge of new holes to plastic of mounting bracket. Like a router making the hole bigger but don’t cut the plastic. Go slow and test fit after.-wire up one at a time using pic. Don’t forget your pod retaining nut needs to go over wires before going to next one. Connect switch to 12v power and ground (directly down stream from battery is best for true reading)-make sure all connections are good and pods are tightened.-reconnect battery-test unit (should all light up with covers off and switch on) start testing usb with something cheep not phone. Same with car plug.-enjoy your job well done in hopefully an hour or less
S**.
Would Buy Again
This worked great for my trolling motor 100 AH lead acid battery box build. Everything worked correctly. I am not able to confirm if the USB outlets are putting out 2.1A, but they will charge your device. I deducted 1 star because of wiring diagram confusion. Pay no attention to the gold blades being stated as + Positive. The line in (+ from your power/battery) goes to center blade on switch. The load (+ out of the switch is the silver blade. The gold on the SWITCH is - neg. in from your battery. All other units (volt meter-USB-12V power outlet) are marked +/- which are correct regardless of blade color. I did not use the inline fuse that was included, instead I spliced in a blade type fuse holder...I have made and attached a .jpeg template that I used by taping on my battery box and drilling through that some my find helpful in their install. You should be able to copy/save it and print out full size (4.1" x 3.3". I hope this review is able to help in making a purchase decision.
R**I
All good except provided wiring diagram
I purchased this so I could convert my usb outlets in my rv. I needed the power socket for my CPAP. As a general contractor, I tend to second guess instructions and in this case I am glad I did. I used a multi meter to test my wiring before energizing.In this case the power socket has no gold pin, but all three pieces except the switch were labeled + and - so I followed those markings.Overall an easy a straight forward install even this unique application. And the ability to power off the panel will help save power when dry camping.
J**N
Voltage meter went out- Revised
Revised: The fuse while not blown had a weak enough connection inside to prevent the Voltmeter from coming on. An Ohm meter shows the fuse good, the 12 volt outlet and USB plugs lit up, but the voltage must have been too low for the meter (even though the battery is fully charged). The meter would come on if I plugged the power cord directly to the meter bypassing the switch. I tried multiple things before changing the fuse to insure it wasn't a connection problem with the wires or the switch itself. Once the fuse was replaced, everything worked as it should. I wanted to leave the rest of this review in the event it happens to someone else.Received the product October 2, 2024; voltage meter quit working on October 15, 2024.I used this to make a 12V battery box in the event of a power outage. Decided to see how long the battery would last just charging cell phones. This would have been the 3rd day of turning it on after charging the equivalent of 6 cell phones and the voltage meter doesn't come on. I checked the connections and the power switch, USB ports and 12V power plug all still work. I've had multiple people ask me to make them boxes, but I wouldn't feel comfortable building with this panel.
K**B
Works great
Used in portable ham box. Has performed well and looks great in my radio box.
J**N
Great Power Panel
This was just what I needed. I installed this today in place of an old single DIN radio inside my dune buggy. Very simple installation, and like that it comes with an in-line 10A fuse. It is a bit smaller than a single DIN radio head, so if you are replacing one then you'll need to make a bezel to cover the gaps, but that was not a big deal for me. This is a great little USB power panel.
Trustpilot
3 days ago
2 months ago
1 month ago
4 days ago
