🚗💨 Tow Boldly, Tow Smartly!
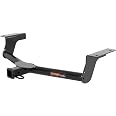
The CURT 13149 Class 3 Trailer Hitch is a robust, custom-fit towing solution for select Toyota RAV4 models, rated to tow up to 3,500 lbs. Featuring a durable dual-coat finish for superior rust and UV resistance, it offers a standard 2-inch receiver and has been rigorously tested to meet strict safety standards, ensuring reliable performance and easy installation.


| Brand | CURT |
| Vehicle Service Type | Pickup Trucks, Marine-Personal-Craft, ATV, Car, Sport-Utility-Vehicles, Snowmobiles, Trailer |
| Material | Carbon Steel |
| Finish Type | GLOSS BLACK POWDER COAT |
| Pull Force | 3.5E+3 Pounds |
| OEM Part Number | 13149 |
| Manufacturer | CURT |
| Maximum Towing Capacity | 3500 Pounds |
| UPC | 612314131495 |
| Global Trade Identification Number | 00612314131495 |
| Model | Class 3 Hitch |
| Item Weight | 34.4 pounds |
| Country of Origin | USA |
| Item model number | 13149 |
| Is Discontinued By Manufacturer | No |
| Exterior | GLOSS BLACK POWDER COAT |
| Manufacturer Part Number | 13149 |
| Position | Rear |
O**3
Works great on Toyota threads 12 1.25
Needed to re-tap the welded nuts to install a Curt trailer hitch on a 2018 Rav4. I used a 1/2" pipe brush from Home Depot and PB blaster a few days earlier to clean and loosen some rust. Then with some left over enging oil on the tip of the tap it went through the nuts smoothly and the trailer hitch went on easy from there. I used my socket set with the tap.
N**N
Easy to Install
25 minutes to install. Even for me. Found video online. Simple. Nice product.
A**.
Good so far
Hitch fit great. Box it came in didn't hold up well, but I didn't buy it for the cardboard. Instructions are okay, but you can honestly get by without them just lining it up. Only problem I had was that the holes in the frame on the passenger side of my car were too rusty for the bolts to thread. Wire brush, brake cleaner, and some elbow grease and they worked fine. Haven't pulled anything yet, but it seems solid.
S**4
Fits 3rd gen RAV's almost perfectly
I don't know what's going on with all the "the holes don't line up" comments, because they do, at least if you're trying to fit this receiver to a 3rd gen RAV. The only issue is that the alignment's off just a tiny bit, such that when you've got three bolts threaded in, the last hole will always be off by maybe 1/16". Just enough to prevent you from threading it in straight, and making it easy to accidentally crossthread. Putting a pry bar between the hitch bracket and the fuel tank shroud and prying gently will solve this easily.Honestly, the most difficult part of installing this hitch is getting access to the bolt that's above the exhaust resonator. The instructions advise you to pop the rubber hanger to allow you to move the exhaust a bit, and although I tried everything to avoid this, I ended up doing so anyway, to make room for my deep socket and torque wrench. If you have a shallower socket and/or different torque wrench, you may be able to avoid popping that rubber hanger. It was no big deal for me...I just stuck a flathead screwdriver in and pried the hanger off, but if your hangers are old and hard, it won't be any picnic. I remember when I installed a hitch on another 3rd gen RAV 20 years ago, I ended up sawing the hanger off and just replacing it.One thing: This ships in a big box with no packaging or anything to protect it, so the box basically comes apart in transit. Don't be surprised if you come home to a hitch on your porch with cardboard hanging off it. And an unhappy UPS guy, as it's clumsy and a bit heavy.
C**2
Great
Worked well. Went with the "Used-Very Good" option and save a few bucks. No notable wear the hitch. I did have to tweak it a little bit with a sledge hammer to get the fit adjusted for my Rav4, but other than that, worked great.
R**.
The hitch arrived with several areas of the paint scraped ...
The hitch arrived with several areas of the paint scraped down to bare metal. The damaged areas were underneath cardboard protective sleeves that were wrapped around the hitch tubes.There was no real damage to the box, but the hitch was simply tossed in a big box with no packing at all.Due to the cost of shipping, I decided not to return the hitch. I purchased rustoleum primer and paint, sanded down the damaged areas, and repainted them.When installing the hitch, I discovered that one of the mounting flanges had been bent inward and that the hitch would not fit my car. The paint was cracked at the bend. Given the condition of the shipping box, I do not think this damage could have occurred in shipping.10 Minutes on the anvil with a 5 lb sledge and I had it straightened out, but I had more painting to do.This time I took a closer look at the paint and discovered numerous areas all over the hitch where the paint did not appear to be adhered to the base metal. I could lift several square inches of paint at each spot with a putty knife. The metal appeared somewhat corroded under the paint layer.When I torqued the mounting bolts, all the paint within 1/2 inch of each bolt head cracked away from the metal.My sense is that none of the paint on this hitch is actually adhered to the metal (except, perhaps, the rustoleum I applied).I expect I'll have to take the thing off next summer, have it sandblasted and repaint it properly if I want it to last.So, the actual tools I needed for this install:17 & 19 mm socketstorque wrenchputty knifesandpaperrubbing alcoholragsprimergloss black topcoat5 lb sledgeanvilTools I'll need to properly protect the hitch in the near future:Sandblastermore paint.If I had it to do over, I would pass on this.
Trustpilot
1 month ago
1 month ago