Desertcart purchases this item on your behalf and handles shipping, customs, and support to Greece.
๐ฉ Upgrade your kitchenโs quiet confidence with every pivot!
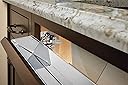
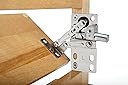
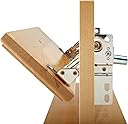
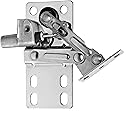
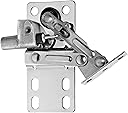
The Rev-A-Shelf 50-Degree Pivot Hinge LD-0220-50SC-40 is a patented soft-close hinge pair designed for tip-out trays in kitchens or vanities. Featuring a 50-degree opening and reinforced stiffening ribs, it ensures smooth, silent operation and enhanced stability. Easy to install with a face-mount design, it comes with a limited lifetime warranty, making it a durable and reliable upgrade for modern cabinetry.
| ASIN | B018A36II6 |
| Best Sellers Rank | #115,387 in Tools & Home Improvement ( See Top 100 in Tools & Home Improvement ) #367 in Cabinet & Furniture Hinges |
| Brand | Rev-A-Shelf |
| Brand Name | Rev-A-Shelf |
| Color | Zinc |
| Customer Reviews | 4.6 out of 5 stars 2,554 Reviews |
| Finish Type | Unfinished |
| Finish Types | Unfinished |
| Hole Count | 2 |
| Included Components | Included: (1) Left hinge, (1) right hinge, and screw pack |
| Item Dimensions L x W | 4.8"L x 4.5"W |
| Item Type Name | Soft-Close 50 degree Pivot Hinge for Sink Base Tip-Out Trays |
| Item Weight | 8 ounces |
| Manufacturer | Rev-A-Shelf |
| Manufacturer Part Number | FBA_LD-0220-50SC |
| Manufacturer Warranty Description | Limited lifetime warranty. |
| Material | Metal |
| Material Type | Metal |
| Model Number | LD-0220-50SC-40 |
| Mounting Type | Face Mount |
| Product Dimensions | 4.8"L x 4.5"W |
| UPC | 090713017969 785577790171 |
| Unit Count | 1 Count |
Z**K
Excellent product - tricky install
Felt compelled to write review as this product is abundantly better than the set I bought from Menards. With that said, let me first say the instructions included with these were nearly useless, and were quickly discarded. Before my review, here's my written installation tutorial: ------------------ INSTALLATION: Hardware eventually attaches to both the drawer front and the face frame (assuming you have a face frame cabinet); the order in which they are installed does not matter. These instructions will mostly be for attaching to the frame first. 1) with drawer front panel still installed (or aligned to desired location), use pencil to lightly mark the perimeter on the front of the face frame. [If installing hardware on the drawer front first, from the inside of the cabinet, trace the interior perimeter of the face frame onto the back of the drawer front panel.] Now remove drawer front panel. 2) take the two pieces of tilt hardware, and denote which one is L and which one is R. Take one and place it on the appropriate side of the face frame. Align it so that the bottom is resting on the face frame, and the front is flush with the front of the face frame. With a pencil, trace the locations of two mounting holes (you can use any two) onto the frame. NOTE: I recommend not using holes that are ~too~ close to the top or bottom edges of the face frame, as this will make drilling difficult/inaccurate. Repeat the same process for the other side. 3) Drill (with 3/32 drill bit) the two holes into the face frame. Attach hardware with screws into these holes (I believe instructions called for the provided flathead screws; though I discarded and used my own hardware). Repeat for other side. A 90ยฐ drill/driver attachment is useful for this step 4) once hardware is mounted to the face frame, place drawer front panel against the face frame in the desired location (using your previously traced perimeter). From the inside of the cabinet (I did it by feel as I'm not the most flexible) mark the mounting hole locations from the hardware onto the drawer front panel. Remove panel and ~carefully~ drill (3/32 bit) the mounting holes. BE SURE NOT TO DRILL ALL THE WAY THROUGH PANEL (drill bit stop collar is helpful here). 5) install drawer front panel to the hardware. This can be tricky, but can be done either from the inside of the cabinet with the hardware 'closed,' or from the outside of the cabinet with the hardware 'open' though the angle may present challenges. Tip: do not fully tighten screws until all four are in place. 6) test function. You may have to slightly loosen the screws and nudge the panel over to get it to close flush or evenly. ----------------------------- Review: Great product, as stated previously. However, installation can obviously present some challenges due to the tight angles and fairly tight installation tolerances. Lack of helpful instructions can further exacerbate these challenges for many other buyers. Functionally, these are incredibly smooth and close with the right amount of force. Compared to the previous set (different brand) that I had installed, these are night-and-day difference in terms of smoothness. Also for the fact that the previous set SLAMMED shut to the point where it would make a good impromptu nutcracker. I still rate this product as 5-stars due to the great functionality, though engineering improvements to ease installation would be a good place for the manufacturer to focus in the future.
D**M
So much better than the Bang!
Got nice high end cabinets, the sink tilt out drawer would slam shut, even with bumpers. I thought there would be something like this out there and low and behold it's nearly identical to the other Blum tilt out spring loaded hardware so all the holes even lined up. Got this installed before the sink went in, so much easier! I cannot believe these didn't come on the cabinet already. I got sets for my pantry and bar sinks too. The last thing you want to hear is a bang when you put your sponges and bottle cleaners away, then find they have been catapulted into the far reaches and dark depths of your sink cabinet. These do have a shock that sticks out further than standard Blum spring loaded tilt outs so if you have a zero clearance sink on the sides of your cavinet, you need to check dimensiocabinet, to see if it will fit. I've got an inch on either side between my sink and cabinet so I was fine. These work great, install perfectly vertical or tilted with the top angling back into the sink area slightly for the best tilt out face position.
I**L
Nice hinges, but they are hard to install
Now that these are installed, they are great. The soft close is gentle and quite, and the mechanism is smooth and easy to open. It does not come with install directions though so it takes quite a bit of monkeying around to get them in place. If you are not mechanically minded I wouldn't recommend these. Some tips if you do decide to give it a shot, you will want to attach the hinges to the cabinet door first then to the cabinet base after because if you install on the base first, you will not be able to get a drill or screwdriver at the right angle to attach the door. Also, try to install the hinges as low as you can because this will give you more of an opening once it is all put together, and it will be easier to fit the drill in there while installing. All in all I really like these. I just caution anyone, if you have a hard time figuring out installs without directions, consider a different product.
D**Y
UPDATE -- does not close completely
They work, sort of. Maybe I should have bought the kit?? I got them installed without any instructions, just watching installs on the net. No template came with this order, so you are on your own, but it is not hard to figure out. One confusing thing is the picture on the Ad Post, it shows the mounting plate mounted behind the cabinet face, but all the install videos show the mounting plate screwed to the face of the cabinet. I followed the instructions found on You Tube for this product and mounted the hinges to the cabinet face, not behind it. If I were to mount behind the cabinet front I would have had to add a piece of 3/4" wood to get it level. I went with the video instructions. It works, sort of. Opening is easy, and closing it seems to work like my soft close drawers, but it stops about 1/2" short of closing totally and you have to push it shut. UPDATE -- The soft close works great. Apparently it had to get used to its surroundings, ha, ha -- after a couple of days it started closing all the way, great, love it -- updated to 5 star -- quality. Came with screw, no instructions and no template, but not that hard to figure out. The picture in the AD post makes me scratch my head, it shows the mounting behind the front cabinet facing, while the install video on You Tube all show it being mounted directly to the cabinet facing. I put mine on the cabinet facing and all is well, just be sure and counter sink you screw holes to prevent any splitting .
E**X
For Many, Replacement of Scissor-Type Hinges Will Be Very Easy
First, the hinges function very well and allow for a simple nudge to close versus holding the pull throughout its closure to prevent it from snapping close and spilling the tray's contents. While these hinges are not critical in people's lives, they are a nice touch, and they motivate household members--especially children--to actually use the tip-out drawer and tray. Regarding installation, one should immediately compare these hinges to their scissor-hinges already in place. For me, every exterior dimension was the same except for the presence of the soft-close piston which was irrelevant, and most importantly, the size and location of the two mounting plates--to the frame and the back of the drawer panel--were the same size and location. Of the four utilized mounting holes on each hinge--two facing the interior frame and two facing the back of the drawer--three matched exactly. Only the lower mounting hole of the plate to be attached to the back of the panel did not match, and consequently, a new mounting hole only in the back of the drawer panel needed to be created. As a result, all I needed to do was: 1. With the drawer fully opened, I used a cordless screwdriver to back out the two screws attached to the frame for each hinge 2. After removing the drawer completely, and with the drawer flipped and exposing the old hinges while placed on the kitchen island, I used masking tape to locate the exterior edges of the mounting plate and hinge assembly 3. I removed the old hinges and placed the new hinges on the backside of the drawer panel at the exact location of the old as dictated by the masking tape and mounting holes of the plate. I then used a marker to mark the new location of the lower mounting hole and then drilled a 1/8" pilot hole. 4. After screwing in and attaching the mounting plate of each hinge to the back of the drawer, I pulled to open each hinge fully to its lock position, placed the drawer and hinges in the frame opening, and screwed in the mounting plate of each hinge to the frame using the existing mounting holes. The hinges worked perfectly, and the drawer was positioned in the exact same location as before. Comparing dimensions and mounting hole locations of old versus new hinges is worthwhile and may allow for easy replacement as above. Early DIYers can accomplish this, and they should not be afraid to dive in. Good luck!
S**P
Works Great!
These hinges worked perfectly on my drop front toothpaste/toothbrush drop down drawer. Dh replaced old ones and it was super quick and easy. Works perfectly now! Very pleased with these! It is a set of 2 hinges.
S**E
Great product, just have patience while installing. Itโs a two person job.
Our new house had the original Rev-A-Shelf tip out hinges with the exposed springs, but they were not in good condition (rusty and stretched out of shape). I was excited because the pilot holes were already there for the new soft close hinges, i.e. no measuring or calculating where to put the hinges in the first place. However, even with the pilot holes it was mildly difficult to get everything screwed into place. For the first drawer I installed the shelf with the hinges to the base cabinet first. Then tried putting on the interior cubby and attaching a handle to the outside of the tip out drawer. This way was the most difficult as it was hard to get leverage with the screw driver (even using an Allen wrench style Phillips head). I tried climbing into the cabinet, lacing my arm up and through, you name it. But itโs difficult with the sink blocking your arm. After many swear words later I proceeded onto the second shelf. This time I attached the hinges, screws for the interior cubby and drilled the holes for the outer handle before attaching the whole thing to the sink cabinet. Then, I needed someone to hold the shelf at the appropriate tip out so I could screw it all onto the base cabinet. This worked WAY better. Have a look-see at the new tip out shelf (with new paint job as well). The hinges open and close nicely. I noticed some people mentioning that the shelf doesnโt shut fully...if you just press it a bit it will close completely. I am very satisfied!
K**B
Great soft-close hinge, but no instructions
As others have said, great hinge, but no instructions or templates. I found a video on Youtube (do a search for Deepspeak's video for Rev-a-Shelf Tip-out Undersink drawer - Installation and Review) that helped guide my installation and made things a lot easier. I did a few things differently from the video. I didn't have a countertop yet, so I clamped the drawer front in place from the top and then marked the holes on the drawer front from above, but I could have done it with double-sided tape and/or done the markings from below. I also didn't remove the hinges from the frame before attaching them to the drawer front like Deepspeak did. I'm not sure why he did that, but it seemed an unnecessary step for me, and it was. One thing that wasn't clear was which set of screws to use where. My hinges came with both flathead and panhead screws. I used the panhead screws exclusively. No logic behind it other than that's the first bag I opened. I would have given these hinges 4 or 5 stars if they had come with installation instructions and templates, but they didn't. Otherwise, great product.
K**O
Trรจs bonne qualitรฉ
Il est de bonne qualitรฉ
P**H
Highly recommend this one
Amazing item to use on the blank space under the sink now I have a functioning unit that surprises everyone that sees it
M**L
Over priced & no instructions, see photos!
Itโs a good idea. But a template that lined up would be a good start point at This price! And some basic instructions as well ! Like mark inside of draw 1st, 2nd mark bottom of draw on cabinets so you know where to place hinges, 3rd pilot hole and screw test depth! 4th only put 1-2 screws in & test positions !
A**R
It works very well.
I disliked that it did not have the templates that were supposed to be included and ti was expensive. I liked that it worked as advertised so it is worth the expense.
J**H
Fantastic replacement part
This part was a perfect replacement for the existing hinge that "slammed" shut...it was very easy to swap out the parts and works great.
Trustpilot
3 weeks ago
1 month ago