Desertcart purchases this item on your behalf and handles shipping, customs, and support to Greece.
☕ Elevate your coffee ritual—because one perfect cup is all you need!
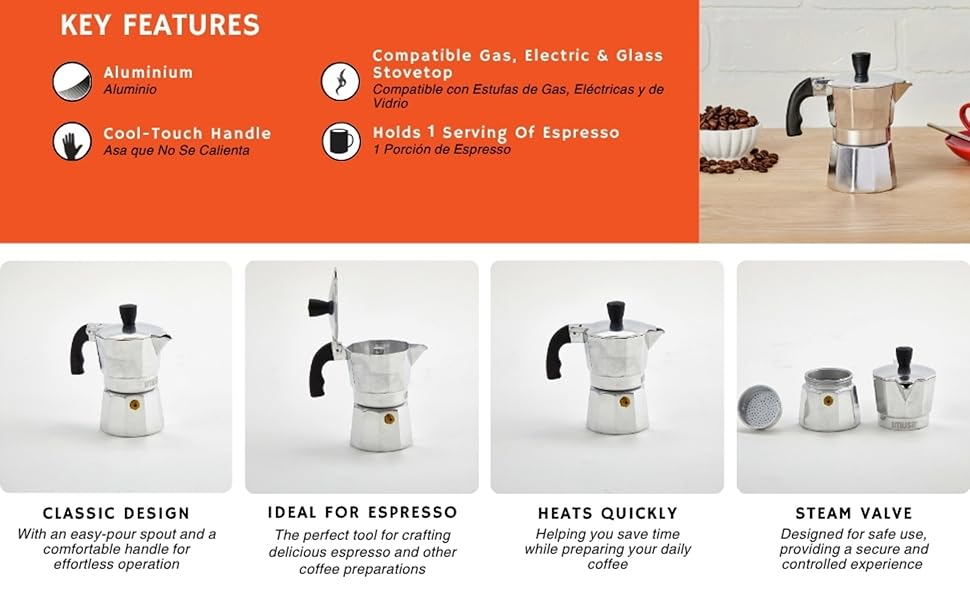
The Imusa Aluminum Espresso Stovetop Coffeemaker is a sleek, durable 1-cup espresso maker crafted from aluminum to retain heat and deliver rich, concentrated espresso. Its compact design and cool-touch handle make it ideal for single servings at home or on the go, while the flip-up top and side pour spout ensure easy brewing and serving. Perfect for millennials seeking a stylish, manual coffee experience that rivals café quality.


| ASIN | B0018E6DO4 |
| Best Sellers Rank | #5,312 in Kitchen ( See Top 100 in Kitchen ) #8 in Stovetop Espresso Pots |
| Brand | Imusa |
| Brand Name | Imusa |
| Capacity | 1 Cups |
| Coffee Input Type | ground_coffee |
| Coffee Maker Type | Espresso Machine |
| Coffee maker type | Espresso Machine |
| Color | Silver |
| Colour | Silver |
| Country of Origin | China |
| Customer Package Type | Standard Packaging |
| Customer Reviews | 4.4 out of 5 stars 30,566 Reviews |
| Exterior Finish | Metallic |
| Filter Type | Reusable |
| Global Trade Identification Number | 00094046200180 |
| Human Interface Input | Touchscreen |
| Included Components | Coffeemaker |
| Is the item dishwasher safe? | No |
| Item Dimensions D x W x H | 7D x 10.5W x 13H centimeters |
| Item Type Name | Coffeemaker |
| Item Weight | 0.4 Pounds |
| Manufacturer | Imusa USA |
| Material | Aluminum |
| Model Name | Aluminum Espresso Stovetop Coffeemaker 1-cup |
| Model Number | B120-41V |
| Number of Items | 1 |
| Operation Mode | Manual |
| Other Special Features of the Product | Jug, Removable Tank |
| Part Number | 490482 |
| Power Source | Manual |
| Product dimensions | 7D x 10.5W x 13H centimeters |
| Recommended Uses For Product | Espresso |
| Special features | Jug , Removable Tank |
| Specific Uses For Product | Espresso, Travelling |
| Style | Classic |
| UPC | 094046200180 |
| Unit Count | 1 Count |
| Wattage | 120 watts |
| coffee_filter_size | #2 |
M**R
Ok
Fair enough aluminum kettle Above avg quality
S**R
Can be dangerous, also way smaller capacity than expected.
Be careful using it, use low heat since and keep an eye on it while on stove since high heat level can send all the coffee up in the air. Regarding the capacity, it is barely enough for a 300 ml finished product. For me that is enough for only 1- person.
H**.
Not 3 cups very small size
Not even one cup how come 3 Be carefull its not 3 cups
J**.
Looks Good, Works well
I have not brewed coffee in it yet. But I have gone through the process of "cleaning" it, by boiling the water over the stove on low heat. Water is coming out without a problem. Will start to brew my coffee after I repeat the process a couple more times. Now I need it to cool down before. Happy it works for a fraction of the price against branded ones. Update: Have been brewing myself a cup of coffee for the past one month. Some discolouration due to coffee stain which is normal. No issue with the product itself. Contemplating to get a 6 cup as the 3 cup gives only half a cup of regular coffee.
S**W
Secrets to brewing espresso? Are you curious...
This little coffee pot is capable of brewing delicious coffee with a little work and patience you will have a great little coffee maker I have used these for 20+ years I am happy to share what works for me because the directions are vague in places. However there are things that you need to do first before using it to brew your coffee I will explain why. Now If you are not willing to take the time because your lazy, and/or ask for a golden goose during a factory tour whining when factory owner says no your not going to like this coffee maker do yourself a favor give it away as a gift. If you have arthritis or your hands hurt I have arthritis and carpal tunnel just have someone help or just take your time this is not a race. When I pulled this one out of the box I noticed aluminum dust and debris inside and that the threads are a little rough this is to be expected it is not coated this is a cast aluminum aka Pot metal. For many years before the plug and play instant gratification nonsense came about everything you can think of cookware wise was made like this and it was excellent it lasted forever. So I am going to walk you through what I did to make this a good little coffee maker and how to maintain it. First use warm not hot water and normal dishwashing soap along with a non abrasive dishwashing sponge or cotton washcloth or soft bristle nylon brush . Do not use acidic, aggressive, or caustic cleaners its not neccessary and you will ruin your coffee maker. So begin to thoroughly wash/rinse everything inside and out including funnel until all dirt and debris are cleaned out and dry everything with a cotton cloth. Fill the coffee maker with water as the directions specify to the valve and assemble do not add coffee. Now when you assemble the top to the base do not over tighten dont forget your gasket sometimes they fall out just place it back in place. Hold the top and base when tightening not the handle or you will break your handle. As you feel the base make contact with the silicone gasket in the top just tighten snug to seal not over tight this will help seat your gasket. If in doubt about how tight turn until top makes contact with bottom turn until it snugs about a half of an inch extra tighten you don't want to bind your silicone gasket. Place on a burner with the handle away from the burner so it doesn't melt turning heat to medium high while waiting for it to finish the brewing process watch the little brass safety valve it will probably steam a little this is completely normal your valve is working fine. If it leaks between the top and base while percolating remove from heat, allow to cool and tighten a little more when you refill it this sometimes happens dont give up. Pour off the water and allow it to cool this is your first heat cycle a very important part of breaking in your new coffee maker. Absolutely do not cool it off under a faucet with water I know its tempting yet just patiently wait for it to cool on its own down to room temperature for everything to expand contact properly. When it has completely cooled off pull it completely apart again. Looking inside you might see more little black spots or loose debris this is normal rinse and wash them out again as described above. Wipe dry the outside and inside dry with a cotton cloth this prevents water spots and helps loosen any debris. Fill with water to valve again tighten snug not too tight and place it on a burner on medium heat allowing it to run water through watch the pressure relief when finished pour it out allow to completely cool to room temperature completing your second heat cycle. When cool disassemble your coffee maker notice how it comes apart your gasket in the top should seat nicely with the bottom and you shouldn't have any cast debris they should be gone it should look nice and clean inside. Now I will tell you what I do for a delicious cup of espresso. Fill with water using cool or cold filtered water up to the valve, drop in the funnel, add coffee level with the top of funnel loosely no need to tamp, screw on top notice how nicely it seats after all that work, place on burner on medium heat, listening for it to percolate its done when the top is about 3/4 full usually, and pour your espresso into a cup enjoy. It should taste amazing if its too strong or too weak adjust your coffee amount or heating temperature. When finished rinse thoroughly and wipe dry. If you place it in the dishwasher I don't recommend that I made that mistake. Hard water spots happen don't worry about them. With proper cleaning and care this should last for many years. I use these at home, shop, traveling, and they are wonderful on a camping stove. If you notice any yuck on the bottom from a burner or if coffee maker gets nasty dirty inside/outside I clean these with non abrasive white shop hand cleaner buffing it in until dirt is loose, wipe off excess cleaner, wash as described above, and cycle water through it. I have many of these in different sizes all plain aluminum like this. I have polished the outsides of these and and top inside to a beautiful shine with aluminum polish using the same procedure as you do with silverware when I encounter hard water or high mineral water. I have sanded the rough cast inside surface of the base smooth and polished the inside to a mirror shine for fun and easy cleaning. I have busted off or melted off the handles and replaced them with different designs of my own creation. I have Heliarc welded these if they get a seep in the bottom or if the lid hinge breaks/cracks. With care you should be able to pass this on to your children or someone close to you who loves delicious espresso. Hopefully this was helpful for you and you enjoy your espresso maker. If you have any questions just ask me and I will share what has worked for me. Good luck and importantly have fun.
A**I
Bad Buy
Found the coffee maker to be of very poor quality. It weighs about half of a similar one that I have. I have used my earlier coffee-maker for twenty years and will be happy if this lasts for even two. Not the right brand for anyone looking out for such a product.
A**L
Inexpensive and easy to use. Works great for iced coffees too!
If you've never used an espresso (moka) pot before, it's easy to use and makes great, super-strong espresso, just like the shots you get from Starbucks. This little pot works just great, so why pay more for an Italian pot or some super-expensive machine that does exactly the same thing? All espresso pots operate pretty much the same. There are 3 pieces included. The base is heavy cast aluminum with a pressure safety valve (the little brass bit you see in the pic). This is filled with water, right up to but not over the brass valve. The second piece is the coffee filter. You can't see it in the pic but it looks like a funnel met and fell in love with a strainer, and had this filter as the baby. You fill the open top of the filter with coffee (it doesn't need to be espresso grind) and gently drop it into the base. The top of the coffee and filter will be flush with the top of the screw threads of the base. Try not to get coffee in the threads of the screw part, that will affect the seal. The third part is the coffee pot itself with the handle. It holds the brewed coffee. The lid is hinged, and when you open it, you'll see the tube that the coffee comes up through and into the pot. If you flip it upside down, you'll see a filter built into the bottom of the pot to strain the coffee from the grounds and a silicone or rubber ring around the inside of the screw threads, that helps seal the pot and bring it up to pressure. As I said, even the expensive Italian versions work the same. When you place the filled pot on your gas burner, make sure that your flame doesn't lick up the sides of the pot. Match the flame to the size of the bottom. Common sense, but some people have melted off the handle apparently. Mine has never even gotten hot. If you have an electric stove like me, set it slightly off to the side of the burner, not right in the center, just to make it easier to pick up. I crank mine up to high. After a minute or so, you'll hear a lot of hissing. What's happening is that the water in the base is beginning to boil, creating pressure. That's why there is a safety valve. If the pressure is too high in the base (due to over-filling), the safety valve will give way first, releasing any pressure. No worries though, it's really very safe! If you see excess steam coming from the screw threads, and it doesn't stop soon, you just didn't tighten it enough. Once the pressure has built up enough, it forces the boiling water up through the funnel and filter, and through the coffee grounds at high pressure. The brewed coffee (minus the grounds) is forced up through the tube and into the top pot. You'll hear a lot of hissing and loud bubbling, that's the sound of the coffee percolating through the tube. Once the sound starts to die down, take the pot off the burner and set it on a hot pad. That's it! Clean up is easy too. The base doesn't need it, and the filter and pot clean up quickly with a bit of soapy water. Let dry and reassemble. I use mine to make cafe Americano and iced coffees. For Americano, just add boiling water to taste. The straight up espresso is WAY too strong for this sissy. For iced coffees, I make a mocha syrup, mix it with the espresso and put it in a glass bottle in the fridge for iced coffee on demand. I keep mine for no longer than a week. To make the mocha syrup, use a microwaveable glass or ceramic bowl or mug. Mix 2 tablespoons of unsweetened cocoa powder and 2 tablespoons of sugar in the bowl. Add several tablespoons of cold water to mix into a thin paste. Microwave for 1 1/2 - 2 minutes. I usually pour the hot coffee into the bowl, stir well, let it cool and pour it into a bottle (I really don't recommend plastic). Then when you want an iced coffee, add a few tablespoons of your mix to a glass of cold water, add sweetener of choice, cinnamon or vanilla (etc.) if desired, and then your dairy/flavored creamer/etc. These are really good and you'll save a lot of money. Enjoy!
S**D
تحذير من المقاس
المنتج مكتوب انه ٣ اكواب لاكن يوم جاني طلع كوب واحد . الي يبي ٣ اكواب يطلب الي مكتوب في العرض انه مخصص لكوب واحد . هم ملخبطين او متعمدين الله العالم . وانتبه ما فيه إرجاع!!! بالنسبة للصناعة لاباس والان تحت التجربة
Trustpilot
1 day ago
3 weeks ago