We remain fully operational. Our teams are working around the clock to ensure your deliveries continue safely.

DOWNLOAD THE APP


Customer Services
Copyright © 2025 Desertcart Holdings Limited
DOWNLOAD THE APP


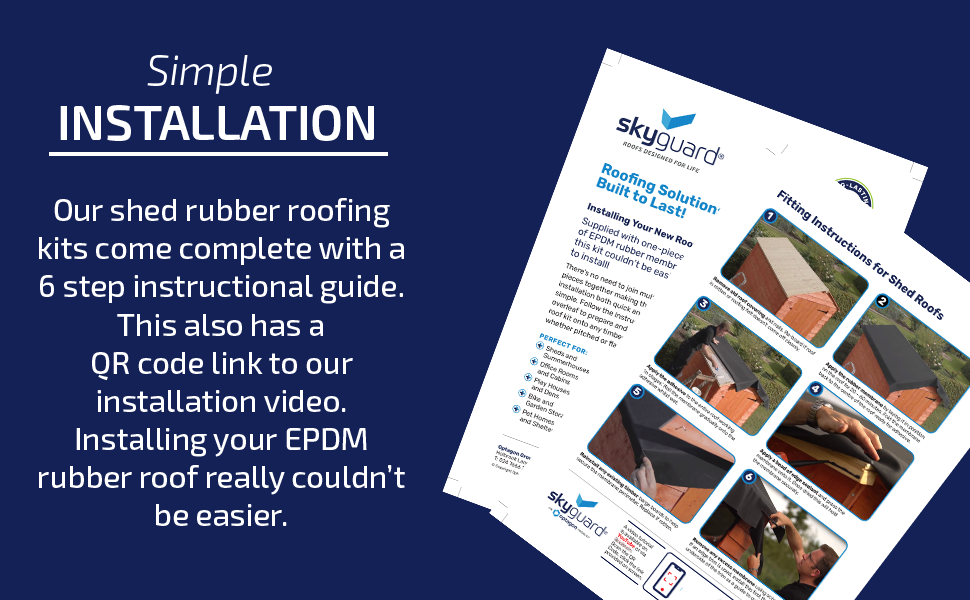
🛠️ Upgrade your shed roof once, enjoy it for decades!
SkyGuard's EPDM Rubber Shed Roof Kit offers a premium, single-piece roofing membrane designed for rapid installation without nail holes. Engineered for unmatched durability, it boasts a 50+ year lifespan with UV stability and tear resistance, backed by a 20-year guarantee. The complete kit includes all necessary adhesives and tools, ensuring a hassle-free, eco-conscious upgrade that outperforms traditional roofing felt by a wide margin.


| ASIN | B083SKB1BF |
| Base Material | Rubber |
| Base material | Rubber |
| Best Sellers Rank | 12,325 in DIY & Tools ( See Top 100 in DIY & Tools ) 50 in Roofing (DIY & Tools) |
| Brand | SkyGuard |
| Brand Name | SkyGuard |
| Colour | black |
| Country Of Origin | United Kingdom |
| Customer Reviews | 4.7 out of 5 stars 922 Reviews |
| Door Style | Hinged Doors |
| Frame Material | Wood |
| Is Assembly Required? | Yes |
| Item Weight | 6.03 Kilograms |
| Item weight | 6.03 Kilograms |
| Manufacturer | Rubber4Roofs |
| Material | Rubber |
| Material Type | Rubber |
| Style | Modern,Garden |
| Style Name | Modern,Garden |
| Top Material Type | Rubber |
| Ultraviolet Light Protection | uv |
| Unit Count | 1.0 gram |
| Water Resistance Level | Water Resistant |
M**R
Fitted it to my flat roof
Smashing stuff, plenty of glue with some to spare, so no need to skimp. Easy to work with, nice and thickness is just right. Watch the video to see how to apply the glue. I did my back porch area on a dry day, but not too much sun, as I didn't want to glue to go off before I was ready for the next section. I lipped the edge up on the sides and folded in the corners, as this was not a shed roof. I appled the glue to about 600mm depth of the roof and smoothed it down with a paint roller, being sure to push any air pockets out, I did the same size again, until I was lapping in to the gutter. It has rained heavy since and not a spot of water has got past it, I did add some side strips to cover over the lipping, as the sides were on to a garage and conservatory. I have posted a couple of pics. Well worth the cost, and a little of your time. I made sure to vac any dust from the before I started. Not one air bubble, don't forget to use a paint roller with some pressure, to be sure you get a nice bond with no air bubbles. Good luck and enjoy your new roof. I will do my workshop roof next year.
A**S
Great product, Measure twice before buying, quick to fit, minimal waste.
The kit turned up on time and contents were as expected: Exactly 3.0m x 3.5m rubber sheet circa 1.0mm thickness. Two tubs of glue and a mini-roller. Disposable plastic gloves. A tube of sky guard mastic. After reading some online information, I decided to replace the polycarbonate sheets with plywood sheets as product is described as for bonding to wood. Laying out the rubber sheet on the roof revealed how exact the measurements were. Thankfully 25mm on either side for the conservatory is sufficient to drop into the drainage channels, it was a bit close! I ignored the mini-roller as it was ridiculously undersized for the area I am doing. Made use of an old large paint roller I have. Having spent time brushing the sheet flat and letting it relax as much as possible I applied the glue. There is sufficient for the area, with little to spare. I have some left over as I have an overhang of 0.3m x 3.5m which requires zero glue. Otherwise I think like others there would be an exact amount of glue. Minimal wastage is good for the environment. Brushed out air bubbles as best as I could, and it is hard to do on an area this size by yourself. Having to accept it is not perfect. The glue changes colour from white to a luminous violet in the sunshine and if you get it your hands it becomes impossible to handle anything as the tackiness starts to kick in. Recommend a decent throw away pair or two of disposable gloves. I did not use the thin plastic one which are supplied. The bulk of the job was done in a day, having to resort to use of ‘flashband’ product, purchase separately , at the point where the rubber meets the wall to achieve a waterproof seal. I find the product is easy to use, apply and relatively quick to fit compared to traditional felt roof product and it should last 40-50years. Superb stuff. Just measure twice before buying. Keep the leftover rubber and use it for other tasks. I have found several uses for it over the years, mainly hose pipe washers, tap washers, weather strips, draft excluder. After a recent severe storm of high winds and rain, there are zero leaks, no drips and no trickles of water on the inside of conservatory as there was once before. Job Done. Well Happy. 😃
P**N
Good product
Very good kit easy to use great Finnish , no extra adhesive needed
P**R
Get help for larger areas.
Product was excellent and simple to use, although I would advise doing it with two people for larger areas. However instructions were limited, so I strongly recommend looking up the YouTube references to watch online instructions as this is very clear.
P**F
Fantastic if it lasts as well as expected
First off, I'm not an experienced DIY'er but I do like to "have a go" if I think a job's within my (limited) capabilities. I've not refelted a shed roof before so this whole experience was a first for me. My shed roof is roughly 11 ft x 12 ft. The SkyGuard membrane came as a single piece with two joins; the joined parts were all the same shade. (A nitpick of some other reviewers was that the constituent sections were different shades of grey.) The kit came with no instructions whatsoever, but it was easy enough to google around and find videos and the like explaining the installation process in detail. I found the membrane dead easy to work with (working on my own as I was), and I had it glued down to the roof timbers very quickly. I didn't bother to buy separate edge trims (available from some other suppliers); instead I simply used the sealant provided, which seems to work fine. In all, I have a high level of confidence that this roof covering is watertight and that it will last a long time - long enough for me to never have to recover the roof again during my lifetime. It's more expensive than felt, but well worth it in my opinion if it lasts as well as expected. I'll post an update in 50 years.
T**M
Great kit and great value
Good quality rubber, thick enough and strong. Plenty of adhesive provided, and plenty of edge sealant. All arrived in a nice kit with everything required. 10x6 shed completely re-roofed in 4 hours including an hour for the rubber to rest. Great value if it lasts as it should - the 'premium' felt only lasted 3 years!
M**N
Fantastic product to use.
This product does exactly what it says it does, if you follow the instructions as directed in the videos and have a structure that fits that brief then you will have a great experience. A Stanley knife or large pair of wallpaper scissors will cut the membrane easily. There is a seam when the size of the material is large enough and this can also be cut but needs a little more effort. Make sure you have all structural pieces in order before applying the membrane. Cut to size and as instructed add a little more on overlap. Do not scrimp here, you can trim but once it is down it is pretty much down. You can slide it around slightly. I did a single sloping roof and an intricate lower roof that the first slid over on wheels for an observatory build and there were a couple of limitations. The product works well over a flat single surface, as soon as you change levels or try to go up and over an edge there will be performance issues with the adhesive unless alternative or additional measures are taken. Be prepared to buy strong additional adhesive for situations like this. Corners were more difficult than I thought they were going to be and it wasn't always possible to fold and cover with a piece of wood that could be mastic and nailed. (Plan out your corners beforehand and have your materials at hand). I got some of the adhesive on the membrane as I worked and it was fine after. Don't worry too much about the odd dot it will not be visible. Wear gloves or be prepared to be rolling the stuff off hands for hours. It's not a super glue so it will need some time to stick and can be difficult to roll the membrane down in a crease and wrinkle free fashion. Best applied on a decent day, cold and rain don't help. I arranged the membrane below the area to be covered. Glued the top section for about 18 inches and rolled the membrane up into position. The remaining membrane could then be rolled up on itself above the adhesive, set in position and rolled down as more adhesive was added. It is at this point that smoothing the membrane out as you go is imperative. I hand smoothed and used a broom but it is not that easy to get a perfect finish. After a few days it looks pretty neat. Its the kind of job that you undertake and get better at each time, pity it lasts 50 years :)
T**S
Simple and effective
Much easier than felt to fit and looks better as its one piece. Easy to cut and fairly easy to remove bubbles. Instructions supplied for a pent roof but it's a little different for a single slope. We used a long piece of timber to stretch and anchor, working downwards. Wrapping it first to keep it tight and positioned for the adhesive.
Trustpilot
2 weeks ago
2 weeks ago