
Desert Online General Trading LLC
Dubai, United Arab Emirates
Desert Online General Trading LLC
Dubai, United Arab Emirates


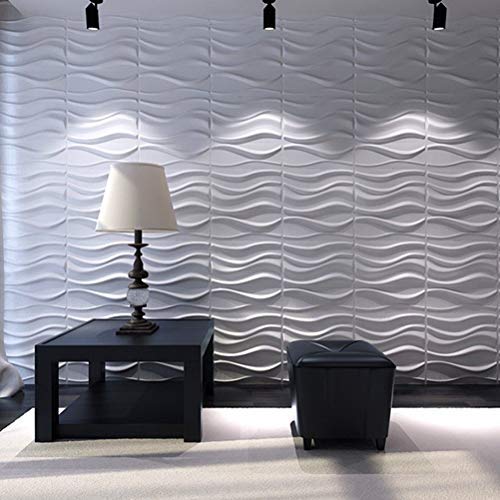


🌟 Elevate your space sustainably with Art3d’s 3D wavy wall panels!
The Art3d Decorative 3D Wavy Wall Panel pack includes 12 eco-friendly bamboo fiber panels, each measuring 19.7" x 19.7", covering 32 square feet. These polished, heat-resistant panels offer a durable, stylish Art Deco design that’s easy to install and customizable with paint, ideal for living rooms, bedrooms, kitchens, and feature walls.


| Brand | Art3d |
| Material | plant fiber |
| Size | 19.7"x19.7" |
| Color | Wavy-White |
| Finish Type | Polished |
| Style | Art Deco |
| Installation Type | Glue Down |
| Product Dimensions | 19.7"L x 19.7"W |
| Pattern | Panel |
| Item Weight | 0.6 Pounds |
| Shape | Rectangular |
| Item Thickness | 25 Millimeters |
| Edge Style | Square Edge |
| Unit Count | 32.0 Square Feet |
| Item Display Dimensions | 19.7 x 0.6 x 19.7 x 0.6 inches |
| Recommended Uses For Product | Living room, bedroom, kitchen room, TV background, feature walls, ceiling |
| Coverage | 32.00 Square Feet |
| Form Factor | Rectangular |
| Water Resistance Level | Not Water Resistant |
| Special Feature | Heat Resistant |
| UPC | 712809592234 |
| Manufacturer | Art3d |
| Part Number | A21031 |
| Item Weight | 9.6 ounces |
| Item model number | A21031 |
| Is Discontinued By Manufacturer | No |
| Finish | Polished |
| Item Package Quantity | 1 |
| Number Of Pieces | 12 |
| Mounting Type | Protruding |
| Certification | certified frustration-free |
| Special Features | Heat Resistant |
| Included Components | No |
| Batteries Included? | No |
| Batteries Required? | No |
| Warranty Description | 2 year manufacturer |
P**.
Really transformed a wall for our airbnb,
We had an accent wall at our airbnb, that was covered in brick wallpaper. It needed some modern updating and I came across these on Amazon as a solution.It took me about 2 days on and off to install them. I went with the plant based tiles, and while I like them, if I had it to do over I would go with the pvc option. The plant based tiles have a very comfortable finish, it really looks nice, and matte. They are basically a very nice, hefty cardboard, and I can see them taking stains and damage easier than the pvc option. With the plant based tiles too, I would be very careful about painting them, a light coat of paint or primer before hand, is probably a good recommendation. I can see them soaking up a ton of paint, becoming heavy, and not sticking to the wall. I used a contact cement and it worked well for sticking the tiles to the wall.Things that I did not think through that I should have before installation. You are going to want caulk between the tiles, even if you run them very close. You also want flexible caulk that is not going to crack. Have a good solution for cutting the tiles. I thought I could use wood saw and jig, but it did not give a clean cut like I wanted. I then tried metal cutting snips, and while they work for very small cuts, they do not do well for long cuts either. I ended up using a cutting wheel on a Dremel, and it did pretty well, I sanded and cleaned the edge a little after each cut. If I had it to do over again, I think a table saw and very small tooth blade would be the easiest and give you the best looking cuts. You are going to want to frame in the edges of the wall you do with some type of base board, I used 1/4 white square, and it worked well. If you don't, the edges of the tiles that meet the wall are not going to look good. If you have outlets on the wall, have a plan in mind. I cut out perfect holes in the tile for the outlets, then 3d printed some little riser frames to go under the outlet face plate. Also if you plan on going around a corner, this may not be the product for you, I recommend this just for an accent wall. I can think of solutions to get around corners, but it is going to complicate the job significantly.Overall very pleased, it looks great. It also looks way more pricey than it actually is. You will most likely spend the same for instillation materials as you will for the initial tile purchase, so keep that in mind.
K**.
Worth the work :)
Before I purchased four boxes of the Wavy 3D Wall art I read as many reviews as possible and thought that this was something I could handle. As some reviews mentioned some do's and don'ts. Well.... it never occurred to me that the wall of my choice for the art was not entirely square. As I live in an older home. So my dilemma was how to keep the pattern going straight and level. Next was finding how to secure them to the painted wall which had texture on it. I measured out how many panels would go across and then down the wall. No problem, until I found that I had to cut down a few panels to finish the one side, seven to be exact. No matter how I placed the panels on the wall I would have to cut some down to fit so I made the cuts on one side of the wall instead of dividing up the difference and having to cut fourteen panels. I was fearful that it would look chopped up on both sides. I found that by using a large sharp pair of scissors worked best for cutting the panels. Made clean cuts. Either for cutting around an electrical outlet or for smaller pieces. Now I had to figure out what product to use to adhere them to the wall. I found that by using my Hot Glue gun worked best and was easy to work with. You must work quickly because the glue will cool down and if not in place while the glue is still hot it will not stick. I placed a small amount on each corner of the panels and quickly put them in place. I also found that they were easy to remove if they needed adjusting, just reapply more hot glue. So after a weekend of working on this project I LOVE the end results. OMG...it's beautiful. I did not paint the panels, keeping them their off white color, but painted the three surrounding walls a little darker color and now the 3D art wall just pops. I'm have had so many compliments on my DIY project. Worth the trouble and hard work.
A**.
Nice design, hard pressed card board
These are not super hard to install, but it takes time to align them and for the adhesive to set.They are a hard pressed paper / card board. Means: it does not lay totally flat and need to apply some pressure until the glue sets.The gaps between each "tile" need filled and lightly sanded to make it once professional looking wall cover.While it is not really easy to install, the result is worth it.
D**Z
Cool look, not necessarily as simple an alternative to tile
We love the look of this panel but after all the work I had to put into it I'm not sure its any easier than a mosaic on mesh install. It's lightweight and only needs a general adhesive to be installed, however it didn't fit the measurements of our wall as hoped and we had to cut into the middle of the stone to make it fit. This meant we had to come back and fill and caulk all the way around because there were odd gaps across. It's a sturdy material but it's harder to cut than we expected so it made for some frustrating moments and bent cutters. The 3D shape makes blade cutting almost impossible if you have to cut outside of the trim. It's best to spackle the seams afterward. Installing around outlets is hard because of them being 3D. You need 3D outlet rings and you'll want to caulk around them as well. All this to say is they look really cool but I would not call this a cheaper, easier alternative. It took a lot of work and with all the extra things I needed to make it work I could have bought a mosaic on mesh at a wholesaler and it would have been comparable in work and cost with the size of job we did. I do however recommend the product if you like the look. It really is a cool style
Trustpilot
1 week ago
2 weeks ago


