🌬️ Cool Control, Hot Performance!
The Driver Module is a versatile PWM 4-Wire Fan Temperature Controller designed for PC fans and alarms, featuring dual independent temperature control, a digital display, and a stall alarm function. With a wide operating voltage range and user-friendly settings, it ensures optimal cooling performance for your systems.
Package Dimensions | 13 x 7.5 x 2.8 cm; 40 g |
Batteries required | No |
R**D
does what its meant to do.
Firstly lets address a common complaint... people say no instructions and it doesnt work...Took me a simple google search to find the manual online. Few things not quite what I expected, but it was fairly obvious once you realise how the buttons work.Google "GY17493", it was the top of the list for me, a pdf file on "aliyuncs".If you read the manual, it will work how you expect!Next... it is wired for a regular PWM fan with black, red, yellow, blue (-,+, taco, pwm)You set the fan speed to test, then the temp low and high... when it is higher than the set temp, the fan goes on and increases to 100% when it reaches the high temp.So it does the main job of fan on when too hot, incease fan speed as it gets hotter!If you dont need two channels, you can turn off channel 2.Yes the leds are a little bright, but that's not a show stopper... just put some opaque masking tape over the leds and you can then control the brightness the old fashioned way.
G**Z
Works really well
I can wholeheartedly recommend this fan speed controller. My application was for a high power RF amplifier.
D**L
Nice little Device
For the price it does a pretty decent job it has a few querks but eventually got the settings right despite no instructions which are below as i found them After i got it setup !!!!Setting Description:1. Basic speed settings: basic speed setting for adjusting fan speed before temperature control is started, which is the fan speed when it is lower than the accelerating speed temperature. Setting method: press the "OK" button in any operating state and at the moment, channel 1_two LEDs light up at the same time horizontally with LED display showing current setting value (10-100); set the size by pressing the “+”&“-”button and long-press the button to do continuous modification; press “OK” button after the previous setting; enter into channel 2’s basic speed setting; using the same method to do the setting and after the setting, press “OK” button to save it and exit.2. Temperature control zone and stop-rotating alarm settings: under normal operating state, long-press “OK” button until the display is L**(**is digit value); release the button; channel 1_two LEDs lighting up at the same time horizontally stands for being in channel 1’s accelerating speed temperature setting status; set the digit value (range 5-94, unit: centigrade) by pressing the “+”&“-”button; after the setting press “OK” button to enter into channel 1 full speed temperature status displaying “H**” ; set the amount by the same way (range 10-99, unit: centigrade); after the setting press “OK” button to enter into channel 1 stop-rotating alarm setting; “+”&“-”button setting; “boF” stands for stopping the channel stop-rotating alarm; “boN” stands for starting the channel stop-rotating alarm; after the setting press “OK” button to enter into channel 2’s digit value setting with the same quickly and setting method as the channel 1 did. After the above setting, press “OK” button to exit and save the parameters.3. Channel 2 displays blocking setting: in control panel power-off state, keep pressing “OK” button to power up it with LED display showing “2on” (starting channel 2 display) or “2oF” (blocking channel 2 display); release “OK” button; set switch blocking by pressing “+”&“-”button; after the setting, press “OK” button again to exit and enter into the normal operating status.4. Normal and reverse l0gic mode switch (newly added): disconnect the fan; under controller not being powered up status, at the same time press (keep pressing) “+”&“-” button to power up the controller; at the moment, controller enters into mode choosing status; release the button; press “+”&“-” button again to switch mode: displaying “F-1” is normal mode and displaying “F-2” is reverse l0gic mode; after the modification, press “OK” button to exit (automatically being saved when exiting) the setting.Setting Note:1. at speed and temperature zone setting state, if it stays more than 15 seconds without operation, it will automatically exit without saving any data.2. when the temperature zone is set, the same channel full speed temperature must be higher than its acceleration speed temperature at least 5 degrees centigrade; when you set a temperature digit value not meeting this conditions, the controller will automatically adjust another temperature digit value to ensure the conditions; this is an automatic one-way adjustment and if you need to adjust back, please manually adjust another temperature digit value.3. channel 2 blocking display settings only affect working status data display and do not affect control and parameter setting (it can work normally).SIDE NOTE: Using 4 x High Performance Noctua NF-P14s redux-1500 PWM Fans you do notice a Speed drop when setting them to 100% due to the power output from this module i assume as this modules Power Output is lower than the 4 Fans can use.
M**S
Fans not stopping when device is cold
Are these supposed to stop the fans working once the temp is down on the device or do they run constantly. I’m showing 13.9 on the screen and the fans are still running even though the temp was set at 15.0Can someone please guide me where I’m going wrong.Note* these are not set up in a computer but a cooling system for a DC-DC charger
M**T
Functionality and build quality great
Function of this little unit is brilliant with x2 temperature sensors and x2 fan ports, capable of 3 amps apparently. Planning to run x4 120mm Noctua fans from first port and x2 200mm Noctua fans from second port.Haven't connected it all up yet but build quality seems really good; soldering good, component positions consistent, connectors solid. Sensors and buzzer a bit rudimentary but suits the price-point and will be hidden anyway. Found a Youtube video that was reassuring in how it demonstrated usage. Very happy overall.
F**D
A1
A1
K**O
ne fonctionne déjà plus
ne fonctionne déjà plus après quelques minutes (sous 48V), même pas eu le temps de configurer le deuxième canal.
L**O
Funktioniert einfach
A**E
Funktioniert wie beschrieben
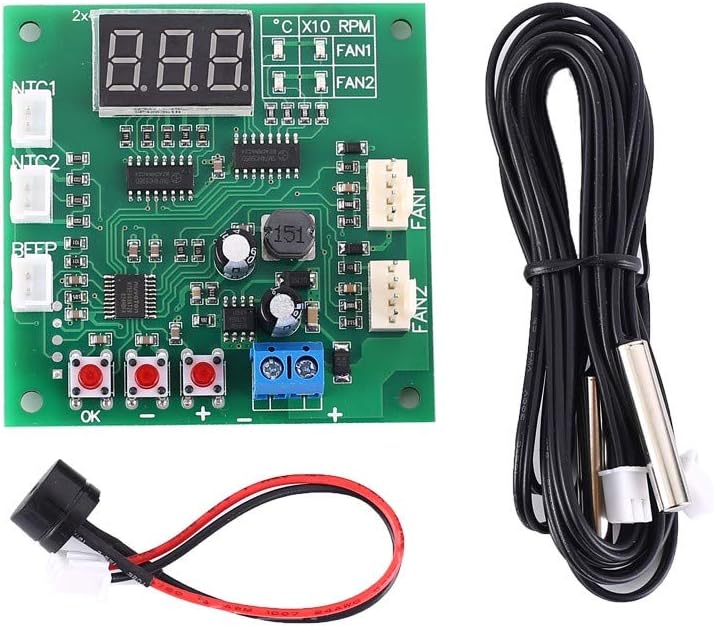
Die Steuereinheit leitet die Eingangsspannung an den Lüfter weiter, d.h. man sollte für 12V-PC-Lüfter auch nur ein Netzgerät mit 12V verwenden. Es existiert keine Anleitung, aber die Grundfunktionen sind schnell erklärt: die Anzeige wechselt zwischen den verfügbaren Informationen: Temperatur und Drehzahl. Bei Drehzahlen über 1000 wird die erste Ziffer abgeschnitten, da die Anzeige nur drei Ziffern darstellen kann. Es gibt zwei Temperaturfühler, die jeweils einen der beiden Lüfterausgänge steuern.Die Mindest- und Höchsttemperatur (H: High/Max, L: Low/Min) für die Drehzahlregulierung lässt sich einstellen, wenn man die OK-Taste für einige Sekunden gedrückt hält. Das Prinzip dürfte von diversen anderen Geräten (Monitore, TV, Backofen) bekannt sein: +/- um den Wert einzustellen, OK um zum nächsten Wert zu gelangen. Als letztes lässt sich auch der Warnton ein- oder ausschalten (on/off). Dieser scheint unabhängig der Temperatur zu erklingen, sobald der Lüfter still steht bzw. nicht mehr angeschlossen ist - dabei ist zu beachten, dass bei der Nutzung von Y-Verbindern (um mehrere Lüfter am gleichen Ausgang anzuschließen) immer nur ein Lüfter seine Drehzahl übermitteln kann und so ggf. einzelne Lüfter ausfallen können, ohne dass ein Ton erklingt. Der Warnton ist erfreulich angenehm, für manche Einsatzzwecke (vor allem im Gehäuseinneren) aber vllt. zu leise und unaufdringlich. Ich konnte keine Möglichkeit finden, den Warnton für die Überschreitung einer Maximaltemperatur zu nutzen, dafür gibt es aber inzwischen genügend Smart-Home-Lösungen, die dabei helfen können.Ich habe die Steuereinheit für den Betrieb von 4 PC-Lüftern zur Kühlung eines Netzwerkschranks gekauft und um ein Gehäuse, Stromanschluss über DC-Buchse und einen Ein/Aus-Schalter ergänzt. Einziger Nachteil an diesem Modell für mich ist der zweite Lüfteranschluss, der über einen zweiten Temperaturfühler gesteuert wird, was in diesem Fall eigentlich redundant ist. Leider zeigt die Anzeige im Wechsel auch die Werte für Ein- und Ausgänge, an denen nichts angeschlossen ist. Dafür sind die 4-Kanal-Buchsen von Haus aus mit gängigen PC-Lüftern kompatibel, was bei Steuereinheiten mit nur einem Lüfter anscheinend nur selten der Fall ist.
F**R
Funktioniert aber leider keine Beschreibung dabei!
Hat jemand einen link oder eine pdf mit einer Beschreibung für mich zu dem Produkt, denn ich kann den Verkäufer nicht erreichen? Andernfalls muss ich versuchen das Produkt zurückzusenden und erneut bestellen!Danke
T**.
0 Sterne kämen der Steuerung eher gerecht
Nach 10 Monaten und 15 Tagen stellte die Steuerung ihren Dienst ein.Das Motto des Verkäufers in der Artikel Beschreibung Zitat: “SHOP MIT VERTRAUEN: Um Ihnen den bestmöglichen Service zu bieten, wenden Sie sich bitte an uns, wenn Sie Fragen haben. Wir bieten Kundendienst an, bis Sie zufrieden sind.“ scheint ein Marketing Gag zu sein.Der Verkäufer ist nicht mehr greifbar.PS: Eine Beschreibung bei der Lieferung gab es nicht, findet man aber zumindest auf youtube.
Trustpilot
3 days ago
1 month ago