
DOWNLOAD THE APP


Customer Services
Copyright © 2025 Desertcart Holdings Limited
DOWNLOAD THE APP


✨ Restore brilliance, protect forever 🛡️
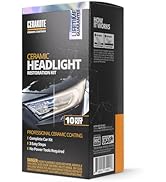
CERAKOTE® Ceramic Headlight Restoration Professional Detailer Pack offers 20 ceramic clear coat wipes designed for quick, professional-grade headlight restoration. Using advanced inorganic ceramic technology, it provides lifetime protection against oxidation, dramatically improving clarity and nighttime visibility. Ideal for detailing pros and car lots, each pack treats up to 10 vehicles with a fast, easy application process that cures in hours, delivering long-lasting, like-new headlights.


| ASIN | B08FF6X75N |
| Best Sellers Rank | #15 in Automotive ( See Top 100 in Automotive ) #1 in Automotive Headlight Restoration Kits |
| Brand | CERAKOTE |
| Customer Reviews | 4.6 4.6 out of 5 stars (65,188) |
| Date First Available | June 9, 2020 |
| Item Weight | 8.8 ounces |
| Item model number | AH-828 |
| Manufacturer | CERAKOTE |
| Manufacturer Part Number | AH-828 |
| Position | Front |
| Product Dimensions | 7 x 1.5 x 5 inches |
B**A
Great product easy to apply
I recently used Cerakote to restore the headlights on my 2010 Tucson, and I am absolutely amazed by the results! The headlights were cloudy and faded, significantly diminishing my night driving visibility and the overall look of my vehicle. After considering several options, I decided to give Cerakote a try, and I couldn't be happier with my decision. Applying the product was straightforward, and the results were immediate. Once completed, the headlights looked as good as new! The clarity restored is impressive, allowing for much brighter and clearer illumination at night. Not only has this improved my driving safety, but it has also enhanced my car's appearance, giving it a fresh and polished look. What stands out about Cerakote is the durability of the finish. Since the application, I haven't noticed any signs of fading or cloudiness returning, something I've struggled with in the past after using other products. It's a fantastic investment that truly revitalized my vehicle. Overall, I highly recommend Cerakote for anyone looking to restore dull headlights. It worked wonders for my Tucson, and I am thrilled with how bright and clear they are now!
C**E
Seeing is believing – INCREDIBLE ⭐⭐⭐⭐⭐
This Headlight Restoration Kit made me a believer – I’ve used similar products before but this Cerakote's Headlight Restoration Kit was both easier to use and the results were amazing! My son has a 2002 Infinity and the headlights were so fogged and yellow I figured we needed to purchase entire new headlight assemblies. But that option was going to be too expensive for this car. I read the reviews and figured it was worth a shot. Results were immediate and I am thoroughly amazed with the results and my son saved $$$ with this Headlight Restoration Kit. The instructions are detailed and step-by-step and we followed them exactly. I still find it hard to believe these old foggy, yellowed headlights turned out looking so clear - NO yellow - just crystal clear. And when driving at night he says the headlights are so much brighter which improves safety too. The whole car looks better with these clear and shiny ‘like new’ headlights. The product description, photos and all the positive reviews are consistent with our results. One of the best and most affordable improvements to my son’s car🚗
S**I
Review After Using on 3 Different Cars over 3 years
Cerakote Headlight Restoration Kit : After Using on 3 Different Cars over 3 years This is my second time purchasing the Cerakote Headlight Restoration Kit, and I’ve now used it across three different vehicles. At this point, I feel comfortable saying this product genuinely works when used correctly. Before trying this kit, I considered replacing my headlights entirely. The cheapest replacement set I found was around $150 just for the parts. Installation would have required removing the grille, bumper, and other components, which adds time and complexity. For an older vehicle, that didn’t make financial sense. Instead, I chose to restore the original headlights. Cost and Value My first package cost me $17, and I restored two cars with that single kit ( about 9$ per pair). That alone made it worth it. For under $20: I restored two separate vehicles Avoided buying new headlight assemblies Avoided removing the bumper and grille Compared to a $150+ replacement plus labor, the savings are significant. Durability 1 year+ under direct Cali sunlight (currently on year 2 and still good) First Car – Learning the Process The first time I used the kit, my results were decent but not perfect. That was mainly because I didn’t fully understand how sanding and polishing actually work. ( this reoxidized fastest under 8 months, but it was mostly my fault) I didn’t initially realize: The headlight needs to stay wet during sanding Oxidation must be completely removed before applying clear coat Even pressure matters/ 50% overlap coverage when appling ceramic Once I understood that sanding is the most important step, everything improved. Second Car (beater) Major Improvement The second vehicle was heavily oxidized and yellowed. I used the remaining material from that same $17 kit and restored it completely. The clarity difference was dramatic. It looked close to factory condition, and night visibility noticeably improved. That was when I realized the product itself is solid; the key is proper technique. Third Car ; Recent purchase By the third car, the process felt straightforward. I followed the instructions carefully, kept the surface wet while sanding, and applied the clear coat evenly in one smooth pass. The final result was clear, glossy, and uniform. No haze, no streaking. Durability On my first vehicle, the restoration lasted close to a year perfectly( I sold that car this year and it still had clear headlights), and that car was parked outside in direct sun most days. For a DIY kit at this price point, that level of durability is impressive. Final Thoughts I seriously considered spending $150 on replacement headlights( this was cheapest ) and dealing with removing body panels. Instead, I spent $17 and restored two cars. Now having used it on three vehicles, I can say this kit is effective, cost-efficient, and worth the time if you follow the process properly. It does require effort and patience, but the results justify it. I would purchase it again.
L**Z
Just as good as the other brand but this takes more wipes based on instructions.
I would give this 5 stars as it did exactly what it is supposed to do. If I'm being honest, the competitor popular brand we all know, works just as well. Only thing this one may be different in, is if it lasts as long as I own my car, like they claim. The description as well as the video do not say you get multiple uses or pads from this but I have seen reviews that you get multiple wipes for multiple uses, which is not true. If you read the directions on this, it says to use all of the wipes in the steps but I guess some people have cut steps or used less wipes and saved the rest. But with that in mind, if you follow the steps completely as instructions say to do this, the process is actually longer to complete than the competitor "popular" brand we all know. Both having equal effect but hopefully as they say here, it will last the entire time I own my car. We will see. So, yes, this product definitely works well!!
J**8
Worked like a charm
This kit came with everything you need. It had multiple oxidation removers. I only had to use one per light as mine weren't as bad. Instructions were easy. It helps to review the video first. You get a QR code to watch the entire process. There are also written instructions. If you saw the video, the instructions were very clear. I wasn't too sure on it as the headlights were pretty cloudy after the sanding. Once I added the final step, everything cleared up. The results were instantly visible. It looked great! My headlights weren't as bad as others I have seen but the change is still remarkable. This was an inexpensive, easy to use solution.
A**E
Das Ergebnis war wirklich phänomenal und ich kann es jedem empfehlen. Meine Scheinwerfer waren zuerst komplett matt. Nach der Anwendung waren sie wieder klar und sehen wie neu aus. Das Set ist einfach anzuwenden und die Anleitung ist sehr verständlich. Wenn man sich exakt nach der Anleitung hält, dann kann absolut nichts schiefgehen. Das Preis-Leistungs-Verhältnis ist top. Ich würde das Produkt jederzeit wieder kaufen.
N**E
Nice and good
R**.
Muy facil, muy entendible la aplicación, el paso 3 los deja como nuevos, en mi casi estan amarillos por dentro pero muy satisfecho, alcanzan hasta 2 carros con un kit talvez 3
P**P
I used this headlight restoration kit and the results were exactly as mentioned in the product description. My car’s headlights were yellow and dull, but after following the steps in the kit, they became clear and bright again. The process was simple, and all the required materials were included. The final finish looks almost like new, and the light output has improved a lot. Definitely worth the money and highly recommended for anyone wanting to restore their headlights without replacing them.
I**D
I very rarely write a review on products I buy from Amazon because what one person finds good another might find bad so I think reviews are subjective! But I’ve decided I needed to write a positive review on this product, it has absolutely transformed my old fiesta headlights and they are looking like new, I just wish I’d taken some before and after photos! I followed the instructions which were easy to understand and with just a little time and effort my headlights are totally transformed! Time will tell how long before they become oxidised again but if it lasts the year it was well worth the £18! I would definitely recommend this product and would definitely buy it again
Trustpilot
2 months ago
1 month ago