Description
🔥 Shrink your art, expand your style!
- EASY ENGAGING - Includes 10 sheets and simple instructions for instant crafting fun
- PERFECT FOR ALL AGES - Safe and fun for kids 5+ with adult baking supervision
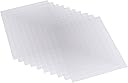
- ENDLESS CUSTOMIZATION - Blank transparent sheets let your imagination run wild
- CREATE UNIQUE KEEPSAKES - Make charms, keychains, jewelry, and more that stand out
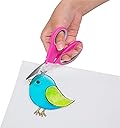
- TRANSFORM YOUR CREATIVITY - Draw, color, and bake your own glass-like masterpieces
The Shrinky Dinks Creative Pack includes 10 clear, 8x10 inch sheets that shrink when baked, allowing kids 5 and older to create custom glass-like charms, keychains, and jewelry. This easy-to-use kit encourages creativity with blank sheets and step-by-step instructions, making it a perfect hands-on craft for all seasons.