Desertcart purchases this item on your behalf and handles shipping, customs, and support to Greece.
📼 Digitize your past, own your nostalgia—before it’s gone!
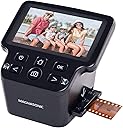
The Magnasonic FS71 is a compact, all-in-one 24MP film scanner designed for professionals and enthusiasts alike. It converts multiple film formats and slides into high-resolution digital JPEGs with a vibrant 5" LCD preview and HDMI output. Featuring built-in memory and expandable SD card support up to 128GB, it operates independently without a PC, offering fast, user-friendly scanning with adjustable color correction. Perfect for preserving vintage film archives with modern ease and speed.


| ASIN | B086DX4253 |
| Best Sellers Rank | #27,244 in Office Products ( See Top 100 in Office Products ) #6 in Slide & Negative Scanners |
| Brand | Magnasonic |
| Color Depth | 24 bits_per_pixel |
| Connection Type | HDMI, USB |
| Connectivity Technology | HDMI , USB |
| Customer Reviews | 4.3 out of 5 stars 3,007 Reviews |
| Item Dimensions D x W x H | 4.44"D x 5.43"W x 4.91"H |
| Item Weight | 13.44 ounces |
| Manufacturer | Magnasonic |
| Media Type | SD Card, USB |
| Minimum System Requirements | Windows 7 |
| Model Name | Magnasonic FS71 24MP Film Scanner |
| Optical Sensor Technology | CCD |
| Product Dimensions | 4.44"D x 5.43"W x 4.91"H |
| Resolution | 24MP |
| Scanner Type | Film, Photo |
| Standard Sheet Capacity | 8 |
| UPC | 061783270400 |
| Unit Count | 1 Count |
| Warranty Description | 1 Year Full Manufacturer's Direct Warranty |
| Wattage | 5 watts |
J**J
Picky photographer says: amazingly good for the price, much faster than traditional scanners
This is a great scanner for the price. I tested it on various slides, on different film types, too light or dark, with a color cast, etc. I'm a picky photographer. The scanner automatically brightened a dark slide to be exposed properly without being "blown out" (totally white), but overexposed slides came out dark; again, I used a photo editor to fix the image. I only scanned a few color negatives, so I can't comment in general... but one underexposed negative (which should be too dark) scanned too light, with no true black. So, again, a photo editor is your friend for improving some scans. The images from slides were very sharp. I could see the film grain in the scanned image. The cable is fairly short. You might need a longer USB-A to mini-USB cable. The unit gets power from the USB cable. If you don't have a computer, you'll need a mini-USB power supply brick that plugs into a wall outlet. (This means you can use the scanner on a laptop.) The scan was almost instant. (Unlike other film and paper scanners I've used, there's no light/scan bar that moves across the image.) From a 35mm slide I got a scan file 6000x4000 pixels, 6.2 MB file size. (The 6.2MB will vary depending on how complex your original photo is... that's how JPGs work.) A bit of the edges were cut off, but this was usually fine. The color adjustments are in steps and a bit coarse (0, 0.5, 1.0, etc.; you can't pick a value between). They worked pretty well for big changes, but I preferred a photo editor and a computer screen. You'll need to understand that these three settings -- red, green, and blue -- can be negative to add the opposite color. For instance, yellow is the opposite color of blue. If the image is too yellow, you can't reduce yellow; you have to increase blue. If you don't want to fiddle, your photo editor probably has a "fix color" setting you could try on the saved image. Note that the scanner "remembers" the previous color adjustment... if you don't want that, reset each color after you finish one slide or you capture the next slide. The single negative holder is really frustrating because it doesn't hold a strip of film tightly... so, as you try to put the film strip in the holder into the scanner, it can shift and make the scan off-center. I've ordered a negative holder that holds a whole strip of six photos; that should be a lot easier! Tip: You don't need to open the single slide holder to put a slide in it, then close it. Instead, while the holder is closed, try pushing the slide in from the left end, as in the photo. To avoid touching the film (which will make a fingerprint that can eventually eat into the film!), use your fingernail to scoot the inside of the slide mount left and right. Vertical photos have to be turned to go into the scanner horizontally. I rotated them with the lossless JPG rotation in the amazing free Irfanview app... or you could open the image in a photo editor, which takes a bit more time. On my Windows 11 desktop, when I went to "Connect to PC" on the scanner menu, the File Explorer app opened. It (in this case, the F: drive) showed the photos in the scanner memory. You'll need to transfer the photos yourself if you want to keep copies after you unplug the scanner. If you aren't familiar with File Explorer, you can probably use another app that copies the photos for you. Kodachrome slides scanned just fine. (Kodachrome is a problem on some scanners.) To help avoid dust spots, insert the cleaning brush through the slot once in a while (dust wasn't a problem for me, though). After you line up the film in the holder but before you put the holder into the slot, use a can of compressed "air" to blow away dust (invisible or visible). If spots bother you after you see the scanned image on a computer screen (where it's much easier to see the spots), use something like the Healing Tool in the powerful free GIMP editor (gimp.org). If you don't line the film up exactly, the scanned image will have a black bar at one side. I had to move the slide holder while it was in the scanner to get rid of the bar. Luckily, after pressing the Capture button, the image on the scanner screen is "live": As you move the slide holder left and right, you can see the black bar disappearing. A scanner like this will be designed to cut off a bit of the edges so you normally won't see a black edge on any side (which would be caused by scanner scanning some of the opaque cardboard slide mount). Some cardboard slide mounts were too thick to fit in the holder easily. A lot of the slides were too thin; they shifted left and right as I handled the holder... I had to carefully hold it flat as I put it in the scanner. Tip: I scanned an underexposed negative, which should come out dark. But the scan was too bright: a bit "washed out", with no true black. I opened the scanned negative in a photo editor and checked the amount of red, green and blue in the scanned file; it didn't have any true darks. (The photo editor's histogram shows this: the left side of each curve, which shows how much of the darkest shade of each color is in the scan, shows no dark colors.) I used the editor to "drag" the left edge of each curve to span the whole width; that improved the scan a lot. (Note: don't just turn down the brightness in the editor because you'll probably lose the brightest colors. Spread the histogram curve so you'll have dark darks and bright whites.) I've included the original scanned photo and the one darkened with my photo editor. Overall, for the price -- even with irritations like trying to align the film in the holder -- this scanner is amazing.
N**S
Amazing
Idk what all these bad reviews are about but this thing is amazing. Don’t need to edit any of the photos and the quality of the image is perfect. I feel like I’m getting more than what I paid for. Been running film through it all day and no issues. It doesn’t scan 120 film but I found that if you put it in the 126 adapter and scan in 35mm it’ll scan it perfectly! Also if you’ve had sd card errors you have to make sure you’re using a newer higher gb sd card atleast 64gb and make sure to format the card on the machine before scanning.
T**N
Cheap, efficient, and worth it
I finished scanning over 8,000 negatives (up to 35 years old), including one Black&White set of negatives. On the whole, this is a really awesome little gadget. It does all the basics, very efficiently, and with a very minimal learning curve. I managed to complete my scanning in less than 6 weeks, working basically on weekends (maybe 40-60 hours tops). It really beats having to scan your prints, using your home printer, at the rate of 3 minutes per print, assuming you have a decent copy of your prints. With this machine, it takes longer to get the negative out of its current location, identify the proper side, than to load it and make the digital copies. I have not tried any of the other similar products, so I'm not sure how they compare. What I've used: - Different negative types (mainly 35 mm, color & black&white, some 110, some 126) - it has all of the adapters - A perfect little dust brush to clean the interior glass surface on a regular basis (particularly if you own cats/dogs in the house). - The brightness setting for particularly under or over-exposed pictures. Keep in mind that it won't make the picture better, just lighter or darker. What you'll need: - an SD card to load your scanned images, which you'll then need transfer elsewhere A couple of things that could be improved: - With the included adapters, you can only scan the equivalent of a 4x6 ratio, which you can easily adjust horizontally (left or right) as you see fit, but which you cannot adjust vertically (top or bottom), meaning that it crops the top and bottom for you systematically. The only way around the vertical cropping is not to use the adapter and feed the negative without the adapter, at the risk of not positioning it quite right. I only did that for a few pictures. - It would have been nice to have a USB cable into your computer directly and skip having to scan the negative onto an intermediary SD card. I guess it was fine though, the SD card served as my backup until I copied the photos to alternate devices. However, the SD card adds on to the overall price of the project, but you can repurpose the card later. - The default color may not be perfect, although who knows whether it's the machine's fault, or the deterioration of the colors on the negative strip itself. I had a hard time using the feature without the original print for comparison. A few things to keep in mind: - If your negatives are in good shape, and were high quality to begin with, this machine will work beautifully. If your negatives are bad, no machine in the world will make them better. - If you need a poster size high-quality image, then you might consider taking those negatives to a professional. But for 4x6 prints, this machine is fine. For perfection, you'd have to invest in a much fancier, pricier and more time-consuming device. If you have the time and money, that would be ideal. In the meantime, this little machine is pretty nice.
B**R
Quality machine, works great
I love this scanner. I have scanned a large box of slides for my family and they are thrilled. Easy to use, lightweight, easy to clean with enclosed tool. Great quality and easy to connect. Great price for what I need it fir.
J**G
Gets the job done, but feels very cheap "you get what you pay for"
TL;DR: Cheap, usable, but dark by default, crops the image more than expected, and requires post-processing to look good. This is very much a "you get what you pay for" item. It feels cheap and outdated, and the quality is just average. ---------------------------------------------------- Out of the box, scans are noticeably dark and flat. You typically have to increase brightness (+0.5 to +1.0 EV) to get usable results, especially with older or dense slides. Even then, dynamic range is limited and shadow detail is weak. Expect to do post-processing if you want the images to look good. One of my biggest complaints is how much the scanner crops the image. Other reviewers are right! Compared to other methods, the Magnasonic consistently cuts off more of the slide frame and edges. This isn’t optional or adjustable. If you care about preserving the full image area, this is a major drawback. I thought it would be okay, but it really bothers me. I’ve attached comparison photos showing: - Magnasonic default settings - Magnasonic with +1.0 brightness - A photo taken with a Pixel 10 phone through a handheld slide viewer (pardon the dust--it's inside the viewer) These comparisons make it clear what the scanner does well (consistent, neutral capture) and where it falls short (limited dynamic range, muted color). The phone photos often look better immediately due to aggressive AI processing, while the Magnasonic scans look flatter and require more work afterward. The live preview can flicker when scanning very dark slides, which is distracting (though the saved image itself is stable). The scanner also has no clock, so every image is stamped with the same incorrect date, which creates extra cleanup work if you upload to Google Photos or care about metadata. This is not a high-quality archival scanner. It's a low-quality way to digitize family photos for funsies. Colors are muted, contrast is low, and fine detail is only average. It’s usable, but it feels outdated and cheap compared to modern imaging tools. If your goal is museum-quality scans or full-frame preservation, look elsewhere. If you just want an inexpensive, basic way to digitize slides and you’re willing to accept cropping, limited dynamic range, and extra post-processing, this scanner will do the job I guess. For the price, it's "good enough," though it's really only worth 2/3 of the price, IMO. I don't think I'll send it back, but I wouldn't recommend it. I'll probably still end up getting my best slides processed by a professional scanning service.
J**S
Does a very good job!
Bought this because I have many hundreds of 135 slides (some older than me) and I wanted to convert them all to digital. If I sent these slides out to have someone else convert them for me, it would cost easily over a couple thousand bucks. I purchased the Magnasonic All-in-One 24MP Film Scanner for $119. I'm very pleased with it. Very easy to use. Just plug in the USB cable to the included power adapter (same thing as any USB power adapter for your phone), or directly to your computer. No software needed. Comes with film negative and slide insert trays. The learning curve on this device is easy. When you turn it on, the menu is self explanatory. Just insert the slides into the machine, center the picture, and then hit the scan button, and in about 1 second, the slide is converted into a JPG format picture which is saved in memory. You can add a 128G SD card (not included) for more memory. After your slides are scanned, you can select "Up-load Pictures" (needs to be connected to your computer thru USB), and your computer can access your picture folder just like a USB thumb drive. Copy and paste the pictures where you will. With this, I was able to insert and scan a slide about every 5 seconds. Picture scans are very good quality. Image dimensions are 6000 x 4000. Resolution is 72 dpi. Bit depth is 24. Average JPG file size averages about 4.5 to 5.1 Megabytes per picture. I displayed these on a big screen TV through a HDMI cable, pictures display nice and sharp. I would recommend the Magnasonic All-in-One 24MP Film Scanner to anyone who needs to convert their old slides.
N**D
Easy to use slide and negative scanner
I wanted to find a way to preserve old family slides. I considered sending them to a professional slide/film scanning company, but was hesitant because of the cost and fear of what if they got lost or damaged. After recent surgery, I was getting bored having to remain home bound for several months while I recover. I looked into different scanners and decided on the Magnsonic All-in-One after researching and comparing to models like the Kodak Slide N Scan - this one suited my needs. It’s very user friendly. Can be used right out of the box. The only thing I needed to do was purchase an SD card (sold separately) and format it which was very easy to do. I had to get used to how to use this, but once I did it is very simple to use. It’s time consuming if you have a lot of slides or negatives as you can only scan one at a time, but again right now I have the time. I did a few at first, then inserted the SD card into my computer to make sure I was actually capturing the images. It works! I recommend this. I tried to upload a video of how to use this but I ran into issues, so I posted pics. I will try again to get the video uploaded.
A**2
Nothing special, but does the job
We've been using this to scan old photo negatives for a couple months now, slowly working through our collection of old photos. It works quite well; easy to use, way cheaper than a mail-in photo scanning service, and good quality. You can easily see the film grain on scanned negatives if you zoom in, and I have no complaints about color accuracy, blurriness, or other image quality issues. As for the product overall, so far I only have a few minor complaints. The biggest one is that there doesn't appear to be any way to set the date on images as you scan them. This is a pain because it means we have to go back and forth, transferring images to the computer and setting their date there for each album we scan. It would be really hard to remember which pictures were taken on which dates if we scanned multiple items and had to fix them all at once later, and leaving an incorrect date set in the photo metadata would make organization a huge mess. (Imagine scrolling through your camera reel in Google Photos, and suddenly coming across 2000 pictures all on the same, incorrect date. That'd be super annoying.) Another issue is that the film adapter had some plastic ridges on the inside that kept getting caught on the (slightly bent) film as we scanned it, preventing us from inserting the strip more than a few inches. I was able to solve that by filing down the plastic in the offending areas, but it was an annoying design flaw nonetheless. Another thing to note is that this scanner does crop off small portions of the negatives as you scan them. It's not a big deal because you can see what's getting cropped off and adjust the position before you save the photo, but for those deeply concerned about preserving all available information that might be an issue.
H**S
Facilidade de uso
Fácil de usar. Boas conexões. Ótimo passatempo para escolher as fotos antigas.
H**Y
Magnasonic FS71.
Magnasonic FS71 arrived in a timely manner. Relatively easy to use. Care has to be taken with cleaning dust that gets into the scanner - the cleaning brush included with the item works reasonably well. The FS71 can be connected to a monitor - which is useful for checking how well the slide/negative will scan before saving the scan. Manual operation required - which is slow - especially if dust on slides/negatives has to be removed. Easy to transfer/copy the saved images from the FS71 to PC.
M**E
Excellent viewer, easy to use
I bought this to look through some old slides that I found at my mum's house whilst clearing it out. I wanted an easy way to view a large bag of slides from the 1960s - 1980's. This is so easy to use. You put the slide in the adapter provided, and then manually push the slide through the viewer with the next slide. It's easy to change the colour and brightness if you need to. Then just 1 press will capture the image onto the SD Card for you. It's only a few seconds per scan, and they are good quality. The picture above is from 1972, I did not edit any colour balance. I think the Magnasonic has produced a brilliant image. It is cheaper than other viewers out there, but it is certainly not lacking in quality. Again, as others have said, if your source image is faded or poor, then you won't get a brilliant scan, but otherwise I have absolutely no issues with it.
A**D
ممتاز
يعمل بكفاءة كل انًواع النجاتيف والإسلايد تقريبا
ヨ**ー
過度な性能を期待しない〰️✨
高解像度は期待しない事〰️✨ あくまでも大量のフィルムから必要なモノをチョイスし軽い気持ちで電子化する用と考える❗
Trustpilot
3 weeks ago
1 month ago