Desertcart purchases this item on your behalf and handles shipping, customs, and support to Greece.
๐ฅ Upgrade your kitchen game with GEโs radiant power!
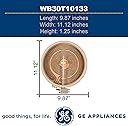
The GE WB30T10133 is a genuine OEM 9-inch radiant dual surface element designed for select GE electric ranges. Crafted with durable stainless steel and metal, it offers an exact fit for seamless replacement, ensuring reliable, even heating. Backed by a 1-year warranty and trusted by hundreds of users, this element combines professional-grade performance with easy installation to keep your cooking on point.


| ASIN | B004H3XQY8 |
| Best Sellers Rank | #105,403 in Tools & Home Improvement ( See Top 100 in Tools & Home Improvement ) #31 in Appliance Replacement Fasteners |
| Brand | GE |
| Brand Name | GE |
| Controls Type | Knob |
| Customer Reviews | 4.5 out of 5 stars 688 Reviews |
| Form Factor | Drop-in |
| Global Trade Identification Number | 00048172018645 |
| Included Components | Single GE WB30T10133 Genuine OEM 9" Radiant Dual Surface Element for GE Electric Range |
| Item Dimensions D x W x H | 1.25"D x 9.75"W x 1.25"H |
| Item Part Number | WB30T10133 |
| Item Weight | 16 ounces |
| Manufacturer | GE |
| Manufacturer Part Number | WB30T10133 |
| Material | Stainless Steel, Metal |
| Material Type | Stainless Steel, Metal |
| Model Name | WB30T10133 |
| Model Number | WB30T10133 |
| Number of Heating Elements | 2 |
| Number of Items | 1 |
| Product Dimensions | 1.25"D x 9.75"W x 1.25"H |
| UPC | 048172018645 |
| Unit Count | 1 Count |
| Warranty Description | 1 year manufacturer warranty |
C**O
This is the genuine article.
We've had a radiant heat LG stove for more than 12 years. Inner burner on left side quit working one day. Not really surprising, since it was the one we use the most. The electrical terminal overheated and broke off, and the wiring connector was also a little crispy. I repaired the wiring, but the burner had to be replaced. Ordered it Friday night, and it arrived a day early on Sunday. An easy fix. This burner is the real thing, same color parts, stamped numbers, size, shape, etc. It was less expensive by far on Amazon than other parts replacement websites. I did not want a cheaper one from a brand name that is just a jumble of letters, even if it does say "upgraded." I was puzzled at first that a part for an LG stove came up as GE, but it was the exact same part number. And the first one lasted more than 12 years.
S**Q
Works perfectly
Fantastic! Saved us the expense of buying a new stove. Very easy DIY project.
B**L
Unit works great! As good as new.
Fit right the first time. We've been using this for over a year now. Heats up fast, has worked great ever since installing this replacement. Perfectly compatible with our our GE Adora oven.
A**K
Perfect! Works great and packaged well!
Got this for my 4-yr old GE JB650STSS Range to fix the following scenario: Front-left burner stopped working with hot-surface light on 24/7 even w/ a cool surface. Switch light turns on but burner refuses to turn on. Short-story: this part came quick and packaged really well and most importantly, it works! Long-story: I'm a typical guy who has never serviced a range before, but I've done minor handy work around the house. If you're not confident in doing this, hire license people to do this. First off, I had to figure out whether its the switch or the burner itself that was broken. In mine's a burnt spot was visible in my burner right at the end of the metal rod and below coils. Before you check anything, turn off range breaker and pull plug. Electrical range electrocution may be fatal! To check the burner, you will need to unscrew 2 screws on the front right above the oven door. From there you can open the oven much like opening a car hood and see the burner backs. The front-left burner is attached to the glass surface via 2 metal hinges. Unplug the wires first and then use a needle-nose pliers to unhinge the burner. The hinges are a little tricky but if you examine them you will notice there's a little nub that locks the hinge to the burner's frame-holes. Pull against the nub to unhook first and then it should slide off easy. Once the burner is off, check for signs of black burns. You can also check continuity/ohms via multi meter. Hot-surface light is controlled individually by the burners and not the switch for this range. To check the switch, you will need to unscrew a few screws in the back to access the switches. You will also need a multi-meter to measure the continuity/ohms of the switch when its in the off and then the on positions. For instructions on how to use a multi-meter on the switch, refer to YouTube as I'm no expert (or beginner for that matter!) in this unfortunately. You can also open the switch to check for any burns.
A**R
What I needed.
Fit perfectly, easy to install. Too pricey, but needed it quick.
G**E
Easy to replace your stove's burner and save big bucks
Buying this burner saved me a lot of time and money. I found several you tube videos that show how easy it is to replace the burner and fix your stove. It was my first time and was easier and quicker than I had thought. Be sure to check the model number of your existing burner, before purchasing. Recommended.
W**Y
Easy Burner Element Replacement You Can Do -- Save Hundreds of $$$
From the man of the house. We have a $750 GE Range. This is the 2nd time the 9" front burner on the left has burned out. It is a fast-boil 3,000 watt item with 2 selections -- small and larger burners. The first time it went out, we had a repairman come. The whole process of inspecting the stove, ordering the part, and then returning to install it, took several weeks and $250! Then, a year-and-a-half later, the burner went again. This time I decided to repair it myself. I ordered this part, which came (with Prime shipping) in 2 days. The first thing I did was turn off the range circuit breakers at the outdoor panel. I checked that the clock etc. was out, and none of the burners would come on, to make sure the power was off before I opened up the range. I'd watched the repair guy and made notes, so I knew all I had to do was remove 2 screws situated under the glass stove top (I had to open the oven door to expose the screws. I took a piece of scrap wood, about 2 ft long, raised the entire top (hinged at the back), and propped it up with the wood. I compared this 9" dual burner element with the old one still in the stove to see that it was identical. First thing I did was make a little diagram to remind me which wires went to which "prongs." They are color coded, and the prongs are easy to identify. Then I used needle-nose pliers to pull off the wires in order from left to right. They are the slide-on "sleeve" type, and it took jiggling on a couple as the high heat had made them difficult to get off. There are 2 clamps that hold the element to the glass top and I was able to get them off pretty easily. I removed the old element, and while it was fresh in my mind, lined the new one up exactly like the old one. I put the clamps back on it. Like the repairman, I used a flashlight shining from underneath, while I checked from the top to make sure the element was exactly where it should be. I hooked up the wires again, in reverse order from right to left, until each of the 5 (color coded) wires was back on its prong. Easy. I removed my piece of wood and lowered the glass top. Then I went out and flipped the circuit breaker back on, returned to the kitchen and checked that the clock was back on, both elements of the burner were working, and the correct indicator lights came on (near the knob, and the heat warning light under the stove top). Everything looked good so I screwed in the two screws that hold the stove top down. This time, the entire repair only cost me the price of this element. The whole thing took about 15 minutes. Recommended!
J**N
Junk
This burner went out after just over three months! I had ordered an off brand and it only lasted five weeks, so I figured I'll get an OEM part.... Well, it lasted about three times as long but what a joke. Where's can you get quality parts these days????
L**Z
Estaba todo quebrado
La pieza venรญa toda quebrada
M**R
Great!
Thatโs was the perfect piece for my oven. Very easy to install and save lots of $$ to do it myself. Work well.
B**D
Element
OEM product, fit right in and works great
S**L
Bien observer avant de brancher
Fonctionne bien !!! Lors de la connexion, bien observer les lettres inscrites sur les connecteurs pour le branchement. Ne pas brancher selon l'emplacement original sauf pour les deux fils de courant ( un a chaque serpentins)
V**R
Fast shipping & OEM product
GE OEM part, fit perfect without any modification. Saved me from buying a new range.
Trustpilot
2 weeks ago
1 month ago