🎨 Unleash Your Joy-Con's True Colors!
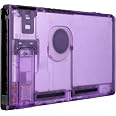
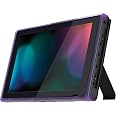
The eXtremeRate Clear Atomic Purple Joycon Handheld Controller Housing is a custom-designed replacement shell for Nintendo Switch Joy-Con controllers. It features an ergonomic D-pad for enhanced gameplay, is made from durable ABS material, and comes with all necessary tools for a DIY installation. This vibrant shell not only improves functionality but also adds a personal touch to your gaming setup.


| Material Type | Plastic Acrylonitrile Butadiene Styrene (ABS) |
| Item Dimensions W x H | 6.1"W x 3.54"H |
| Color | Clear Atomic Purple |
| Hardware Platform | Nintendo Switch |
M**R
Second time with a shell-swap, Just as smooth as the first
Shells are a nostalgic color and came with 2 different D-pads, one in black and one matching the shell color.There are tons of guides available online. The best one I would recommend is the "NintenDIY" tutorial from CptnAlex. It's fast, simple, and gets the job done for both experienced tinkerers as well as beginners.It has been about 3 months since installing these and have zero issues. They perform just fine. To make the installation process easier, go into your Switch settings, go to controller input, and test ALL the button inputs before screwing the back onto the front.One of the more annoying things I forgot was the '-' button. It felt mushy and difficult to press, that's because the grey membrane wasn't situated correctly. Also don't forget those black dust protectors around the joystick. Those are easy to miss.Overall solid product. Can always rely on Extremerate for customization, however. I RECOMMEND you purchase your own screwdrivers. The two they send you are not that great, and you really don't want to strip any screws. Good Luck!
T**E
Great shell replacements
Great shell replacements. Overall the right joy on was a little more difficult than the left. Don’t over tighten screws just barely snug. All in all awesome customization. My old white joycons with my ILED had sticky buttons and were scratched up. This is new and has a nice crisp look. I like the full D pad for retro games also. .
P**G
transparent blue
Comes with replacement screws and springs. I used the original screws since i was not sure the quality of the screws. It also cames with a set of screwdriver but the tip chipped off as soon as i tried to remove a screw. Assembly was easy as long as you're organize, patient and have the right tools. don't over tighten it as the plastic tend to strip easily.The quality is ok with a matte finish to give that nice grip feel, one of the trigger button feels softer than normal. One thing i do love is the dpad. It's really good and responsive.Things i would recommend getting also is a set of ifixit tool set and doublesided tape. it will make you life so much easier with that tool set.
M**S
Challenging install but great product!
These look great. I had two matching pairs of boring grey joycons. Now one pair is a grey transparent with colourful buttons! Installation was tricky (which I kind of enjoy - working on small electronics is satisfying for some people!). I broke one joycon while installing - I think I must have shorted out the main board on it. Take your time installing! The right controller is much more complicated than the left, so maybe start with the left and figure out what you're doing then go to the right one. Fortunately a replacement joycon was inexpensive on ebay and on my second try they both seem to work great. Installation was not a fault of this product, they supply replacements for all of the screws and springs, as well as good quality (especially for the price) screwdriver and bits for the job.Would do this again! Would just be a little more careful the first time! Thanks !
R**N
Not the easiest swap
I've modded my 3DS and GBA SP, as well as various controllers and the right joycon is one of the more difficult swaps I've done. If you are patient and gentle and follow a video guide you should be fine.Just a few things of note:There are about 6 tiny and fragile ribbon cables with tiny clips on each joycon. They all detach and reattach differently, which is why I reccomend a video (or take a video/pictures of how and how far the cables go in before they are clipped in place. Some have bumps to indicate, others do not. I had two I thought were in place pop out as I went on to the next step. Again, why I reccomend a video over a quick guide with some pictures.The rz and lz require a little force to remove from the old piece so I held my breath a little there.Other than that it wasn't too bad and the left joycon is much easier than the right so maybe do that first to get an idea of what's to come with the right one. Only weird thing was there are these 4 screws that form a square and 2 screws are short and 2 are long, so don't mix those up.Overall looks great and feels as good as the priginal buttons, but the D-Pad feels amazing compared to the original 4 button setup. I ended up using all the original screws but it comes with everything you need (even springs) as far as I can tell.
B**T
Be sure to have flush cutters for the buttons.
Make sure you have some pointy tweezers and some flush/sprue cutters to make things a little easier.Everything came out great. My only critique is with the video. There were a couple of issues. One was addressed by the company on their website (be sure to pay attention to that). The issue was that in the original video they installed the cable upside down.The other issue was that they didn’t swap over the dust cover thing (for the joystick) on the first controller, so I didn’t think I was supposed to, but then they did it on the next controller. This was when I checked out someone else’s video to see if they kept the dust cover. They did. So I went back and disassembled and reassembled the first controller all over again to swap the dust cover.The parts seem great and everything turned out fine. It takes some time and patience, but it was worth it.I bought both the green and purple sets so I could have one controller of each color.
Trustpilot
2 weeks ago
2 months ago