🎯 Master your space with the ultimate cord control kit!
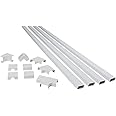
The Legrand Wiremold CordMate II is a 12-foot, white cord cover kit designed to conceal and protect up to three cables. Featuring a durable low-profile plastic build and self-adhesive backing, it offers easy, customizable installation with included fittings for corners and junctions. Ideal for wall-mounted TVs and indoor floors, it enhances safety by reducing trip hazards while delivering professional-grade cable management trusted by pros.


| Manufacturer | Legrand Wiremold |
| Part Number | C210 |
| Item Weight | 12.8 ounces |
| Product Dimensions | 48 x 1 x 0.1 inches |
| Country of Origin | USA |
| Item model number | C210 |
| Is Discontinued By Manufacturer | No |
| Size | 144 Inches |
| Color | White |
| Style | Conceals up to 3 cables |
| Finish | white |
| Material | Plastic |
| Pattern | Cord Organizer |
| Installation Method | Self-Adhesive |
| Item Package Quantity | 1 |
| Number Of Pieces | 3 |
| Certification | No |
| Included Components | 12ft of Cord Channel (3 sections, 4ft long)^ 2 Flat Elbows^ 1 Inside Elbow^1 Outside Elbow^ 2 Couplings^ T-Fitting |
| Batteries Included? | No |
| Batteries Required? | No |
| Warranty Description | Limited one year warranty |
A**K
Worked well on clean textured wall
Great product for hiding and directing one or more cords, which adheres well and looks great. Not designed for use on textured walls, however the adhesive is very strong and will work on them if the texture is minimal and the product is not overly stuffed with cables.I purchased this item through the Amazon Warehouse at a significant discount. The package arrived with Installation Instructions and all the pieces pictured, however the package had been opened before.I wanted to contain the cable from my Mohu Leaf 50 Indoor HDTV Antenna (formerly Leaf Ultimate) to my HDTV. I used two of the strips and one elbow joint for this project to contain and guide the one cable from the antenna over a doorway and down one side of it to the TV. I made sure the wall was clean and dry prior to installation, as well as making sure the cable would easily fit inside and that the strip would snap (locking it).TIP: Place the cable or cords into the Cord Mate II strip you want to use, and snap it shut, prior to placing it on the wall. Then peel back small sections at a time, pressing down on the section with the exposed adhesive and holding it for a few seconds prior to moving on with the installation. This makes for easy installation.I installed one length, then attached the elbow to the installed length, placing the next strip inside the elbow (with the cord already snapped inside it) prior to removing its adhesive and completing the installation.I like that you can cut and paint or stain this product, however I didn't have the need to do either.There is a (2) power cord maximum capacity for this item per the Installation Instructions, however I think if you were containing speaker wire, you could easily fit at least 4 cords inside this item. There is a warning not to loop cords inside the strips.A product that lives up to its promise of 'easy to install', it's also very durable, attractive and useful. Easy to place horizontally or vertically, I highly recommend this product for hiding unsightly cables and cords in any room of your house.NOTE: If you have the need to tidy up more than 2 cords at a time, you may want to consider another solution per the warning that comes with this product. However it will be tough to locate a 'flat' solution with a higher capacity. The Legrand CM62 Cord Mate II Flex with multiple cable ties may be an alternate option to consider.
R**T
Easy to use...cut, install and self-sticking.
Really like this cord cover. Easy to assemble and easy to cut. Self-sticking holds well. Durable and looks really good once installed. Nice joining pieces and corner pieces make the system really good and better than the short piece systems.
M**G
Works well but is fragile
This kit is pretty nice and helped me hide wiring that goes up along a wall to my projector, as well as some speaker and sub woofer wiring around a door frame. The included 3 pieces of the cord channel were just enough for my application, but just barely. One kit will probably not be enough for most applications.The pieces fit together nicely, the connectors are handy, and everything looks neat. The adhesive is fairly strong, which I found out when I tried to unstick a piece of the channel because it was flush against the door molding, and a connector wasn't fitting around it as a result.Each channel should comfortably fit 2 coax size cables, but not too much more.My biggest gripe with the product is the quality of the plastic where the channel hinges open. When I got mine, part of it was already cracked along the length of the hinge. While I was cutting another one shorter, I pressed down on the top of the channel while holding it down, and it just cracked through in that spot too. After that I was careful about how I held the pieces and avoided additional grief, but perhaps the plastic should be a bit thicker or less brittle to prevent this.Fortunately, the cracks weren't too visible and the product got the job done, so only one star lost!
N**E
Very simple to use! Room for more than one cord!
I needed to run a cord in an obvious place, and didn't want it hanging there looking ugly and being a tripping hazard, so I found this product. It consists of 2 self-adhesive backed strips and various connectors (to turn corners.) I could have used more outside corner pieces for my particular use, but modified one of the leftover pieces with a razor blade. You just cut the strips to the length you need, peel the paper off the adhesive strip and push it to the wall. I didn't even use a hacksaw (mostly because I was too lazy to go all the way to the basement to get it!)..I just used a razor blade.I did find it easier to open the channel (if you squeeze it a little the channel opens easily), slip in the cord (there is room for more than one electrical cord...maybe a coax cable and one/two more if you need tv cable), then push the whole thing onto the wall. I didn't paint mine, but it would probably be easier to do that before hanging them, as well. The connector pieces don't have adhesive backing (wish they did) but they just snap onto the channel strips. If you need more bendable strips (these are just straight), they also sell a flexible channel here: Wiremold C110 White Cordmate Kit.The product works well and probably could be screwed inside the channel if the adhesive ever seems to fail (or if you want a more permanent application.) Overall, a very nice idea for a common problem of too many loose cords!
Trustpilot
1 day ago
2 months ago