We remain fully operational. Our teams are working around the clock to ensure your deliveries continue safely.

DOWNLOAD THE APP


Customer Services
Copyright © 2025 Desertcart Holdings Limited
DOWNLOAD THE APP

🥄 Elevate your gut game—homemade yogurt, perfected with ease!
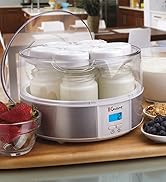
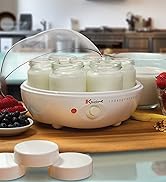
The Euro Cuisine YM80 Electric Yogurt Maker empowers health-conscious millennials to effortlessly create up to 2 pounds of fresh, probiotic-rich yogurt at home. Featuring seven BPA-free 6oz glass jars with airtight lids, a transparent lid for monitoring, and a simple on/off switch with timer reminder, it offers customizable yogurt crafting without preservatives or additives. Backed by a 3-year warranty, this sleek white incubator blends convenience, versatility, and wellness into every creamy batch.


| Best Sellers Rank | #11,956 in Kitchen & Dining ( See Top 100 in Kitchen & Dining ) #4 in Yogurt Makers |
| Brand | Euro Cuisine |
| Capacity | 2 Pounds |
| Color | White |
| Customer Reviews | 4.3 out of 5 stars 6,809 Reviews |
| Included Components | 7 -6Oz Glass Containers, Euro Cuisine Ym80 Yogurt Maker |
| Material | Glass |
| Special Feature | Built-In Timer |
R**N
The absolute best!
First the problem. The timer did not, does not work! It didn't move! I set it for twelve hours and it never worked. Now when the time was up, (I have clocks), I checked it. It was perfect. Firm, creamy and delicious. As good or better than any yogurt I've bought in the stores and I've been eating yogurt for over seventy years. I've also owned and used a very expensive yogurt maker before. This is the simplest and the best. I am very pleased. Definitely recommend this. I read all of the reviews and all of the comments and directions. Then putting it all together I made the first batch. I used the seven cup Pyrex bowl with a cover that so many suggested. So, here's the formula: heat 6 jars of cold whole milk in a 7-cup Pyrex bowl in the microwave for no more than 1 minute. Take it out of the microwave (test to be sure it's only very lukewarm, add ½ cup powdered milk, and 1/2 cup of the very best unflavored Greek yogurt I could buy, after that it's a jar that you have saved from the last batch). Put it in the machine on two layers of folded paper towels. Gently blend, place the cover on. I placed a small folded dish towel on top of the machine. Turn the machine on for 13 hours. Check it after 12 hours by slightly tipping the bowl to see if it is thick. If you think you need an hour more, OK, but no more than that. Put the snap cover on the pyrex bowel and put it in the fridge. (Before you eat any of it, be sure to fill one of the jars to use as a starter for the next time.) This was very thick, there was no liquid until I removed a bowl full. I ate it with honey and berries. Absolutely delicious. When I used it the next day I gently drained off any liquid in the bottom of the bowl. There was no need to strain. This could have been sliced to serve with berries for company. I'm updating my review. I have continued using this little yogurt maker and I am more pleased with the results every time I use it. It is extremely reliable. Producing the creamiest best flavored Greek yogurt you can imagine. I have recommended it to several friends. After seeing the machine and enjoying the Greek yogurt made in it they are impressed and one ordered one right away. Sometimes a product is as good or even better than advertised.
T**6
Love this yogurt maker. Works BETTER than it should!
⭐⭐⭐⭐⭐ Excellent Yogurt Maker – Simple, Reliable, and Worth Every Penny I couldn’t be happier with this yogurt maker. From the very first batch, it delivered rich, creamy, delicious yogurt that easily beats anything I’ve bought at the store—and without preservatives, fillers, or artificial ingredients. The machine is refreshingly simple to use. No complicated controls, just an on/off switch and a clear indicator light. It quietly does its job, and the transparent lid lets you peek in without disturbing the process. Yogurt-making really doesn’t get any easier than this. I especially love the seven 6-oz glass jars. They’re the perfect size for individual servings, and the BPA-free lids seal tightly so the yogurt stays fresh in the refrigerator. Cleanup is effortless—everything EXCEPT THE BASE goes right into the dishwasher. What really makes this yogurt maker shine is the flexibility. I can use different types of milk, control the tanginess, and flavor the yogurt exactly how I like it after fermentation. Straining it for Greek-style yogurt works beautifully too. It’s incredibly satisfying to know exactly what’s in my food, and my digestion has definitely noticed the difference. Between the quality build, ease of use, consistent results, and generous 3-year warranty, this yogurt maker is a fantastic value. If you’re thinking about making your own yogurt at home, don’t hesitate—this machine delivers. one more thing, there is NO TIMER... only a dial to set as a reminder of how long you want it to culture. Highly recommended!
A**T
This is the most simple and wonderful yogurt maker I have ever owned
This is the most simple and wonderful yogurt maker I have ever owned. I got the top tier extender and use one cup canning / jelly jars in the bottom and the jars that came with the machine in the top. I wrap a bath mat over the machine so there is uniform heat in top and bottom and don't have to switch tiers as some recommend. If you are considering buying this product I encourage you to do so without any hesitation. AND there is no need for the timer (or even the "hour marker" that comes on the machine). Buy the "cheaper" "stripped" model without the timer. One other thing I found handy is I put a wet washcloth on the bottom before I put the jelly jars in and it seems to disperse the heat more evenly. I lay it across the round of the bottom and the four corners stick out a bit. PLEASE NOTE: the extender will NOT sit exactly sealed when you use the jelly jars on the bottom as they are a bit too tall. But using the bath mat makes a wonderful "blanket" and the slight gap makes NO difference in the yogurt. A further note - I wanted to make greek yogurt and read about all the "straining" and other effort necessary and was so discouraged. But I simply use greek yogurt culture for my starter and it makes VERY THICK yogurt without the fuss. My EASY recipe is - I do NOT heat the milk etc. I take room temp milk (from our cow), put 1/2 cup yogurt from the store or yogurt from one of the 6 oz jars that comes with the machine - in the bottom of a glass pyrex one quart pouring measuring pitcher, whisk in a little milk to disperse the yogurt, then add three cups of milk and whisk again. I then pour it into jars and place them into the machine and repeat until I've filled as many jars as I want to. I would give this gift to ANYONE who has a cow (or goat). I cannot say how it works with store bought milk as I have never used it. I do know friends who add a little dry milk powder to their milk to make it thicker - but the greek culture works great instead for me. Many people also make milk from almonds and coconuts and have success with yogurt that way - so maybe the storebought almond milk and coconut milk in the milk cartons would be great for yogurt too as an alternative to dairy. I hope this review encourages people to try this product and EAT LOTS OF YOGURT with full control of what goes into their bodies. This is a LOVELY, SIMPLE and well made machine. And the price is absolutely WONDERFUL. Another bonus - it has a TINY footprint and all the parts nest (upside down etc) very nicely so it fits easily in my cabinet and doesn't take up much space on my counter when in use. While it is bigger than my toaster, it fits where a toaster fits on a small counter. Another tip - I put the cardboard case that the jelly jars came in in my cabinet and as they are emptied they get put in there until refilled. I make sure that I eat the yogurt jars that came with the machine last as they are 6 oz vs the 8 oz jelly jars and save enough to make the number of jars I want. I only buy culture about once every three months - a quart of plain greek. I buy new when the culture gets a bit runny. I absolutely LOVE this little machine.
P**R
It's very cute works fine
This makes a great yogurt. I love the individual cups very easy to use. Each cup holds about 6 oz of liquid for yogurt. The containers are small but easy to clean they're about the size of a Yoplait glass yogurt container. I can't speak to the temperature or durability. I actually ended up returning this because I found my mother's old yogurt maker which was actually a thermos that she used for soup and it worked very well. I'm trying to save money.
C**C
Great product, will require some trial-and-error to figure out what works for you
I bought this yogurt maker over a year ago, and it's still going strong. In terms of product durability, the only thing that has "broken" are the little rubber foot pads at the bottom have fallen off, but a dab of superglue fixed that quickly. I've been making batches of yogurt back-to-back in this baby, and I love how quick the setup is. I usually start a new batch late in the evening, so that it can incubate overnight and be done by the time I'm up in the morning. I take one little jar of yogurt from my last batch and scoop it into a pot, then use the emptied jar to measure out six more jarfuls of milk into the pot. Stir the pot well with a ladle, then ladle into all seven jars, stick the jars in the yogurt maker and put the big plastic cover on, set timer, press the red button and go. In the morning, I lift off the plastic cover (you'll need to be a little careful here, there will be lots of water condensed on the inside of the cover, and you don't want that dripping into your yogurt), cap all of the bottles with the provided lids, and stick them in the fridge to cool. Yogurt is done! The yogurt I get is never as thick as the store-bought kind that you can stand a spoon in, but I'm ok with that. My yogurt is a little viscous but still liquidy, kind of like cake batter. You'll need to play around with the incubation time to see how long you'll need to get the tartness and viscosity you want. For me (California Bay Area weather), if I use whole milk straight from the fridge, I incubate for 11 hours for a slightly tart, slightly viscous yogurt. You can go as low as 9 hours if you don't want it very tart but still viscous. For 2% milk (again straight from the fridge), 10 hours for a tart, viscous yogurt. I've tried 12 hours with 2% milk before, and it came out completely watery. So again, keep trying different times. If you want your yogurt thicker, you can try heating the milk first. Measure out six jarfuls of milk into a pot (don't put in the yogurt starter just yet), and heat it for half an hour. Don't boil it, you want just under simmering. Then cool the milk to room temperature, and warm the yogurt to room temperature. Once both are ready, scoop the yogurt starter into the milk, mix, and ladle into the jars, etc. The heating denatures the fat proteins and spreads them out into longer strands, so that your yogurt has the fat more evenly distributed for a more even network that binds better for thick yogurt. Higher fat content in the milk will make thick yogurt easier to get. Don't expect store-bought thickness if you don't plan to add gelatin, like they do. I've only made plain yogurt, since I'm not interested in sweetening mine, so please keep that in mind. My roommate likes stirring in spoonfuls of jam right before eating, though. I also never bother with pre-heating the milk (too much trouble, and I'm lazy). There are lips in the jars that are hard to clean out with a dish sponge, so I let the jars soak for about 15 minutes to get the extra yogurt to dissolve, then rinse them out and wash. The provided lids are definitely not leak-tight, but the jar opening is a standard size and I've found that lids from spaghetti sauce jars fit perfectly, and are much more leak-tight. Want more bottles than just 7? Like other reviewers have said, the larger baby food bottles are the perfect size. Also note that when the yogurt maker is done, the beep is very subdued. You can hear it if you're listening for it and you're not far away, and it beeps several times, but it's not loud enough or high-pitched enough to be attention-grabbing and bring you out of that game that you're getting really into. It's more of a reminder than an alarm, and it's about half as loud as my microwave's beep. Great product, and I highly recommend it if you're willing to play around with it a bit. The routine I've settled into is quick, easy, and requires very little cleanup. I'm very pleased with my yogurt maker!
C**R
Thermostat issues after less than 3 months and only 4 uses!
Performs perfectly. Many thanks to the reviewers who recommended using the 7 cup Pyrex bowl rather than the individual jars. I have been able to make yogurt easily in as little as 6-8 hours using whole milk and Maple Hill whole milk yogurt as a starter for my first batch. I bought the separate strainer but find that my yogurt is plenty thick without straining. Update: Bad news. Not even 3 months old, only used 4 times, and the thermostat is apparently wonky. I had a batch of yogurt turn out watery and loose last night and checked the temp; it was 122 degrees. To be sure it wasn’t a oneoff, I did a water test this morning. After only 3 hours, the water temp was 121 degrees F. I’m going to try just putting my milk and starter in at 110, with the machine off, then wrapping a towel around it. Hopefully that will work but it’s disappointing.
D**I
Great yogurt maker
So pleased with the yogurt quality. I bought one, and I was so happy with it,I bought a second one. Now I can make 14 six oz cups of yogurt at a time. It consistently makes quality batches.
M**S
Euro Cuisine YM100 - Review
Let me start off by stating that I had never made yogurt before buying this machine. I watched countless videos and read various techniques about how to make yogurt before even buying this machine. Now that i have it, and have made yogurt successfully, i want to share my experiences with you. If you don't want to read the whole review, just know this: 1. Don't buy the YM100, buy the YM80. The timer on the YM100 is terrible. just look for the reviews about how bad it is. For being such a sucky timer, you might as well just save the money, and buy the other one. 2. Don't bother using the little cups. Pick up a Pyrex Storage 7-Cup Round Dish with Dark Blue Plastic Cover, Clear or Pyrex No Leak Lids 7 Cup Round Baking Dish with Plastic Lid . These fit inside the machine and are so easy to clean. If you want to use the little cups, use them to carry the yogurt to work, but don't bother using them during the process of making yogurt. i have added some pics of the pyrex in the yogurt maker. Now for the rest of my review: I drink raw milk (and cream) from Oraganic Pastures in California. I had wanted to start making my own yogurt using that raw milk. If you are planning on doing that, then be aware that your yogurt WILL come out runnier than if you had boiled it. Also i didn't use any powdered milk or gelatin. If you are planning on using this yogurt for shakes, then maybe runnier yogurt isn't a big deal to you, but personally i disliked the runnier version of the yogurt, and decided the next batch was to made more traditionally. Recipe: --------------- 2 cups of whole milk 2 cups of cream 1 teaspoon gelatin *(optional) 2-3 tablespoons of Dannon plain vanilla yogurt bring the temp up to 150F slowly (med heat), then turned the heat to high and kept whisking the whole time, watching the temp, and once it hit 185F, i kept it there for about 2-3 mins. Then quickly brought it off the stove, and into the sink, where i ran cold water, and let it cool the pot (making sure no water got into the milk). * Yes, I decided to use gelatin. While this might gross some people out, and isn't vegetarian/vegan, after reading the benefits of gelatin for joints and muscles, skin and hair i decided that i would use it in my recipe. You can actually find gelatin made from fish bones if you look, but most gelatin is made from by-products of the meat and leather industry, mainly pork skins, pork and cattle bones, or split cattle hides. Contrary to popular belief, horns and hooves are not commonly used. Anyway.. as soon as my milk was around 120F, i took it out of the sink, and sat it on the counter, where i let it naturally cool to 110F, and then i added in the gelatin, and Dannon yogurt, and mixed it in with the whisk. Then i set the bowl in the machine, and left it for 8 hours. My machine tends to turn off at randomly even though i have the switch set to 12 hours. It does make a beeping sound when it shuts off, so i only make it when i'm awake, and around to hear it. I also check every few hours and use a paper towel to wipe out the moisture build up inside the machine. Otherwise it will drip back into the bowl. I tried to use a paper towel inside the maker, but it just winds up falling into the bowl, so now i just leave it, and wipe it down every 3-4 hours. The Dannon strain of bacteria seems to set fairly fast, and is semi tart at 8 hours. After reading a bit about the bacteria and how fast they set, it turns out that the faster it sets, the more whey it creates, the slower it sets, the more solid it becomes and less whey. I drained off some of my whey, then quickly threw it in the freezer as this will stop the incubation, and make more creamy yogurt. After about 10 mins, i moved it into the fridge, and let it sit for a day. The result is some really creamy tart yogurt. It's at this point i add honey and fruit. there are some recipes that show them adding sugar and flavoring to the yogurt before incubating the yogurt, but i'm not sure how that will turn out, as i have never made it that way. For the price, this is easily one of the best and easiest methods of making your own yogurt. Just know that if you plan on using raw diary, try to get the freshest you can, because the more "bad bacteria" in the raw milk, they will populate as well along with the yogurt cultures (this is what creates the runny-ness), also you will need to keep buying fresh starter for each new batch, because the raw milk strain will degrade faster than if you had boiled the milk, killing all the milk bacteria but leaving the yogurt cultures to dominate. Even over time the yogurt starter will degrade, but as long as you keep using semi-fresh starter from your created batch, and keep the milk clean, you should be able to keep growing more yogurt without new yogurt cultures.
Trustpilot
1 month ago
2 months ago