Some deliveries may take a little longer than usual due to regional shipping conditions.

DOWNLOAD THE APP


Customer Services
Copyright © 2025 Desertcart Holdings Limited
DOWNLOAD THE APP

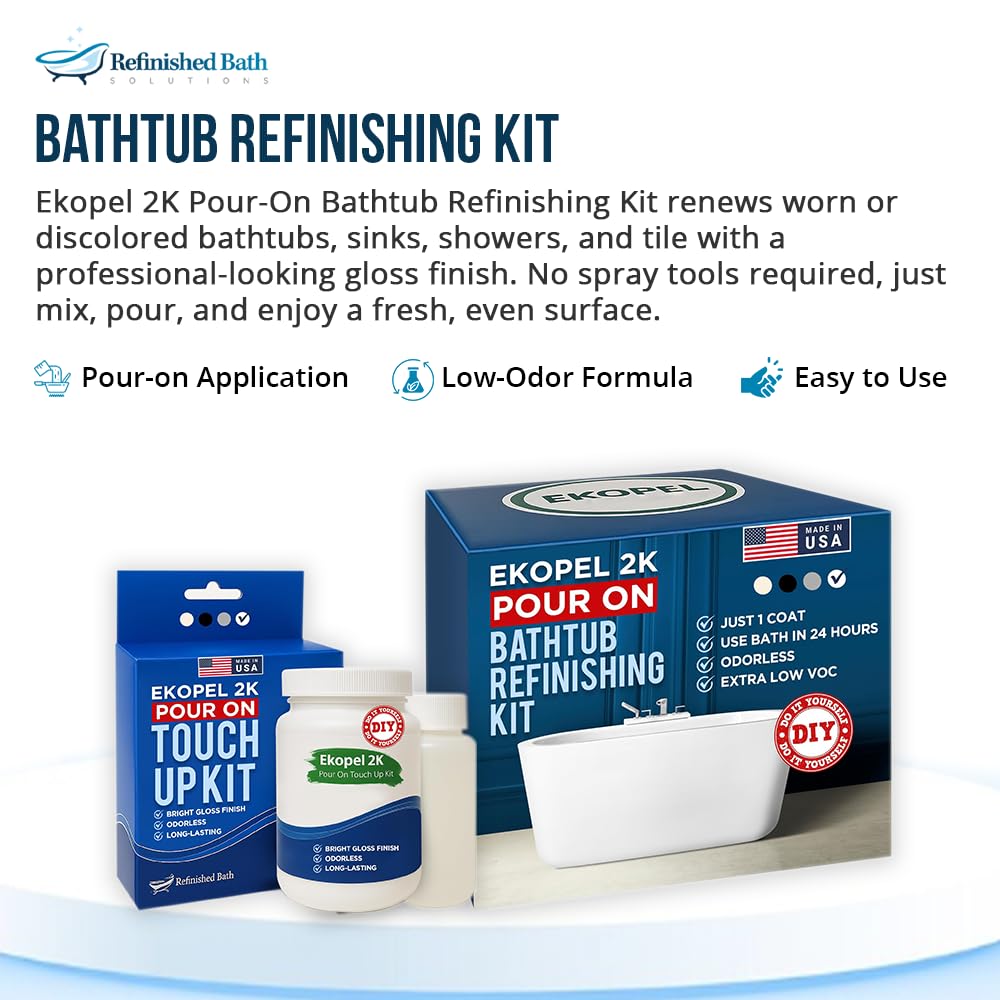
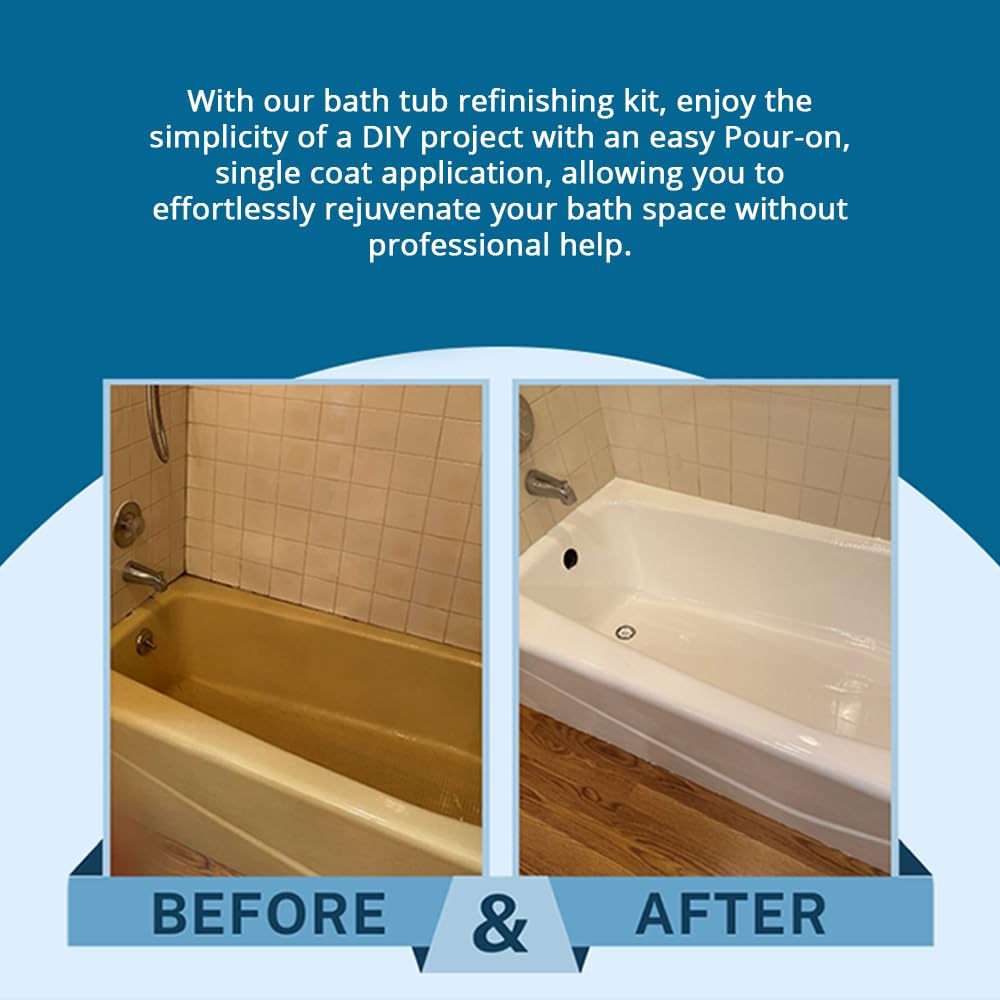
✨ Transform your tub, skip the hassle, and own that showroom shine! 🛁
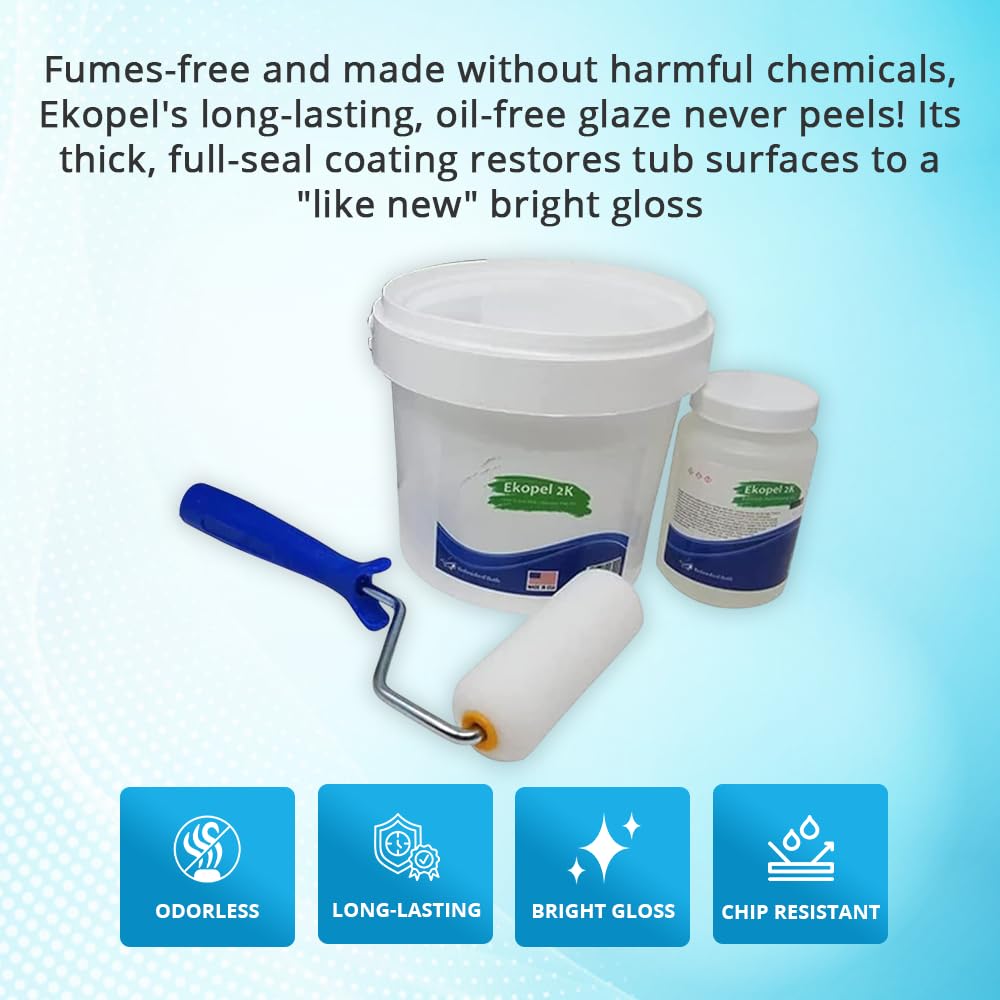
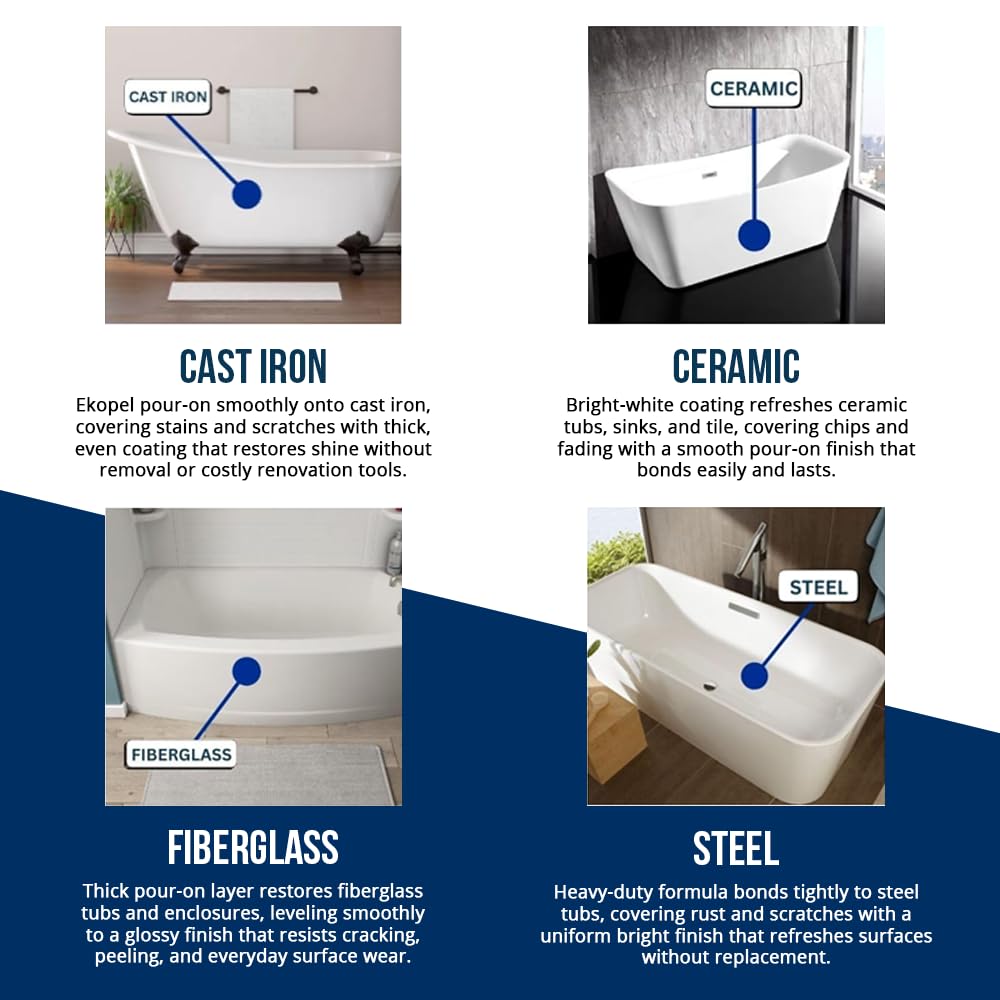
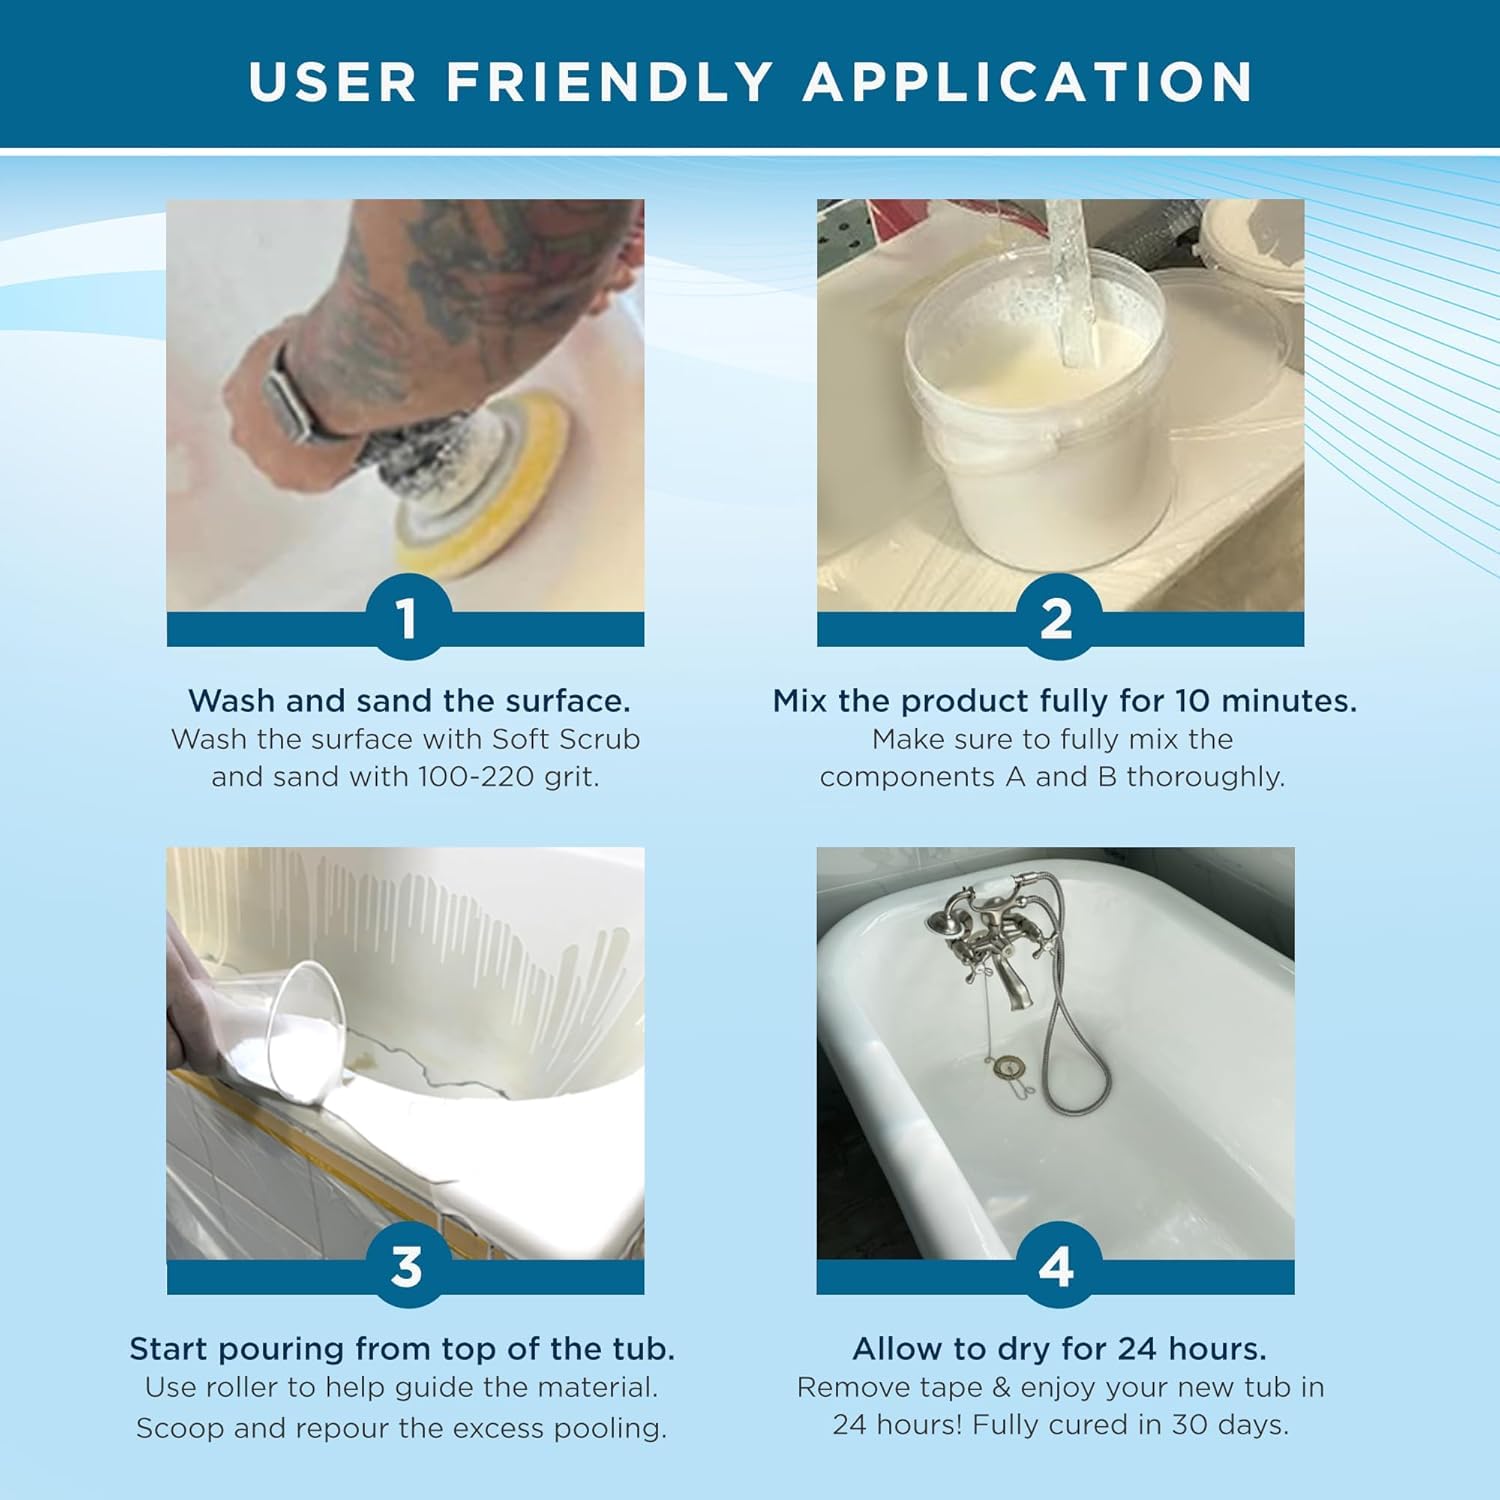
The Ekopel 2K Bathtub Refinishing Kit is a premium, odorless, and non-toxic DIY solution made in the USA that delivers a thick, high-gloss white finish in just one coat. Designed for easy application on multiple surfaces including porcelain and fiberglass, it fully cures in 24 hours to create a durable, peel-resistant glaze that revitalizes your bathtub with professional-grade results.


| Brand | Refinished Bath Solutions |
| Color | Pour On Standard Bathtub |
| Finish Type | High-Gloss |
| Item Volume | 96 Fluid Ounces |
| Size | 1 Count (Pack of 1) |
| Special Feature | Odor Blocking,Non Toxic |
F**A
I messed everything up and my tub still looks great.
I’m just going to swallow my pride and admit this: I made just about every single clumsy, amateur mistake I could have. My bathtub still looks amazing. Hopefully, you can learn from my mistakes. For DIY’ers — resurfacing the tub isn’t a simple project. The amount of prep work that goes into this is no joke. I probably spent 3 hours cleaning the tub, sanding it down, removing caulk, and removing drains and fixtures. My tub was ~40 years old, so the tub drain was pretty stubborn to get off. Three trips to Home Depot and $80 later, I got that corroded old tub drain out. I ended up having to buy a $20 tub drain remover tool. I only bring this up because I had a few surprise expenses that, had I known about before hand, I would have gladly paid a professional to deal with. I got a great arm workout stirring the heavy material in the bucket. I may have broken a sweat even. The product poured on nicely and evenly, and with some coaxing with the foam roller I managed to get an even coat. I did exactly what the videos taught me; around the edges, then the center, then the outside. Over pour, let the product drip, and collect the extra material. At this point, I feel like a true professional. No sticky goo anywhere but in the tub and I’m watching the stuff level out. Proud of my accomplishments (and thirsty), I decide to grab a beer and use the beer bottle as a dam to prevent goo from dripping into the drain (mistake #1). Two hours later, I came back to remove any goo from the drain that may have collected there. Not wearing gloves (mistake #2), I decided to brace myself on the top wall of the tub (mistake #3) and bend over to pull up the damn. Immediately after putting my hand in a pile of white sticky goo I realized what I’d done, and furiously scrubbed my hands with soap. Did I mention this stuff is thick and sticky? Soap wasn’t making any progress — I decided I needed to resort to chemicals, so I went to the closet to find some Goo Gone (leaving a trail of white goo on the handles — mistake #4). After I cleaned myself up, I was able to use the roller to apply some more solution and the spot ended up evening out ok. After I collected myself, I returned to remove the dam around the drain. The solution had started to thicken up quite a bit and it was tough to pull the bottle up. I gently twisted and pulled and removed the beer bottle. In doing so, I managed to pull up my taped off drain cover (mistake #5). The goo was stuck to the bottom of the bottle, and in an effort to keep it out of my drain, I pulled the bottle while twisting and turning it, trying to control the dripping of goo. This caused the last few drops of beer to land in the direct center of the tub (mistake #6). With 2 problems before me, having visions of explaining my embarrassing predicament to a plumber, I decide to focus on the white goo spilling into my drain first. I sprayed Goo Gone on a paper towel and tried to get any of the goo off the threads of the drain first. I eventually got most of it out and setup a walled dam using more painters tape. By the time I got to the drops in the middle of the tub, I few had sank in but I was able to wipe most of them down with a wet paper towel. It wasn’t until the next day did I realize I had made mistake #7 — please double check your paper towels are free of dog hair before doing this. After ~20 hours, the solution had dried and hardened quite a bit. There’s only a few small artifacts of my Three Stooges-esque handyman work. Regardless, the tub looks night and day better than it did. I was able to use an abrasive pad and remove any hair that found its way into the tub. In short: - I found the videos very easy to follow. - I think the product is very high quality - The product is impossibly sticky; I would have really appreciated a video on “how to clean this stuff off” - My bathtub looks AMAZING despite all of the “happy little accidents” - Don’t drink and resurface your bathtub.
M**N
Ekopel Bathtub Refinishing Kit - A High-Quality, Durable, and Odorless Solution!
The Ekopel Bathtub Refinishing Kit has completely transformed my bathroom, and I am incredibly impressed with the outstanding results it delivered. As a homeowner looking to give my old bathtub a fresh and modern look without the hassle of a full replacement, this kit exceeded all my expectations. First and foremost, the fact that this refinishing kit is made in the USA gives me confidence in its quality and safety. The manufacturer's commitment to producing an environmentally friendly and non-toxic product was a significant selling point for me. The odorless nature of the refinishing process was a welcome surprise, as I didn't have to deal with any noxious fumes during the application. The use of pure resin instead of paint sets this refinishing kit apart from other alternatives in the market. The result is a tub and tile reglazing that truly looks and feels like a brand new surface. The bright gloss white finish has completely revitalized my bathtub, making it the centerpiece of my bathroom. I was amazed by the thickness of the coating provided by the Ekopel Bathtub Refinishing Kit. It is 20X thicker than other knockoff kits, which ensures long-lasting durability and a surface that will never peel or chip. This durability gives me peace of mind, knowing that my investment will stand the test of time. The application process was surprisingly straightforward. The kit includes all the necessary materials and clear instructions, making it a user-friendly DIY project. I had no prior experience with refinishing, but the step-by-step guide made it easy to achieve professional-looking results. After completing the refinishing process, I was pleased to find that the newly reglazed surface was easy to clean and maintain. The bright gloss white finish has a smooth texture that repels dirt and grime, making it effortless to keep my bathtub looking pristine. In conclusion, the Ekopel Bathtub Refinishing Kit is an exceptional product that delivers on its promises. Its Made-in-the-USA quality, odorless and non-toxic formulation, and use of pure resin set it apart from other refinishing options on the market. The durability and thickness of the coating ensure that my bathtub will maintain its bright gloss white finish for years to come. I am thrilled with the results, and I highly recommend this kit to anyone looking to give their bathtub a stunning makeover without the cost and inconvenience of a full replacement. This refinishing kit is a worthwhile investment that will rejuvenate your bathroom and add value to your home.
M**X
Poor results despite following instructions, yellowing & scratched in less than a year
Update 3: Within a year of application, the inside of the tub has yellowed. We clean it regularly with Scrubbing Bubbles (as was indicated we should do on the Ekopel website). I reached out to customer service twice and got no reply, no surprise there given my prior interactions with them. Update 2: I refinished it a second time less than a year ago with the roll on version and it does not hold the nice white finish and SCRATCHES! I can't believe the amount of scratches I am seeing with less than a year of normal use. Terrible product, awful customer service, just save your money and time and pay a professional who can guarantee lasting results. Update: The company told me to re-sand and re-apply the product, implying it's my fault and not offering any assistance. If you end up going with this product and the application goes sideways, be prepared to have to spend double the time and double the money to get it fixed. It should have been a warning I needed that this company takes zero responsibility and has no warranty..because the product does not do what it says it does. I spent a really long time (over a year!) researching bathtub refinishing products and this one kept coming back as the best option. I watched easily over a dozen YouTube videos from this company on the appropriate way to prep and use Ekopel, I'm a perfectionist who always researches products extensively before I buy and use them to make sure I'm doing it correctly. I was so excited after months of planning to finally refinish my tub. I have a tub that I love that I didn't want to mess up so I took my time, followed the prep and pour instructions to a T and....ended up with an awful end result. The bottom of the tub looks good but the sides ended up with extensive orange peel texture. I am really disappointed in the product and I have no idea what to do now to fix it. I've reached out to the company and hope they'll have some advice for me. I think it's a huge cop out for the company to not offer a warranty because "people don't follow directions", what about those of us that did our due diligence and did it right but ended up with an awful result? I guess we are SOL. I'll post updates to my review for anyone else that runs into this situation.
B**G
Not for the perfectionist
Ok. So pretty good product, but very difficult to get right. I watched all the YouTube, followed all directions. If you are okay with slightly less than perfect here are a few tips. I am ok with mine, looks better than ugly pink tile, and WAY cheaper (not necessarily faster) than retiling. My over sized stand alone shower, spa tub, and 60inch tub with tile wall each took 2 lg buckets, so I did 6 buckets of this stuff and I'm now waiting on 1 touch up kit. Focus on each one independently. Don't do 2 in 1 day even if scrubbing, even if taping are done day before. Because you want to baby sit the 1 project for a full 2 hours and then some. I thought I have quiet a bit left over I'll get going on shower to make sure I have enough. Bad choice. I did not babysit tub enough and the drips are evident. When you use lysol toilet bowl cleaner dont let it touch fixtures it ruined it. Clean, then fully dry, then tape. Tape everything with solid connection/stick. If it doesn't epoxy moves it and gets under it. Tape drain exactly where you don't want epoxy. Make sure to protect the floor it will drip and get on it. Have a trash can easy to dumb stuff in for when you change gloves, and trash rollers. It starts to harden about 90 minutes after mixing, touch ups on drips are okay for about 30 more minutes, but you want full project done by 90 minutes. It will smear and ruin your work for the next 24 hours. Any hair, mosquito, or drip will be impossible to fix after first 120 min until it is 24 hours dry. Just leave it. Remove tape when it is 120 minutes dry. But, oh so carefully. I pulled tape from wall as carefully as possible and caught the end in the epoxy and smeared it. It never leveled back out. I will have to chip out and touch up kit it. But, if you don't remove tape then it hardens in the epoxy and chips and breaks more. After messing it up and not able to reach jet drains I left them. See pics. This stuff is THICK GOOD QUALITY. As such it drips after making wall nice pretty and smooth. By 3rd project I followed this order. Section 1 pour at high point, used GLOVED HANDS to finger smothe it as far as material would go (this worked way better than included roller), changed gloves, used roller to smooth as much as possible, move to next section and follow same procedure, but after rolling I would roll section 1 again and by time I was done roll section 2 again before pouring section 3. Follow this until it is applied everywhere. The side you cant see of the tub must be smoothed over several times. You won't see it dripping so you must be very intentional here. You finish the project, change gloves and smooth it out for the next 20 minutes. Make sure not puddling at drain get it scooped out if it is. Watch for puddling around edges of shower, keep smoothing it out. As you watch for drips remove tape VERY CAREFULLY. Target Baby wipes take it off skin and oops really well when done immediately. 320 grit sand paper if drys more. Have a hole box of disposable gloves. Switch them out and save your sanity.
J**G
Outstanding Results - Be Patient with the Process
This product worked exceptionally well, and the end result turned out great. Check out my before and after photos. I will not repeat what many of the other Amazon reviews say, but instead highlight a few process steps that I think are important, or that I may have done differently than others. 1) I did this in Ohio in January, so I made sure the room was heated to 76-degrees for a day before installation, during installation, and two days after installation. I also put the product in the room so it could heat up for a day prior to the install. I think this helped significantly. Having warm product seemed to make it flow nicely when poured. 2) As you'll see in the photos, my tub was in horrible condition. I did the acid wash with the Lysol power cleaner, I let it dry, I scraped anything I could get off with a razor blade, I power-sanded areas that needed to be smoothed out, and then I did another acid wash with the Lysol power cleaner. I used a hair-dryer to make sure everything was super dry. I used a can of compressed air to help blow old caulking out of the edges and corners. I did not strip the entire tub down to the base. If I could get the old stuff off with a razor blade, I did, but if the previous coating was in good shape, I left it alone. You'll see this in the photos. 3) I covered every plumbing fixture that could possibly drip with plastic bags. Glad I did, because things that I didn't think would be dripping, actually did drip a bit overnight. For example, the hot and cold handles dripped, which surprised me. Spend a few extra minutes and just wrap all plumbing components in bags. 4) When pouring the product, I did not pour in the entire container. When I watched the videos, the guy seemed to spend a ton of time removing excess product, so I poured about 2/3 of the product in. I still had a bit to remove near the end of the process, but not nearly so much. 5) I was too chicken to pour the front, being concerned it would ruin my nice marble tile floor. I just rolled the front really well and got the product on very thick, and it worked fine. 6) I used a clean putty knife and a small artist brush to help push the product into tight corners and difficult spaces where the roller was too big. This worked fine, and the product evened out nicely. I would consider the putty knife and small artist brush to be must-have tools for installation. 7) I used Frog Tape (a higher-end painters tape) to tape the front. It worked very well and was easy to remove the next day. Since I planned to roll the front, I was not quite as concerned with tons of dripping product down the front. Take your time removing the tape the next day, and have a razor blade handy in case you need to help coax the tape off. 8) I taped the drain, but didn't remove the tape until the next day after the product had hardened. I was concerned I would mess things up if I took it off while the product was drying, or that I would take it off too early and my drain would fill up with the product. Taking it off the next day took some time, but it turned out very well. I used a box cutter to very, very, very carefully cut around the drain and pull the tape off. If you do it this way, go slow and be careful not to slip with the knife and cut the bottom of your tub. Overall, I can't imagine a better product to use for bathtub restoration than this one. It goes on so much thicker than everything else. It's more expensive, for sure, but the results are worth it. Also, it's a bit tricky to do the installation, so like everyone else says, watch several videos and prepare yourself. Based on how this turned out, I think this will last for years. If for some reason I have issues in the future, I'll update my review.
R**Y
Great Stuff
Interesting stuff. It has the consistency of liquidy marshmallow. If its your first time, I strongly suggest watching a You Tube video or two. When its time to start, have gloves and every thing you think you might need available, and then more. You do not paint this, you pour it but I think you could do a bit of leveling with an old credit card used as a squeegee. A couple of observations. It looks like you will not have enough, do not fear you will have plenty for a standard size tub. Do some thinking about the drain, if you can remove it, I would say do so. I ended up with a thick mess at the drain and had to grind some away with a Dremel which was not real difficult but took a while and made lots of dust. So think about the drain set up. Do not let the stuff set up at the bottom of the front edge. Lots oozes down which is fine but it will move onto your floor and make a real glob to remove. I would suggest you slice the stuff at the floor/vertical tub wall before it hardens, This material is tough so once it hardens, it is tough to cut. I tried with a razor knife but good luck, I ended up using the Dremel here also. At the floor in front, put down a couple of widths of duct tape. If you think you need one, put two. A few cents worth of tape is a heck of a lot better than getting this stuff on the floor. I planned on redoing my floor so grinding if off was not an issue but especially if you are keeping the floor, cover it well, anywhere you do not want coverage. Can't speak to the longevity but this result is pretty impressive. One last thought. You will need some anti-slip on the bottom. This stuff is slick and you will kill yourself without the anti slip coverage. If I did this again, I would use their anti-skid topping first. Let it dry a day or two , then put the coating over that. We put on the anti kid after the coating and some of the grit is fairly rough, rougher than it needs to be in my opinion. You might consider buying some antsikid grit, and making a small amount of your own solution using it with the coating mix as you do the coating. The Ekopel kit is OK but it is only a small amount of the coating packaged in a small quantity with a little jar of sand. I think you could make a do it yourself approach for a cheaper solution. This does have a small odor, smells like epoxy but its not bad at all
A**R
Tough for first time DIY Tub Refinisher
The finish of this Ekopel product is superior to the Rustoleum Tub & Tile product sold at Home Depot. I tried 3 kits of the Rustoleum product first, but ended up stripping it all down to bare metal again because the Rustoleum just would not adhere properly to the tub. My only real problem with this Ekopel kit was that I didn't realize I needed to be present on-site where the tub was for 6 hours after I applied the material. I couldn't be present that long. I had to leave 3 hours after application. The instructional video showed you being done after 2 hours. In my case, the material was still settling down into the tub drain that I had masked off after 2 hours. My guess is that it took closer to 6 hours to really firm up. When I returned the next morning, about 10 hours after initial application, the epoxy material had covered my masked drain. I then had to chip off a the epoxy that had covered my masked drain. The rest of the tub was still a little tacky. So, while I was chipping away at the drain, my t-shirt touched the side of the tub. Because the spot on the tub where my shirt touched was still tacky, it screwed up the finish of the tub in that spot. Unfortunately that spot is highly visible. Major bummer after all that work. They could easily solve this problem by including a device with the kit that you can use to plug the drain instead of using masking tape. They should have a tall plug that you can easily grab and remove after the 4, 5 or 6 hours it takes for the epoxy to firm up enough to not run into the drain. If I was doing a 2nd tub, I would obviously plan ahead for this. I would fabricate my own plug out of a piece of wood or plastic. I am truly bummed that the company does not account for this issue. It must happen quite often. They could do so with a cheap plastic plug that costs them less than $1 if mass produced. Just charge the extra $ in the kit price. If I had not had an issue with the drain, then this kit would have gotten 5 stars and a glowing review hands down. The end result is a far superior finish than I got with Rustoleum and would have easily made it worth the increased cost over the Rustoleum product. But assuming you are using this kit for the first time, it will be challenging to get the job done right without making a regrettable mistake. When you pay this much more for a product compared to the competition, it is ridiculous for them not to take such a thing into account. Truly ridiculous. Or, their instructional video, which was not great by the way, should have included explanations for typical problems first timers would likely encounter. And it should have accounted for what to do for the drain. And it should have warned that the material might take longer to set up to the point where you can unmask the drain. The product did not smell bad at all and I found it easy to apply for the most part. The end finish was excellent except for where my shirt touched the tub 10 hours after the initial application and also where I had to chip around the drain. There was plenty of material to cover my standard sized bathtub. It appears this refinish will last a long time, probably many, many years. They are most of the way there with this product, but need some improvement. I would use it again, now that I know what to look out for.
J**E
Surface prep is key, the material itself great.
Just redid my kitchen sink with the gloss white pour on. It was an older American Standard enameled "Americast" drop in sink (think of it as a weird lightweight cast iron). Can't buy these anymore, and I didn't want to build out bracing for an actual cast iron that would have weighed a lot more, nor put in a stainless steel. Sanding the old sink was the hardest part, had to start with 40 grit then 80 grit, would be much easier for plastic of fiberglass obviosuly. I had to patch the inside of the sink for a couple small chips, but also because the enamel was so thin on the bottom of one sink bowl you could see through it. I used short strand glass fiber bondo for this. Applied two layers. ***You really want to feather this in and make sure it is entirely smooth.*** I used denatured alcohol for my wipe down. Taped the drains closed from the underside, got my sink in the brace I built for it (1x3s) and got to work. Mixed it up by the instructions, used a couple small cups to drizzle over the surface. Used the provided 4 inch roller to then push the material around (have a second or third one ready just in case the first falls apart or anything) Hit it with the heat gun to get rid of any bubbles. This took 30-40 mins on the first pour. After 100% coverage i scooped out most of the excess, pushed the stuff up to the sides it one last time to make sure it was self-leveling in the bowl, and pulled the tape off the drains to let the excess drain out. ***Again*** I was not hooked up to plumbing, I was just draining this into some aluminum pie tins. Came back 15 mins to hit with the heat gun. During these is where I saw the only spot that didn't look amazing was where I failed to prep the bondo as smooth as I should. I added a little more material to jus tthat spot and applied a little heat. ***Be careful with the heat gun at this stage as it decreases the viscosity of the material and you'll be thinning it. So go light on any heat after first application. Came back every 30 mins for 2 hours just to monitor it. I let it cure for 72 hours before sanding any drips on the underside smooth. You probably could sand and polish imperfections if you let it fully cure (30 days?) but you are going to have to be very careful. It only sets up about 1mm thick on vertical surfaces and 2 mm thick on horizontal. After 72 hours I put it back in the counter. So what are the results, well it is beautiful. Bottom line: Surface prep is key and the hardest work, scuffing enameled surfaces is rough I had to start with 40 grit and then 80 grit pads and it took a while. Material is very easy to apply and works well. Self-leveling is great, is a very glossy finish, thickness is high compared to paint, is resistant to denting. I'll see again how it looks in a year but so far I really am impressed expect this was a great value. After 2 weeks I am seeing some surface scratches, you can see them, not feel them. Which is expected, it isn't going to be as hard as enamel. Very low odor, far less pungent than windex, and very faint. I still put it in a separate room that had it's own ventilation, just because I can't smell whatever (and I suspect in low amounts) it is off gassed doesn't mean i want to . I just put it in that room, and after it had set for four hours and had a bit of a surface I cracked a window, and applied a little negative pressure venting outside. My goal with waiting 4 hours is so any dust that landed on it wouldn't be embedded in the material and could be cleaned off with a wipe down.
Trustpilot
1 month ago
1 week ago