


Illuminate Your Corners! 💡
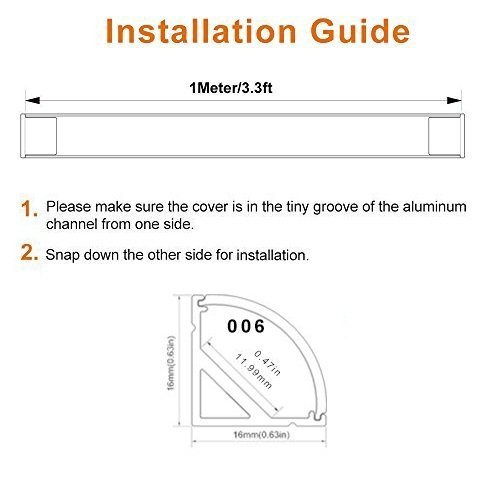
The LightingWill 5 Pack 3.3Ft LED Clear Cover Aluminum Channel is a premium corner-mounted solution designed for 12mm LED strip lights. Made from aircraft-grade aluminum, it offers excellent heat dissipation and protection for your LED strips. Each pack includes five 1-meter segments, end caps, and mounting clips, making it ideal for various applications like furniture compartments and under-cabinet lighting.
| Brand | LightingWill |
| Model Number | HKALP-V02-P |
| Colour | 5*1m-silver(clear Cover) |
| Product Dimensions | 108 x 6 x 7 cm; 1 kg |
| Material | Aluminum |
| Special Features | light, luminous |
| Item Weight | 1 kg |
D**B
Philips Hue Lightstrip Plus fits 100% in this, and the covers 100% fit on afterwards
Which is the good news.... if like me, you are planning on fitting these along the inner edge of the pelmet in the kitchen units (9 meters of them in my case) then please read on and take careful note of whether or not you REALLY want to do this.I'll start by making your life easier than mine was.... buy some decent double sided sticky tape when you order these, you'll thank me for it later.The clips are nice and simple to fit, work very well, no drama thereThe rail clips into the mounting clips very simply... works very wellThe Philips light strip is just a tiny bit wider than the flat recess the led strip should mount to. there's plenty of room in there though with the curved shape of the diffuser though, so it's not an issue in terms of space. HOWEVER.... the sticky tape on the Philips strips is not the best to begin with, add in a slightly too narrow space to stick it down to and the flexibility of the strip allows it to stick..... for about 4 seconds.Now take into account that while attempting to attach the diffuser, you are going to be bent over backwards across the worktop, wondering why you ever considered this to be a good idea... and seeing two 1mm wide grooves in the aluminium channel, and a near paper thin edge to the curved diffuser.... and realising this is going to be a little bit fiddly to say the least! Add in the lightstrip falling down and removing the diffuser from the small amount of progress you had made in attaching it, I can only advise that you attempt this, well out of the earshot of children... and if you have a swear box in the house..... definitely out of range of the money collector.Additional double sided tape will not only be stronger, but also adds a little depth to the strip and allows a good seating contact and keeps things in place.Now... back to that diffuser. I can see why people say it doesn't fit... it's fiddly, very very very fiddly.... but after just completing fitting 9 of them, there's a simple technique to it.Line up one edge in the groove, then press the other edge firmly towards the aluminium channel, and you'll hear a little click.... then firmly slide finger along the channel, and a satisfying series of creaks and clicks will inform you it's slotting into place. The mounting clips for the aluminium WILL tear the edge of your finger nail if you get carried away with the excitement of figuring out how to do this and go too quickly. The textured finish to the frosted diffuser WILL give you a lovely blister on the edge of your finger tip if you use the same finger to attach 9 meters of the stuff.It definitely fits though, and makes a real nice job and finish of the task. Simple yet effective... just take your time and think about how that cover needs to flex to attach it. Don't force it as it's so thin the edge getting twisted will create a big headache trying to fix.... it's more technique than force that's required, and once figured out.... it's almost amusing how frustrated you were with it to begin with.
R**H
Well built
I am very happy with the Lighting Will LEd strips i got them to go under the new kitchen wall cabinets. I have three wall cabinets 2 X 100 cmand 1 X 140 cm if you want to fit them to a wall cabinet 100 cm you might need to trim the aluminum profile strip to fit.
M**H
Patience when fitting diffuser. Otherwise looks really nice.
Glued these up. No predrilled holes. Diffuser takes a little patience fitting. Line up in small lip. Run finger along to push in to place in the top lip. Do it when temperature is warm makes them more ply able.
S**J
Good but not cheap
Works fine but found it a real pain to get the fascia on until I worked out the knack of doing this especially as I was installing them under kitchen men cabinets which were an awkward reach.
4**T
Good value profile with a hole down the channel which ...
Good value profile with a hole down the channel which is useful for running and extra wire down. The lens pops on and off easily but can fracture when cutting with a mitre saw so be careful.
B**N
Five Stars
A superb effect and easily controlled brightness and dimming
N**N
Very Happy!
Exactly what I needed, great quality, perfect for the job. Many thanks from a very happy customer.
T**N
Should have been unpainted inside
The units arrived fast and have all you need, though clips should have been black as well.It would have been better had the inside been left un painted then they would have been reflective and more efficient given were using leds anyway.
E**K
Great manufacturing. Good design. Wished for mounting holes.
I LIKE the shape of the corner style. They fit just behind the front facing of the bottom cabinets well. It allows me to make them virtually unnoticeable.Although they supply a cheap plastic brackets. I think that mocks the quality extruded aluminum channels and the overall usefull durability of the product having to rely on them. I think I lost them after unpacking... But I have a better plan...I WISH that they had some mounting holes and screws to make it easier for the average user to install. I don't like having to rely on double stick tape if I can avoid it. Heat, time and a bump or two in it's lifetime may cause them to fall.SO I applied my own method with great results. Here is what I did to secure it to the cabinets. Pictures should be posted as well. I chose to purchase tiny + head screws that fit flush between the outer edge where the plastic diffuser is attached. And before the center surface that the lighting strip is adhered to. There is not a lot of room but enough for the right screw. Keep in mind that we are working with very light material so that the right wood or sheet metal screw in the correct places will work just fine. So we don't need very large screws or a ton of them. Now the trick to get the holes pre-drilled EXACTLY where you need them could have been tricky. But not this way. First you need to measure your surface width and find a screw head no larger than that.Then decide how deep you can go into the cabinet you are screwing into. For me it was the back of the cabinet facing. Which was 5/8". And found a screw that was 1/2". Next you will need a dial caliper to find perfect width of the flat surface of this aluminum you will be screwing into.Use exactly half of that measurement and adjust your dial caliper to that new setting.Then lock that setting into the dial caliper and "score" the surface of that aluminum along the whole length. This will be your exact center you've located so that the screw head will lay flat against this tiny surface.Then plot your screw hole distances according to where you can screw it in. And how long your aluminum channel is cut to. I used 5 screws for one full meter channel. And 2 screws for the 15" and 3 screws for the 24" lengths. And it worked great.Now use a hole punch to set a defining point at which the first drill bit can catch on and not walk out of center.Then use a very small drill bit for the first hole.After you created the first hole with the tiny bit, put that aside for the other holes. Use a second bit to drill the correct size of the screw so it will easily slide threw afterwards. Remember to use a correct size drill bit for this last step. You do not want the hole to large. And you do not want this hole to small for the screw to grab the aluminum. Because you want the screw to cinch down well on the cabinet, not grab the aluminum when you screw it in place.Now repeat on every hole and you're done!! Hope this helps someone.Cheers!p.s. make sure you don't misplace your end pieces. I somehow did this while unpacking, I think.
J**R
Very nice product and friendly, helpful company
The LED light channels were exactly what I was looking for, look very nice, and offered at a great price compared to other companies I've seen. I noticed some people complained about how the diffuser covers fit, but mine fit very snugly with no chance they could fall off. My guess is they didn't press hard enough to snap them on completely.I will order this product again soon as I have other projects in mind.As a side note, I originally thought I was missing the mounting clips and contacted the company. They went out of their way to make me happy, and I was very impressed. As it turned out, the clips were wedged into the end of the long narrow box they were packaged in. I, of course, opened the other end and when I slid things out, the mounting clip bag was stuck at the other end and didn't slide out with everything so I thought they weren't there, but they were.
J**H
Great Product
This aluminum channel is great for holding LED Lights. The channel is well made and the covers fit very tightly inside the channel groove. I used these to install smd5050 led lights under the gunnel of my v-shaped hull boat. The mounting clips that come with the channels are not adequate to hold these channels onto any surface that has much vibration, so I used 3m VHB Tape to attach the channels to the gunnel of my boat. The channels and light covers bend enough to fit along the gunnel of the v-shaped hull, and I used 3M 08612 Window-Weld 3/8" x 15' Round Ribbon to hold the led light strips in the aluminum channel, because the adhesive strips on the back of most LED light strips do not hold up very well in hot weather.
N**N
Good Quality
Purchased both brown and aluminum frames w/clear and shaded screen covers.Agree w/many that the covers are hard to install but once done properly they are secure in place.Tip Start on one end. Place the cover into the guide slots and gradually snap into place. Work on down the line as you hear a snap. It's properly in place.Tip Screen placement is easiest when the frame is securely fastened to the subject area. Because it takes a good amount of pressure to snap the covers in place the frame is likely to move when doing so. As many other DIY have stated; drill a small hole and use screws to attach the frame. These will keep the frame from moving during installation and reduce frustration for sure! Since the frame is aluminum it is very easy to drill holes through.
M**R
I am very pleased with this product
I am very pleased with this product, it is exactly what I was looking for. I didn't realize it when I ordered this (because I was going to attach the channel using double-sided tape), but it even comes with mounting clips and screws. The only real improvements I could suggest are some different options in regards to lengths/quantities and some additional end caps. For my project, I need sections that are about 30" long, so I had to cut each 1m channel to length. The aluminum channel and plastic cover are very easy to cut with a hack saw. The problem is that this leaves me with a bunch of ~10" pieces. I could probably piece together the extra pieces and use them, but then I would not have end caps for these sections. Ultimately, I'll probably have to order more to complete my project.
Trustpilot
3 weeks ago
5 days ago
