

Buy anything from 5,000+ international stores. One checkout price. No surprise fees. Join 2M+ shoppers on Desertcart.
Desertcart purchases this item on your behalf and handles shipping, customs, and support to Greece.
🔥 Elevate Your BBQ Game — Smoke Like a Pro, Wherever You Go!
The Pit Barrel Cooker Classic Package is a premium 18.5-inch drum smoker crafted from durable porcelain-coated steel. Featuring innovative 360º all-round heat dynamics, it delivers consistent, mouthwatering results whether you’re hanging ribs or grilling burgers. With a generous capacity to smoke 8 racks of ribs or multiple pork shoulders, plus included hooks, rods, and grill grate, it’s the ultimate versatile smoker for both beginners and seasoned pitmasters. Lightweight and portable, it’s designed to fit in most vehicles, making it your go-to companion for backyard feasts or tailgate parties.


| ASIN | B00BQMDZYY |
| Best Sellers Rank | #126,280 in Patio, Lawn & Garden ( See Top 100 in Patio, Lawn & Garden ) #230 in Outdoor Smokers |
| Brand | Pit Barrel Cooker Co. |
| Brand Name | Pit Barrel Cooker Co. |
| Color | Black Porcelain enamel coating |
| Customer Reviews | 4.7 out of 5 stars 1,228 Reviews |
| Fuel Type | Charcoal |
| Global Trade Identification Number | 00857212003028 |
| Included Components | Pit Barrel Cooker Classic Package - 18.5 Inch Drum Smoker | Porcelain Coated Steel BBQ Grill | Includes 8 Hooks, 2 Hanging Rods, Grill Grate and More |
| Inner Material | stainless_steel |
| Item Dimensions D x W x H | 21.25"D x 21.25"W x 33"H |
| Item Type Name | Drum Smoker |
| Item Weight | 57 Pounds |
| Manufacturer | Pit Barrel Cooker |
| Model Name | Porcelain Coated |
| Outer Material | Alloy Steel |
| Power Source | charcoal |
| UPC | 857212003028 |
| Warranty Description | REFUND POLICY/WARRANTY PBC Co. will repair or replace any manufacture defect on cooker or any accessory within one year of purchase date. Rust through is covered in warranty however, surface rust is not. PBC Co. will gladly replace any damaged or defective products reported within 2 weeks of ship date. PBC Co. will accept returns when the product is unopened and unused. A refund will be issued les… |
S**N
An excellent, affordable smoker with consistent, repeatable results even for a beginner.
What can I say that hasn't already been said about this excellent product? It has made me a BBQ master and brought a lot of fun and good times to my home. I've struggled for years with an offset smoker to get it working right. It required constant babysitting and yielded inconsistent results and only fair BBQ. The Pit Barrel Cooker (PBC as I call it) is SO easy to use and best of all: repeatable, consistent results. It just works and works well. Here are some tips for those just starting out: 1. The way the PBC (or any smoker) maintains a low, consistent heat inside the unit for extended periods of time is totally dependent on the so-called "Minon Method". Jim Minon came up with this method so there would be a low temp that would last a long time inside his smoker. Instead of lighting all the coals at once, which resulted in things getting way too hot and the coals burning out too soon, he lit only a small amount of the charcoal and poured it on top of the rest of the unlit coals. Using this method, a small amount of coals would stay lit and burn down, lighting the unlit coals, maintaining a low, consistent temperature over the cook. How much you light and how long you allow the bunch to get going before you close the lid can make a huge difference in the inside temp and how long the coals last. The instructions for the PBC say to light your coals and wait 20 minutes and then close the lid. Do not waver from the 20 minute time. If you do, the coals will get too hot and STAY too hot for the duration of your cook. However, there is a world of variability in how you do this which can have significant impact on your cook. How many briquettes you load in your chimney starter and when place on the rest in the charcoal basket will make a big difference in how hot your PBC gets and stays that way. You can load it full, or only a third and this will result in different temps throughout your cook. If you leave the briquettes in the chimney until the last few minutes of the suggested 20 minutes before you pour them on the rest in the charcoal basket, this will result in a lower temp in your PBC throughout the cook. Or you can pour the briquettes from the chimney onto the rest in the basket as soon as they are started, allowing the entire bunch to get going for that 20 minutes. If you're looking to really slow things down, then fill the chimney only 1/3rd full and pour it on the rest of the charcoal only a couple minutes before you put your food on and close the lid. This will result in a nice, low temperature throughout your cook that will last eight or more hours. If you want to cook hotter (and subsequently faster), then fill your chimney full and pour it on as soon as it's lit well and allow the rest of the coals in the basket to get going good until the 20 minute mark. Low and slow is what makes the BBQ flavorful and tender, so I'd suggest you fill it 1/3rd and pour it on the rest just a couple minutes before you close the lid. 2. The vent at the bottom is important, but it won't have as much impact on the barbeque temperature as varying things as I described above. You can vary things about 50 degrees using the vent, but if the coals get too hot before you put the lid on, it will stay hot no matter what you do (short of spraying water on the coals). The key is how hot the coals get before you put the lid on. 3. Leaving out one or both of the rebar hanger bars can have a HUGE impact on the internal temp. The bars control the flow of air between the vent and the top of the smoker. So even if you're using the grate, make sure you leave those bars in if you can to have a consistent, low temp throughout your cook. They are an integral part of the flow system of the PBC. 4. Taking the lid off for a short time is fine, but leaving it off for extended times can raise the temp inside significantly, and it'll stay that way when you put the lid back on. The temp will come down after you put the lid on, but it may never come down to where you want if you leave it off too long. 5. It's a very good idea to purchase both a good quality, fast-read thermometer (like the ThermoPop) and a leave-in thermometer (like the Maverick Et-732 Remote Bbq Smoker Thermometer). The Maverick is a charm to use and it cuts down on babysitting the food tremendously. You stick one probe in the meat and one near it to monitor the temp of your smoker and it constantly feeds those two temps to your unit in the house (or wherever you are). It will alert you when you've reached your goal temp. Then you can use the ThermoPop to check in more places to see if it's consistently the temp you want. Having those two things will make your life much easier and help you get consistent, repeatable results. Don't listen to people who whine about the probes on the Maverick. If you're careful and you don't get the probes wet, they'll last a long time (I know, because I use it myself). Also, get some grill gloves, preferably some that come very high up the arm (to the elbow, is best). You'll need these for pulling off your meat, or pulling the rebar to put the grate on (for example, cooking a pork shoulder that is hung for half the time, then wrapped in aluminum foil and put on the grate for the remainder of the time). Some silicone BBQ gloves are great too, for when you cut the meat or pull it (as in pulled pork). You could buy one pair for both uses, but I found it best to get one pair for each task. I wanted grill gloves that came high on my arm, but I didn't want to use these to handle the meat (as they are cloth). Smaller, silicone gloves are better for handling the meat for pulling or slicing. When you cut a just-cooked chicken, brisket, ribs or tri-tip, having the silicone gloves makes things so much easier. You can use dishwashing gloves, but it's not very appetizing for your guests to see you using these to handle the meat they're about to eat. 6. Lastly, make good use of the many videos the PBC people have made, teaching you how to cook just about everything you can think of (located on their website, or YouTube). They show where to place the hooks in many different kinds of meat, and how to prep that meat for maximum results. I bought a book on smoking meat that has helped a lot. You can find two or three of the best here on Amazon by searching for "Smoking meat book". Pick the one you think is best. I bought Smoking Meat by Jeff Phillips. Follow the instructions that come with your PBC and you'll be making excellent BBQ in no time. It's very easy to use, easy to maintain and lots of fun to use.
M**E
Superb BBQ Smoker!
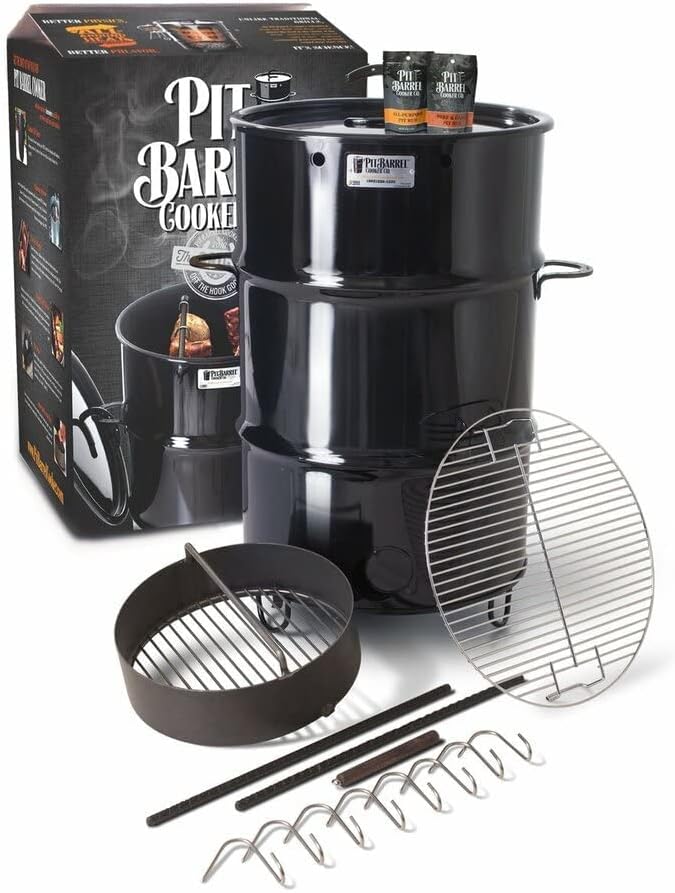
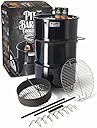
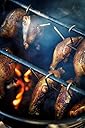
I wanted to buy a smoker to compliment my regular grill, but didn't want to spend a fortune. I read a review on a very popular bbq web site (search for Meathead Goldwyn) about the effective job the Pit Barrel Cooker does and was impressed by the ease of use (as in no tinkering with the temperature, etc.), as illustrated by the company's several excellent instructional online videos. After reading the excellent reviews on Amazon, and watching online videos/reviews, I took a "leap of faith" and ordered the PBC. At the time, the cost, INCLUDING SHIPPING, was $269. The company has since raised the price to $289 (again, includes shipping), which is, in my humble opinion, still a bargain. How does it perform? Admirably! Its simple, but sturdy, construction belies the effectiveness of the results it produces. I've since bbq'd chicken, ribs, etc., and my friends and family have raved about the smokey, juicy taste of the meat. I'd be proud to present my smoked meats to any fan of bbq! The PPC uses charcoal,only, and operation is extremely simple (But, watch the company's videos and follow its instructions carefully.): Prepare your meat (rub, marinade, etc.), light your charcoal (I use a Weber chimney charcoal starter; charcoal ready in about 20 minutes.), pour the lighted charcoal into the charcoal basket in the bottom of the barrel (Use bbq gloves that cover the forearm.), hang the meat on the two rods at the top of the barrel using the provided stainless steel hooks (eight hooks are included), close the lid, and . . . wait! The company videos carefully explain how to position the hooks for different kinds of meat (pork butt, whole chickens, ribs, etc.) and the approximate time for them to cook. Important: Trust the videos! Don't peek while the meat is smoking! ("If yer peekin', yer not cookin'!). After the suggested cook time, check your meat (using an instant-read thermometer, or, with ribs, poke the meat to gauge desired tenderness). For my first cook-off, I hung four whole chickens (each cut in half) on the eight hooks. Before hanging the chicken on the hooks, I added several chunks of apple wood to the lit charcoal. . . . About an hour later, they were done! I rubbed the chicken before cooking with the company's all-purpose rub (excellent!), and the family polished it off in short order. Again, rave comments from all! My next cook was Saturday before Memorial Day, and I wanted a "trial cook-off" before our large family and friends Memorial Day Feast. I hung four racks of baby back ribs on the rods (The PBC will easily do eight racks at one time.); results were acceptable but not perfect. I "peeked" about 2 1/2 hrs. into the cook (The video says do this only after 3 hrs.), and a time or two after. After about 3 1/2 hrs., the ribs were done: A little more chewy than I had expected, but still very good. (My "trial cook-off" tasters didn't complain!). On Memorial Day, I first cooked sixteen boneless, skinless chicken breasts (again, oiled and rubbed, with several chunks---not chips!--- of apple wood added to the lit charcoal). The chicken was done in about 45 minutes. I wrapped the chicken in foil and placed in the unlit oven to "rest." Next, I hung eight racks of rubbed baby back ribs on the rods. No need for added coals: Once you fill the charcoal basket, you've got enough heat for a total of about 6 or 7 hours of cooking (The company says you can easily finish a brisket in this time, unlike the longer time required by other smokers.) Three hours later, I checked the ribs, and left them on for another 45 minutes. Nice and tender! Slathered them with Baby Ray's sauce, put them on the rods to "carmelize," and took them off. Fantastic results! Tender, succulent, smokey Nirvana! Need I say, the family raved?? I highly recommend the Pit Barrel Cooker because of its bargain price and the excellent results it produces. It's the first smoker I've ever owned and I simply cannot imagine other smokers could produce better results. Since my first order, I've ordered eight additional hooks, to allow me to cook more pieces of chicken at one time. Finally, for grilling, a circular grill is included; my hamburgers (80-20% fat; ground chuck) were delicious, smokey and moist.
A**S
Lives up to the hype!
I've been smoking on different charcoal rigs most weekends for years (Kettles, barrel grills -with and without offset boxes, ceramic eggs, and even a competition grill that some buddies and I rented for a massive party). I have become pretty capable at producing great slow-cooked meat, and until now my method of choice for slow-cooking involved a 22inch Weber Kettle with a Slow-n-Sear add-on (still a great set-up involving exceptional products). For the purpose of this review, I'm going to compare what makes the PBC Cooker so incredible, when up against any other options in this price-range: PROS: - Simplicity - I deliberately followed the most simple of the prescribed set-ups for this: fill the charcoal basket to the top (make sure it's level); cover charcoal in lighter fluid; place basket in bottom of barrel immediately and light-it; wait 15 minutes for coals to burn down a little (20 at higher altitudes); put on your food, cover the barrel, and wait until your meat is done. No setting up digital thermometers on grill surfaces, no waiting for the temperature to set and stabilize, and I didn't even add wood chunks or chips (I wanted to see what the end product was if I put in the least amount of work necessary). The food that came off when I took the above described steps was phenomenal! Best ribs and chicken I've ever had! - Set it and forget it - this is where I am most astounded, I set the damper according to the directions provided and this thing held at 260 for the entire cook (which was 4hrs, but the charcoal could've gone for 8+ if I had to guess). I have never seen another charcoal fueled product that can do this - period. It literally is a 'set it and forget it' device. I confirmed this by sticking a digital thermometer in through the holes for the rods, periodically during the cook. I didn't use wood-chunks or chips, and it still produced a great smoke and subtle smoke flavor (which I prefer to a heavy/over-smoked flavor) - the flavor comes from the meat dripping on the coals (check-out PBC's website for an explanation)...it works really well. - Shorter cook-times - I slow cooked one rack of ribs to fall-off-the-bone tenderness in a little over 3hrs (still developed a solid smoke ring), along with a chicken (halved) that were done in 2hrs). A rack of ribs slow-cooked would usually take at least 4.5hrs. - Capacity - this thing's footprint is basically the same as a 22inch Weber Kettle (slightly shorter, but the footprint is identical, and the grill cover for a 22inch Weber Kettle fits this perfectly). Even with a rib rack, the most I could effectively fit on a 22inch Weber is 4 racks of ribs (could maybe do 5 if I halved a 5th rack). The PBC can hold up to 8 racks of ribs at a time thanks to its hanging method - with the same footprint as a 22inch Weber. That is nuts! - Easy Clean-Up - you literally just dump the charcoal out of the bottom when you're done; they have a charcoal pan add-on at PBC's website, or you could lay down tin-foil in the bottom of the barrel to make the clean-up even easier. The stainless steel hooks probably don't 'need' to be cleaned after every use, but it takes about 1 minute to use a scrubber and dish-soap on them. The inside of the barrel itself is never meant to be cleaned (they stress this in their directions and literature - so be aware of that), and the outside should never 'require' it either (cleaning the outside is super easy if you do want to - check out PBC's website for details on how to clean it). - Great Build Quality - this thing is substantial, and I love that they use a porcelain enamel finish now (sounds like they used to use a powdered finish). As is the case with anything, fewer moving parts usually means higher durability and lower maintenance - this thing has very few moving parts. - Legit Even Cooking - this thing does cook evenly as a result of the science/physics behind the design (check-out their website for an explanation). To get the same effect on other rigs, usually you have to adjust the meat's position at least once during the cook. - Versatility - The PBC can be used for grilling or slow cooking; the included grill grate is solid and sits deep enough in the barrel to protect it from flare-ups caused by wind. I think I'll probably still use my weber kettle for grilling on on grates, but it's awesome that this could serve the same purpose (and the grilling surface is substantial). It CAN heat up for grilling, and it does it quickly - take that lid off the PBC and you can literally watch the coals heat-up in a matter of minutes. Something else that makes this versatile is its capacity; as I alluded to earlier, I did a halved chicken and a rack of ribs simultaneously - they didn't come close to touching each-other or messing with each-other's flavor profile...I could've done two halved chickens along one of the hanging rods, and 4 racks of ribs along the other if I'd wanted to. - Product Support & Virtual Community - visit the PBC cooker's website, and you have a ton of available support and info provided by the owners of the company (it's a veteran owned company which makes it more awesome) and a community of people who are fanatical about this product. Slow cooking using a 'hook-and-hang' method is new to most backyard BBQ'rs (myself included); the videos and content provided on PBC's website make the prospect far less intimidating than trying to figure it out on your own, or by using some written directions. The company's owners also clearly care about their product, their customers, and their craft in general - lots of customer engagement and support. CONs/FYIs: - Barrel Depth - this is about as nitpicky as anyone could be about a product, and is really more of an "FYI" than a CON. The rack of ribs I hung to slow-cook was ALMOST too long (almost touching the coals). I always try to pick shorter racks of ribs because you run into similar issues on most BBQ rigs (if they're too long for a kettle, then they touch the sides of the kettle - which you don't want). This rack of baby-backs was on the longer side, so I'm not too surprised that it almost hit the coals. 'Hook-Placement' can help with longer pieces of meat, which is something I'll be mindful of next time I have a longer rack of ribs to slow cook. I will say this, despite the ribs being literally an inch or two above the coals - the bottom of the hanging rack cooked evenly with the rest of the rack (really impressive). Again, this is not really a CON and more of an FYI. I imagine that when the first Weber Kettle came out, it was met with similar disbelief and fanfare - at $300.00 before taxes, you won't find anything like this. Pellet Smokers and other types of electric/automated smokers might offer 'set-it-and-forget-it' ability, but the decent ones are more expensive and they don't offer the same degree of simplicity, near the capacity of this thing, or are as easy to clean/maintain.
K**S
This makes amazing smoked meats!
Bought this as a present for husband after watching all the glowing reviews of it on YouTube. We have had a couple of smokers over the years with electric controllers that did did a decent job but the control modules end up dying on them in just a few years of use. I know this pit barrel cooker is not technically a smoker but it makes better smoked meats than actual smokers we have used and even better than any meal we have had at numerous highly rated Smoked BBQ restaurants we have tried. We have so far, smoked pork butt, chuck roast and picanha with it and it was all amazing!! We are doing pork ribs with it tomorrow... It's so easy to use, gives an impressive level of smoke flavor/smoke ring to everything we have cooked in it and it is well made so we expect it will last for many years. Husband loves it and says he's been very pleasantly surprised by how well it works. Het yourself one, you won't be disappointed!
T**I
4 month update after 1st cook for 20 hungry people - awesome !
Update after 4 months - using my Pit Barrel a couple of times every week - ALL with great results.. 1) I use a Wagner 30 gallon drum dolly - with wheels - that I found on sale for $45 to roll my Pit barrel around - fits just right to leave the bottom air vent exposed 2) The Weber 7451 grill cover for like $10 fits great - after the Pit Barrel cools down of course ! 3) Process wise I started with a Charcoal Chimney to start-up my coals - but for the past 6 weeks I switched over to the starter fluid method - no lighter fluid taster whatso ever - lights coals more evenly in the basket - and overall a smoother/more-efficient process 4) Pit Barrel now has a steel "ash catcher - for like $30 - before they came out with that I use a 17" aluminum pizza pan on the bottom - and then a 16" alum pizza pan on top of that which fits just right underneath the charcoal basket - just pull the 16" up and out with the ashes on it - smooth as pie. I also have a ash/fireplace vac - but the pizza pan trick is so much smoother. 5) On one cook - the combination of a fallen rib rack (my fault) and a couple of bad flavor/wood-chunks - left a wet residue/creosote inside my Pit Barrel - the following day I refilled the charcoal basket 120% - opened the bottom vent 100% - started up that charcoal pile with the lid off - left the lid off for 30 min - then put the lid back on but cracked open 1/2" - the Pit Barrel cooked up way hot and I let go - crisped out that wet residue easy - kindof a burn off deal - so simple and effective ! 6) Pit Barrel also now offers "turkey hooks" - bought two so I can smoke 2 birds at a time for the Holiday's - I am a very/very happy Pit Barrel Cowboy ! ----------------- original post---------------------- I researched the Pit Barrel online before ordering - and setting up the Pit Barrel - was a straightforward and smooth - both the videos on the Pit Barrel website and the independent reviews are spot on ! I received my Pit Barrel early Weds evening - and did my 1st cook Thursday morning - a full 8 racks of spareribs for a office lunch BBQ feeding 20-25 people - and all worked out great ! To be helpful to others - a few specific comments on my 1st-cook-setup: 1) I purchased a Weber Compact Rapidfire Charcoal Chimney from Amazon - this Weber Compact Chimney holds EXACTLY the 40 Kingsford briquettes which Pit Barrel recommends for a chimney startup - rock solid fit for the Pit Barrel - and when lit a easy dump onto the coals in the Pit Barrel 2) I purchased a 2-pack 18lb Kingsford charcoal (Blue) from my local Lowes - while my Pit Barrel was in route 3) While I was at Lowe's - I also bought a Kingsford Charcoal Dispenser Kaddy contianer for $11 (made by Buddeez - I have other great containers in my kitchen made by Buddeez) - and I dumped 18lbs of Kingsford into the caddy loose - perfect fit. Next time I go to Lowe's I am going to pickup a 2nd Kaddy for my extra charcoal - but that's me. 4) I used Weber FireStarter cubes - bought a 24 pack cheap for $3.50 - 1st time I have used these paraffin based cubes - and my recommendation for the chimney is to use them 4/5 at a time - I put them on a folded alum foil under the chimney to light them up - easy - and after I dumped the lite charcoal into the Pit Barrel - burnt/used cube cleanup was a breeze - folded up the used/burnt cube in the foil and dumped.. With these paraffin cubes took maybe 25-30 minutes to get the charcoal in the chimney lite up the way I like it - a bit longer the 20 mins outlined by Pit Barrel 5) I am at 1200 ft - so the Pit Barrel vent was factory preset 1/4 which was perfect for me I am not a hound dog griller/smoker - I eat smoked/cooked ribs maybe 2-3 times a year - either at friends or at a Annual National Championship event in my town - so my comments on my actual 1st cook 1) I was going to feed 15-20 people - so I had my butcher bring in 8 full racks of "natural" spareribs - no sodium/additves - probably $12 a rack 2) I bought three types of rub/seasoning - each 30 oz containers - and did a quick over-test-cook in my over with some country-cut ribs/pork the night before - from Amazon - 30 oz Hawaiian seasoning (and I have Hawaiian Hulli/Hulli wet sauce as a match - Amazon 30 oz Pappy's Seasoning - and from local Sam's Club 30 oz of Head Country Championship for $12. I over tested the 3 - and after my quick oven test - for me I picked the flavor from the Head Country for my 1st cook. 3) Rinsed/pat-dry the racks 30 minutes before cook start up - I did not pull membranes - left membranes on - I inserted the cooking hooks in each rack in turn - and applied the seasoning - and frankly I did not do much of a rub-in - more a shake-on application - and for 8 full racks of spareribs used 1/2 the 30 oz Head Country 4) After the chimney hot coals were poured into the Pit Barrel - put all 8 racks on - and yes. at least 4 of my spare rib racks were as long to be just touching the coals - and I knew from Pit Barrel videos/review that there were no worries with that 5) Put the lid on - and walked away for 3 1/2 hours - and when I was on my way back I picked up two 40 oz bottles of Head Country Original BBQ sauce from my local Walmart Community market. 6) Full 8 sparerib racks at 3 1/2 hrs was not as far along as I wanted - for that amount of meat - and I waited another hour - total 4 1/2 hrs - and then I pulled the racks on turn and lathered with the Head Country BBQ sauce - and frankly the "lather" used one 40 oz bottle of sauce 7) Lathers/sauced - I cooked them another 45 minutes - for total cook time 5 hrs 15 minutes - when I pulled them - pulled hooks - wrapped in rack in foil - and set them in a Husky brand foam ice chest (like $9 at Walmart) that fit them perfectly - and let them rest for me (timing to get to the office and set) - about another 45 minutes - my schedule for setup 8) Sliced up the racks into about quarters - wrapped the quarters in foil - plenty of paper towels for my lunch horde Fantastic - all those ribs - and gobbled up like wildfire - all gone, I mean gone - and in my BBQ-lover area - at least 4/5 "best I have ever had" - and at least 90% "man - this was GREAT"...
R**D
An incredible backyard cooker!
I've been grilling on gas for a long time for all of the benefits that a gas grill gives you. Recently though, I've been bit by the smoking bug and longed for the taste of charcoal/wood flavored food so I started doing my research. I was pretty much set on an 18" Weber Smokey Mountain, but happened to come across glowing reviews of the PBC. It doesn't do "slow and low" like the WSM, but from I could tell it looked like it was turning out some great BBQ in less time and babysitting than any charcoal smoker/cooker I've seen. Seems like the ultimate "set it, and forget it" cooker for a guy like me outside of paying $$$ for a pellet grill. Initial thoughts: The build quality is excellent. The late-2014, 2015 models use thicker gauge steel are are porcelain enamel coated (like Weber) compared the original's power coat. It's a little smaller/shorter than I thought, but considering it holds an 18" grill grate, it should not have surprised me. Mine sits on 4" concrete blocks so I'm not bending over as far. So far I've cooked beef short ribs, rack of baby backs, and two chicken halves on this. Results were good, but fell a bit short of my expectations as I was getting used to the idea of not worrying about watching grill temps. Over time, I expect the food to get much tastier as I trust the cooker and worry less about trying to manipulate the air flow. One thing I have learned, is you really need to limit the number of times you lift the lid. The temps climb quickly and takes it a while to come back down. As a grill, it doesn't get as hot as a traditional grill considering how far the grill grate sits from the fire, but it does get the job done, even if it takes a bit longer. The upside is you don't get flare ups and charred meat, though getting a nice crust may be hard to come by. As far as downsides up to this point, I have a few (with alternative fixes): - Ash clean up is a bit of a pain since it collects at the bottom of the barrel. (Fix: line the bottom with foil and toss after your cook) - The amount of charcoal the instructions advises is overkill for short cooks like chicken. It will easily hold temps of 270-290 for 6+ hours. (Fix: The design of the PBC seems efficient enough that I've gotten away with using half as many coals for shorter cooks. It seems to keep the same temps as I did with a full basket (for much less time). I plan on playing more with this in order to conserve my coals.) - Since there are no dampers, there is no way to kill the fire. (Fix: I found a blog where an owner stuffed foil in the upper holes and in the bottom vent with the lid on. It actually works.) For the price, I think it is a great value for anyone looking to get into charcoal cooking/smoking that doesn't require you to plug it into an electrical outlet. It's made in the USA, no fuss, holds a lot of meat, and a conversation starter due to it's unconventional design and cooking method. However, if having total control over your temps and going low-and-slow is important, I'd look elsewhere. I plan to include updates as I continue to use the PBC.
H**3
Amost Perfect!
When I bought my camp there was a permanently installed ugly drum-style smoker in the yard. I accepted the challenge of learning to cook on it and after much trial and error, finally figured it out and had good results, and wanted something for home use. After a lot of research, I went with this one because it was the least expensive, entry-level smoker with the highest reviews (because I am more likely to be smoking at camp, but want to be able to do it at home without having a fortune invested in something I may use a dozen times a year). The smoker arrived in good order, well packaged (if it's a gift, be warned that the packaging says what it is), it came with a sampling of some rubs, set up was easy as pie, and it's light enough to move around to put it in the shed to store it. First run on it I did a rack of ribs and a small pork butt for pulled pork. I set it up according to directions for altitude, loaded it with some lump charcoal, and away we go. First impressions: it runs a little hot in the "set it and forget it" mode as recommended by instructions. It wanted to run in the 300+ degree range, which is a little high for what I wanted to do. (side note: I purchased a temp gauge that was threaded on the back and reamed out one of the rod holes a tiny bit, just enough so the gauge would screw into the drum, but stuck out far enough so I could still put the lid on the smoker without it interfering). Anyway, as I said, it runs a little hot for the low and slow method, and as-is, there's really no way to completely shut it down if it's getting too hot. What I did figure out though, is that those sheet-style magnets (you know, the ones stuck all over your fridge), will stick to the barrel and do not melt while cooking: so what I did is cover unneeded holes with a magnet, and for the ones that had a rod going through, I cut a hole in the magnet to run the rod through to seal up around the rod holes. I did the same thing for the intake hole on the bottom (I removed the bolted-on vent cover), and viola! Now I can adjust the magnets by sliding them around to open or close up the cooker and more easily regulate the temp. So after stealing all the magnets of the fridge for the trial run and making mother mad, I bought a pack of plain sheet magnets with no stick 'um on them and made a set just for the cooker. (Also, another side note: since I am storing this more than I am using it, covering the holes with the magnets also keeps critters from taking up residence in it over the winter). Anyway, that made it a whole lot easier to control the temp and I gotta tell ya: those ribs and that pork butt were a thing of beauty after 6 hours! I did purchase the "also sold separately" base to put on the charcoal bin and I am glad I did this. It kept most of the ash contained so you don't have to flip the barrel to empty it after every cook, and also, the ash and fire are not sitting right on the bottom of the barrel. I see that they also offer a grilling grate that has a flip-up section that you can buy separately, and it seems like it would be a neat addition if you want to hang a few things on one side and throw a hunk of something on the rack. Maybe I have unrealistic expectations, but it seems like this would be the kind of thing that would be included with this particular cooker for the most versatility out of the box, (especially since as-is, you can either hang stuff, or grill stuff. I had to get creative to get ribs and a pork butt in there for one cook), but whatever, that's just my $.02 gripe, and if that's my biggest complaint, I'd say they're doing a pretty good job overall. My only real complaint/wish for this cooker would be that either, there were perches to be able to put 2 grill racks in it (upper and lower) especially if you want to do a ton of wings, OR, if it had an option to get a riser or domed lid for it and then you could set a rack on top of the hanging rods and have 2 layer cooking, or a place to put a drip pan/water tray/heat shield below the upper cooking rack. I had hoped beyond all hope that a Webber 18" grill cover might fit it, but it is literally off by like half an inch and won't quite sit on the cooker, and the 22" version is waaay too big. With all that said, I really like the cooker. It did what it was supposed to do, the set-up was easy, everything you need to get started is included, and it made some really nice BBQ! I personally did not mind having to tinker with it to make it work just right for me, but hey, I'm a tinkerer and that's also part of the fun of smokin' and BBQ'n: am I right?!?!? And seriously, all it took was $2 worth of magnets to make it as adjustable as any other smoker, and for that, I am happy!
B**N
Beyond expectation!
I stumbled across this smoker on the web somewhere and it peeked my curiosity. So I went to the site and pretty much read all there was to read and watched all the videos several times. Then I read as many reviews as I could find anywhere and the thing that stood out was that there were no negative reviews at all. So I order one. I have a Weber gas grill and a Weber kettle. Even have the Smokenator. This simple pit barrel cooker does exactly what it promises and it delivers beyond expectation! I am a fairly good cook and my own worst critic. When I want baby back ribs I want them to taste like ribs. The rub, spices and marinades need to enhance the flavor of the ribs, not to replace it. The meat should be done, but juicy. The first ribs I cooked were fantastic! They were actually done in 2.5 hours. Maybe that was because I let the ribs come up to room temperature before I cooked them. The included rubs are fairly salty and a bit too salty for my liking. So the next time I used my own 8:3:1:1 Alton Brown inspired rub. The results were even better! The meat is not fall off the bone, but tear off the bone. I mean it comes clear off the bone, with an elegant smoke ring on the outside. The smoke is just from the juices falling on the smoldering charcoal; no wood was added. The meat was tender and very moist. I used a home made bourbon barbecue sauce to glaze the ribs a little bit, but I seriously doubt that the ribs even need it. Every time I cook baby back ribs they seem to get better. Being able to put 8 slabs in at one time makes this thing PERFECT for any holiday with a crowd. I have cooked chicken on it a few times too and the results are great as well. I have cut them in half and used the hanging method as well as just laying a whole chicken on the rack. To me both work well. I was curious about how this cooker worked and it actually makes a lot of sense. I have a Thermapen thermometer and I just stuck the probe into one of the holes for the rods every so often. After you start the cook and cover the cooker with the lid, the amount of oxygen is very limited and the heat will reduce to a smolder. In the beginning the temperature may be anywhere between 350 and 425 degrees. Again, this is just below the lid. This will get the meat cooking and juices will start to drop onto the coals, which produces the smoke. Because the the limited amount of available oxygen there will be NO flare ups. Gradually the temperature will fall and eventually settle around 250-260 degrees. I bit high for a smoker, but they don't claim it to be a smoker. It's a pit barrel COOKER and that is exactly what it does. Just let this thing cook, don't tinker with it; it seems to know what it does. It cooks. It cooks well. It produces some smoke. It does all that very well. I don't need no damn smoker. I have a Pit Barrel Cooker.
Trustpilot
5 days ago
2 months ago