🎨 Unleash Your Controller's Personality!
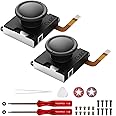
The eXtremeRate Replacement Handheld Controller Housing is a custom-designed shell case for the NS console, featuring a matte purple finish and a full set of buttons. It requires moderate electronic installation experience and includes tools for a DIY upgrade, ensuring a perfect fit and enhanced gaming experience.
A**W
Awesome shells!
Disclaimer: the shells do not come with the thumb grip caps, I bought those separately.As you can see I got both the gradient violet blue and the Pikachu and Eev–er I mean "Monsters Brown and Yellow" colors. It's interesting they're the same price because the Pokemon one has more parts because it has custom strap rails. Most of these colors (including the gradient) do not come with the strap shells or shoulder buttons. Just look at the pictures on the listing.Shell swapping is not for the feint of heart as there are lots of little ribbon cables to fiddle with. You'll need good fine motor skills. You may want to practice opening the joy-con before you buy these (careful with the tri wings on the back!!). I did not watch this company's video but there is another YouTube video out there that has a bunch of views I used. There is no video I could find on swapping the strap shells, but I did find a video about how to remove the strap and that helped me understand how to dismantle it and put it back together. I included several pics so you can kind of see how the layers go and how the white locking tab goes. They give you all the plastic parts and the springs, but you do need your own set of straps because it doesn't come with the metal rails or the strap itself.Here's what I did which I recommend if you want to save some money: I bought several "for parts" joy-con off of eBay. Some worked out of the box, several just needed to have the joysticks cleaned to stop the drift (just use a q tip and isopropyl alcohol (70% if you care about not taking the finish off of the shells), there are YouTube videos on it). Several had damaged shells or buttons, and many had the black coming off of the rail that slides into the switch, but I figured you never see that since it's either in the switch or in the controller mount or has the strap rail on, so I didn't care. A couple really did need new joysticks, but I had some spare already. Saved a bunch of money and didn't have to dismantle brand new joy-con (they tend to go for about $10-15 per joy-con). I did however clean off all external parts with alcohol and q-tips since they were used (buttons, rail, etc).I did not use the buttons the gradient came with because I preferred the black, but I did use them with the Pokemon because the solid black without print looks cool. I did not use the screws it came with, except for one of the Pokemon ones I decided to open the pack to use new screws for the back plate because those tri wings strip so easily. And that's when I learned their replacements are Philips!! I highly recommend using those so it's easier to get into them in the future if you need to. The screwdriver it came with will work probably, but I bought another set previously and I used that. The one that comes with this is NOT magnetic which kind of sucks (note the tri wings are not magnetic, but all other screws in it are). I'd recommend getting an actual set, plus you'll get a pry tool and stuff which is super helpful. I wish I could get the shells without the screwdriver because now I have so many.Take your time and if it doesn't fit right look at it again; there was a time I had the release button not lined up right which caused it to not go back together all the way. I'm still not 100% sure I got it back perfect, there is a little space, but it's pretty good and I didn't want to strip anything. Final tip: there is free software you can download on your computer to change what color the switch reads the joy-con as! It was easy to use once I figured out how to download it. It even has a color dropper so I just went to the Amazon listing and picked the exact color they are!These shells feel different from the standard joy-con, but in a good way. I highly recommend these if you've got a few hours and want to take on this challenge and end with some cool joy-con. If you really screw up and break a cable or board just buy a used joy-con or the part and give it another go (I found it to be cheaper to buy a for parts joy-con than just the motherboard). Again, just be real careful with those screws–take your time, press kind of hard, and make sure the screwdriver is perpendicular to the screw. Enjoy!
L**A
So cute, not easy but worth it
The media could not be loaded. The process of switching the shell was not easy but it was cool to learn. Followed instructions on YT video. All tools needed are included although I found the Y screwdriver was not great and had to use one I already had. R joycon took about 3 hours, L joycon about 45 minutes. Wish the shells would come with SL/SR buttons to replace the original colors, I noticed some color shells do include them but the grey violet did not. Quality of shell feels good and smooth to touch. Really happy overall and already purchased a second color to do my other joycon set.
J**N
DO NOT buy these. Not worth the money or the work.
The media could not be loaded. I bought this skin and the buttons from the same company. I received all of the parts during the last week of March and made the changes to my brand new, out of the box, joy-cons within a few days, so I have at least two full months using the joy-cons after having installed both the buttons and the skin. I've waited until I got a lot of game play in to write my review for this product.First, I DO NOT recommend taking the joy-cons apart at all to put in new buttons or a new skin. I watched a few youtube videos before purchasing that claimed that replacing the buttons and/or skin was tedious, but doable for inexperienced people, but that is extremely misleading. I want to go a head and say DO NOT DO THIS. I myself am fairly inexperienced at customizing electronics, but I went forward with customizing the joy-cons with my fiancé's help (he builds custom computers and has a lot of experience taking electronic parts apart and putting them back together). Even for someone who has experience doing this, the parts and space inside the controller are extremely small and any wrong move you make can impact the controls.I didn't immediately notice to any issue with my joy-cons after we completed the changes, but a few days after we customized the joy-cons, I tried to use one of mine to play Mario party with my fiancé and found the the right joy-con will not register for single controller use. I thought the issue had more to do with the fact that we were using different joy-cons from different pairs, so I grabbed the pair for our other joy-con set and didn’t think to much about it for a while.After about a month and a half after the customization, I noticed some delayed responses to some of my controls when playing. I’ve been heavily paying Animal Crossing during quarantine, so I assumed it was a low battery issue, but after charging the Switch and joy-cons and moving the joy-cons to the joy-con grip, my right joy-con (same one as before) kept temporarily losing connection during extended game play. Then, when I tried to move my Animal Crossing game into two player mode, I found that my left joy-con worked fine, but my right joy-con would not register as a single controller (again, the same issue as before, but this time I wasn’t using joy-cons from two different sets).I still use my joy-cons, but I can’t use them for game play that requires precise controls, like fishing in Animal Crossing or boss fights in BOTW. The toughest issue with the joy-cons is that most of the games will use the controls on the right joy-con for actions, so I really am limited in some of the things I can do with my joy-con.I don’t recommend replacing either the skin or the buttons for the joy-cons, as any customization you do to the joy-cons requires you to take the whole thing apart. I understood that making these customizations could affect the integrity of the joy-cons, which is why I bought a new pair to use for the customizations; However, even considering my precautions, I still don’t recommend customizing the joy-cons, even if it’s a second pair, because you’ll be limited in the uses for those joy-cons (can’t use them in Mario Party, for games that need more accurate controls, etc.).For as easy as this company attempts to make customization with their video tutorials and the tools they include with the product, you really are just wasting your money and time with these products because the joy-cons are not made to be easily customizable and even someone with more experience in customizing electronics will find it difficult to manage the small ribbons, small parts, and small wires. In the end, you won’t be able to make full use of the joy-cons and will probably need to buy yet another new pair. The soft feel of the skin and variety of colors is not worth trouble in customizing and the risk of not being about to you the joy-cons afterwards.
B**N
Huge fan of extreme rate
Installation wasnt hard whatsoever, i use extremerate for their buttons, switches, cases, whatever modifications i make to my switch are likely from this brand. The white is MUCH more of a clean white than the original from the switch OLED, you can see here that i did a shell replacement for my switch and the original white looks dirty and dingy. My left side controller looks much cleaner now. They have a nice, softer feel, it matches me pro controller very well so their color schemes are true across different colored shells. Some paints may differ slightly, so theyre made in batches. Its not uncommon for the color to be a bit mismatched due to buying from different batches. This isnt true at all with this brand so you can expect all of your colors to be true and vivid. Im buying this brand forever.
J**O
So super cute!
Love love love these! Took hubby a little over an hour to do for me. It didn’t sound fun to do from the cursing, but they are perfect! Super soft, gorgeous colour, and fit perfectly.
L**O
Buenos , bonitos , era lo que se esperaba
Buenos material , yo los ocupe para poner solo en la parte de atrás de mi joy-con rosa , aún que párese que se decoloro si fue compatible y sin problemas sin usar los tornillos que venían.
G**O
Diseño, texturas
Quedaron a la perfección es buena calidad el material solo que no es igual a la de los joycons originales, queda un poco de marcar de las huellas pero de ahí todo lo demás esta perfecto recomiendo ver videos de youtube para la instalación
J**O
Great Joy-Con shell replacements
They look great! Good material used (soft to the touch), relatively easy to install (only took me an hour to do, most difficult was the ribbon cables). Software to change Joy-Con colours from Neon-Red/Blue to straight Red was easily found on (GBAtemp). I'm very happy with this
H**.
No es fácil de instalar
No es algo fácil de instalar, y es posible que eches a perder tu JoyCon. En el paquete no vienen todas las herramientas que vas a ocupar. Vas a necesitar unas pinzas muy pequeñas de punta fina. Pero una vez que lo logras queda increíblemente bien. El material se siente de calidad y el aspecto que le da es único.
Trustpilot
1 day ago
2 weeks ago